Extract the Controller
“What the h*** is going on out there?” is a famous quote from American football head coach Vince Lombardi. Well, we’d like to know what’s going on out there as well. An application consists of many moving parts. Data is flowing; methods are being called, visual interfaces are changing. We need a way to keep track of all of this activity. We need coordination! So we put this coordination into a controller object.
Previously, we disconnected the model objects from the view. Then we separated the model objects from the data layer. We have one more layer to pull out. And then we glue everything back together. The controller will be the glue.
We’ll use the same approach as in the preceding chapters.
Examining the existing architecture and code to see where the problems lie.
Identify solutions.
Apply solutions.
Examine Issues With the Existing Architecture
Currently, we have separated the view and model layers, and have introduced the data layer:
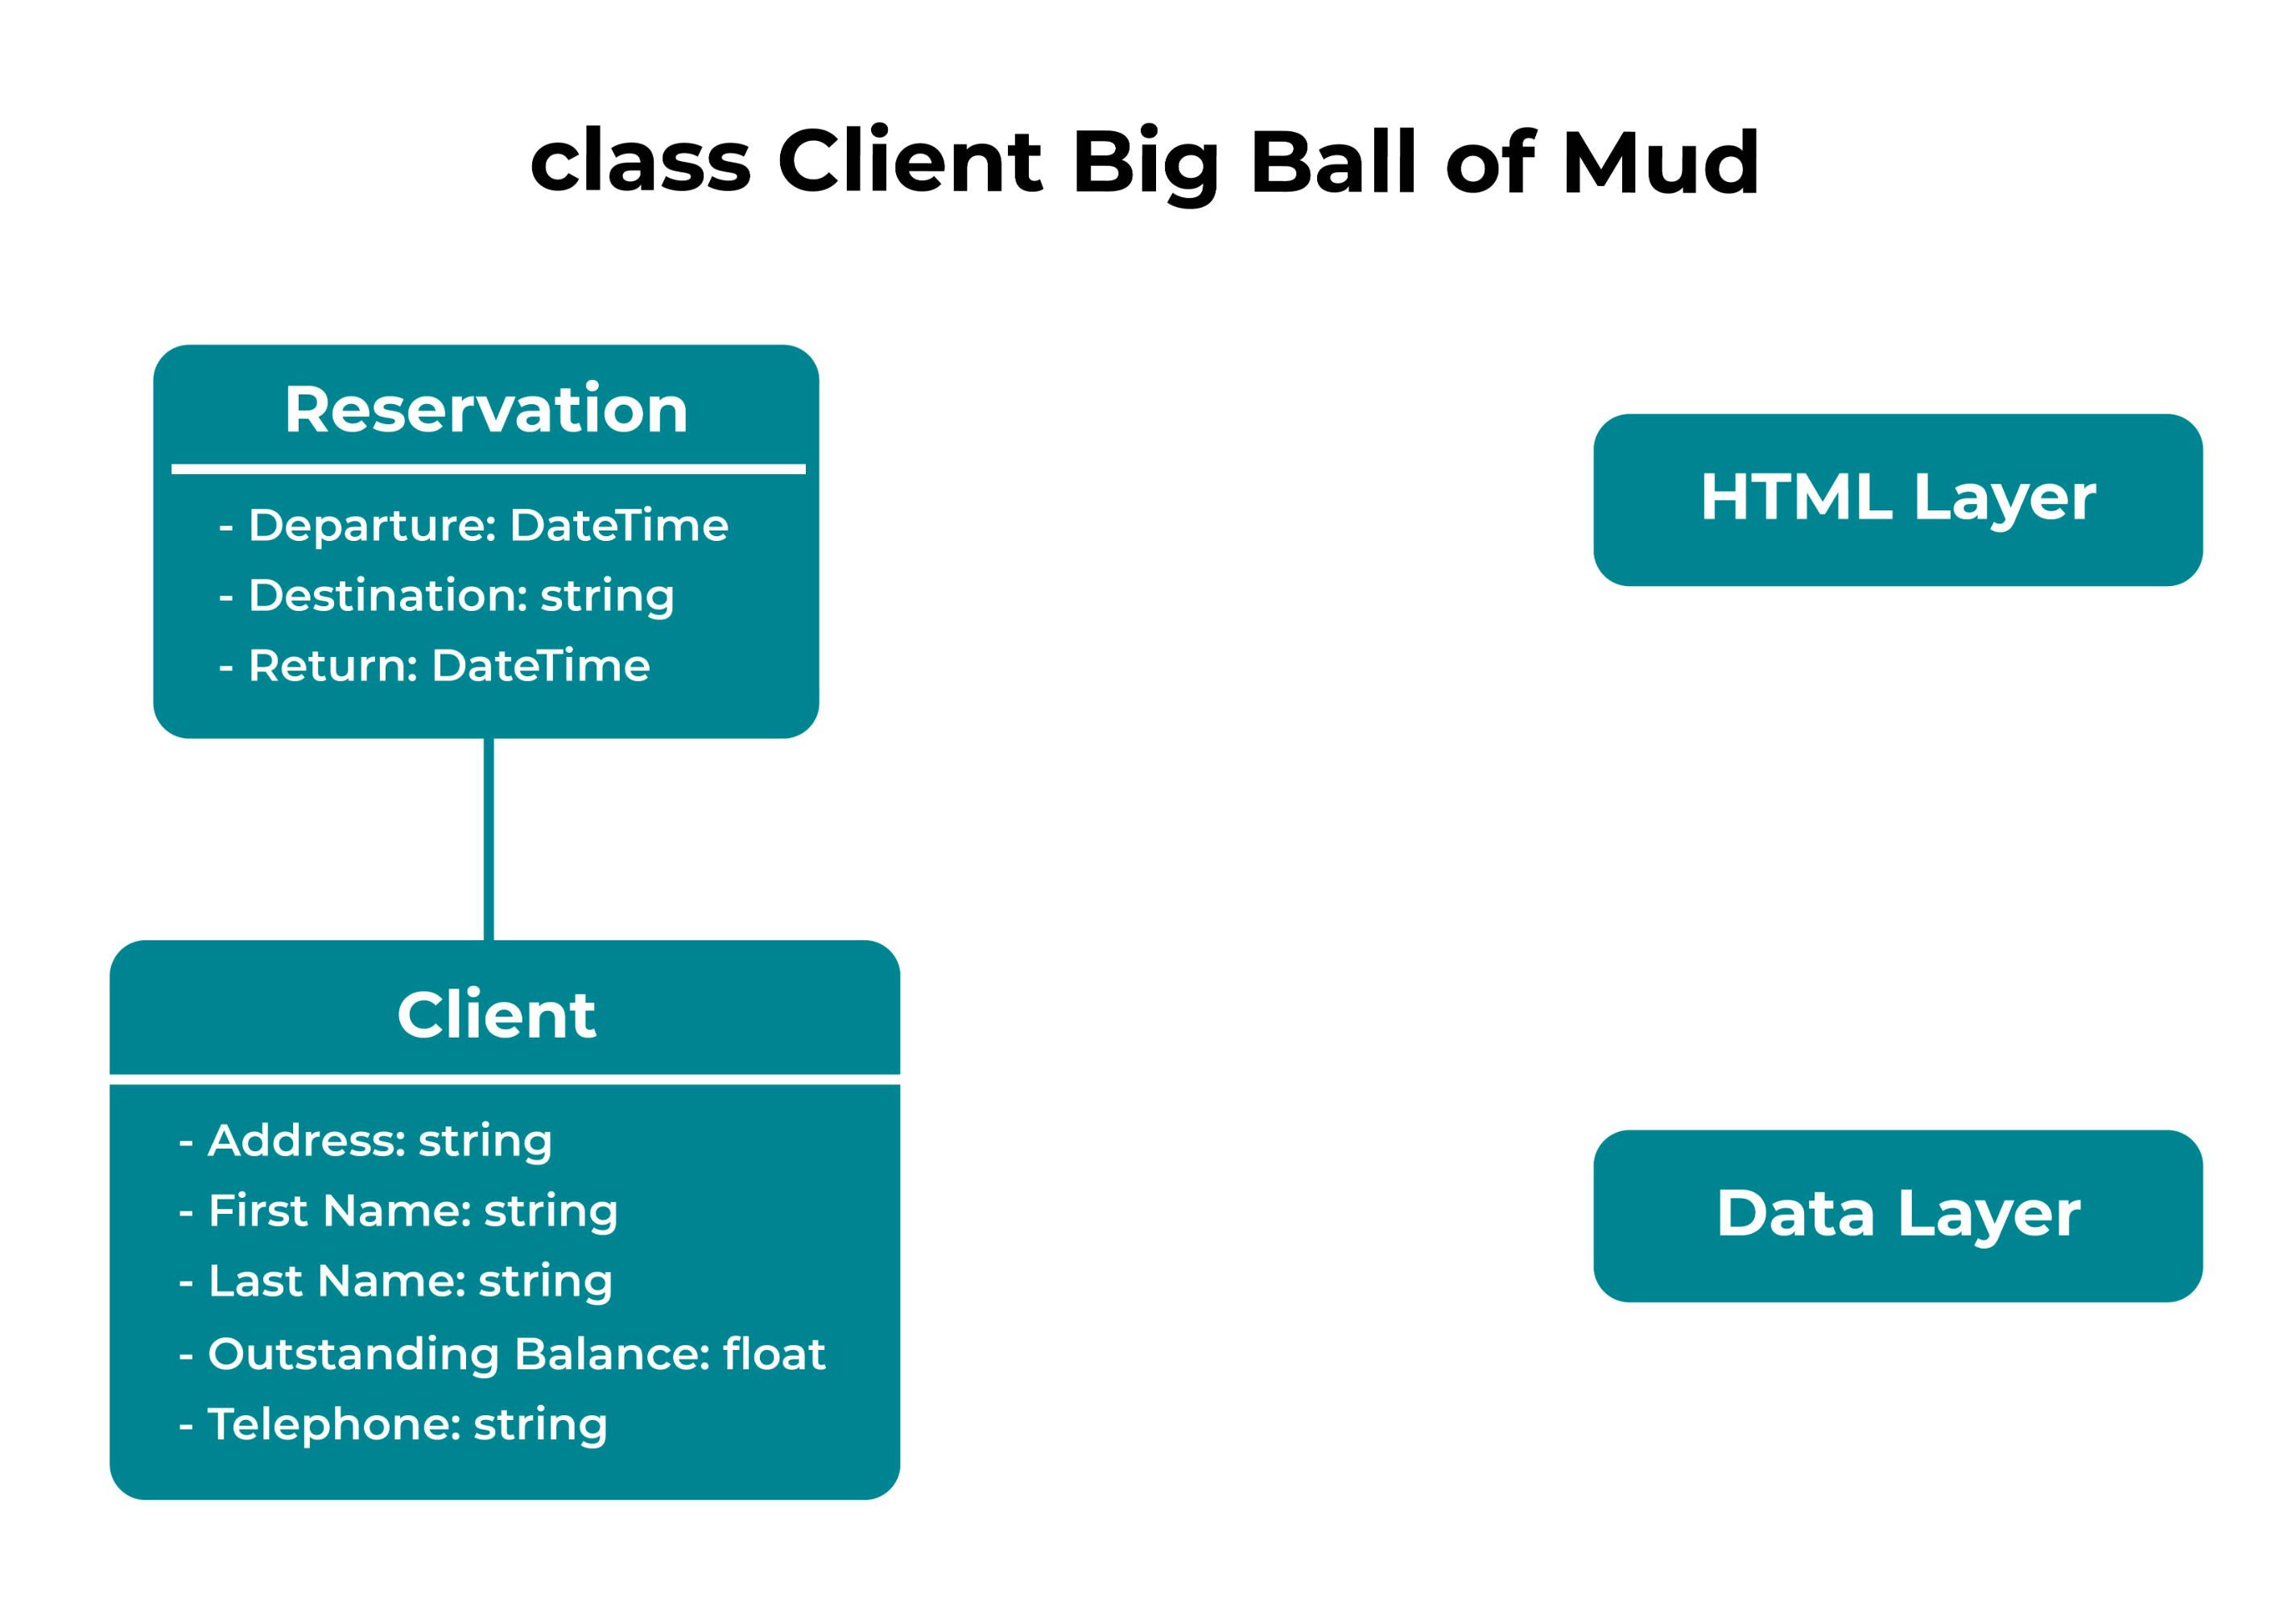
But the control (i.e., what happens when the user clicks on various UI elements) is still nested within the Java Swing classes. We haven’t copied that file into our new project, but let’s look at what it was doing. Every button had the logic of what to do buried inside of its individual event handler:
JButton btn = new JButton("Clients");
    	btn.addActionListener(new ActionListener() {
   		 @Override
   		 public void actionPerformed(ActionEvent e) {
   			 Client.fillTableWithData(table);
   		 }
    	});
And, as we’ve seen before, we can’t test this logic by itself. Also, if the action to perform changes, this code will be challenging to modify.
Identify Solutions
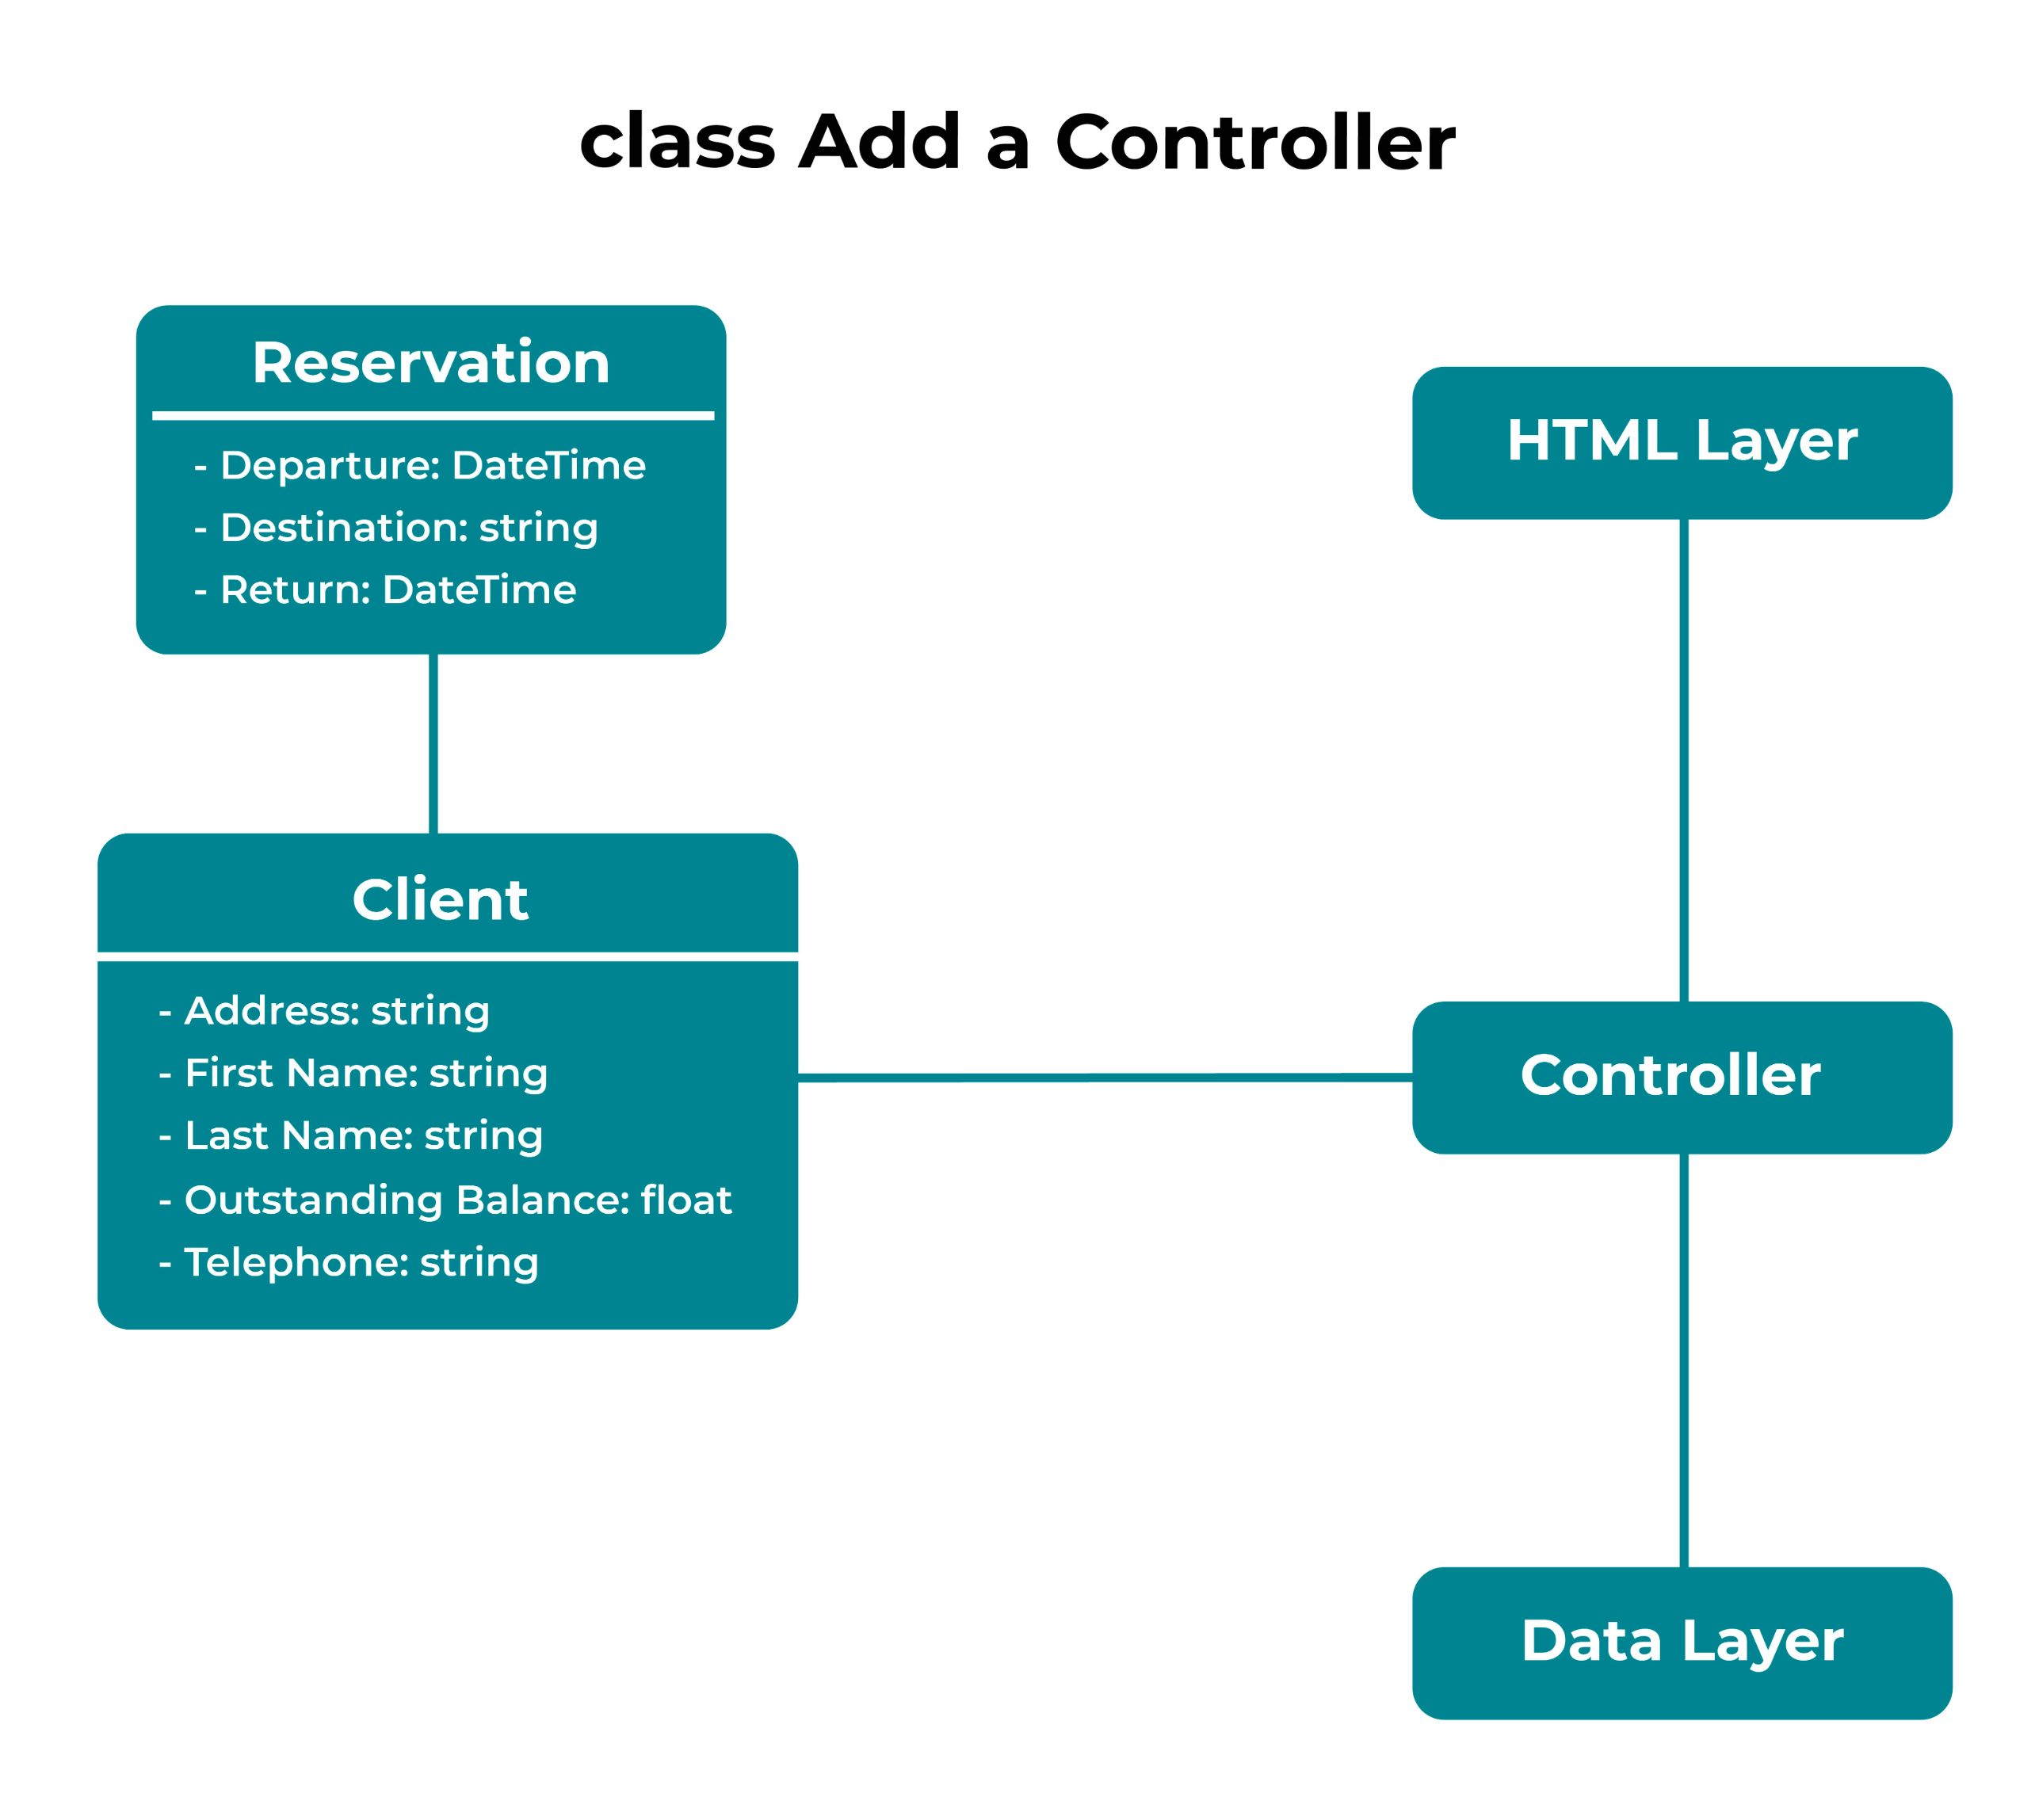
Instead, we need to make sure that the controller class is going to do the coordinating between updating model objects, updating the corresponding data store, and updating the view:
To make this happen, we need to:
Separate all the direct connections between our Java Swing classes, and the event handling business logic.
Create controller classes for each screen, which are integrated into the Spring Boot framework.
Apply Our Solution
In a complicated scenario, just like building furniture out of a box, we need to know what step we’re on, and what is expected to happen next. Controllers need to keep track of the current state of the application. For simplicity, our application will allow users to view, edit, add, and delete items from the list of clients, reservations, and maintenance issues.
First, let’s look at an actual use case: adding a reservation to the system.
As a tour group leader, I want to book a flight of up to 12 people so that they can experience someplace unique.
We already have a Reservation class, that has all the appropriate Spring Boot annotations, and a ReservationRepository class that handles the CRUD operations.
We need to add a set of user interface screens that allow us to do the CRUD operations. Then we need to add a ReservationController class that will connect all the reservation items.
In the GitHub project, you can see a set of reservation-based HTML files (add-reservation.html, reservations.html, and update-reservations.html). These are configured so that the Spring Boot framework will automatically populate the data. It looks complicated, but it is creating a table of reservation data, along with buttons to add, delete, and modify existing reservations. The buttons indicate which corresponding page should come up next.
Now we need the controller class, which determines what happens when a particular page is requested. Much of the code is to get some set of data from the data layer, and then respond to requests from Spring Boot about the data to display.
First, we need to create a package to hold our controllers. Make the following in the project: com.dairyair.dairyairmvc.controllers . Then add the ReservationController class in the package:
package com.dairyair.mvc.controllers;

import javax.validation.Valid;

import org.springframework.beans.factory.annotation.Autowired;
import org.springframework.stereotype.Controller;
import org.springframework.ui.Model;
import org.springframework.validation.BindingResult;
import org.springframework.web.bind.annotation.GetMapping;
import org.springframework.web.bind.annotation.PathVariable;
import org.springframework.web.bind.annotation.PostMapping;
import org.springframework.web.bind.annotation.RequestMapping;

import com.dairyair.mvc.entities.Reservation;
import com.dairyair.mvc.repositories.ReservationRepository;

@Controller
public class ReservationController {
	private final ReservationRepository reservationRepository;

	@Autowired
	public ReservationController(ReservationRepository reservationRepository) {
    	this.reservationRepository = reservationRepository;
	}

	@GetMapping("/new-trip")
	public String showNewTripForm(Reservation user) {
    	return "add-reservation";
	}

	@PostMapping("/reservation/add")
	public String addReservation(@Valid Reservation reservation, BindingResult result, Model model) {
    	if (result.hasErrors()) {
        	return "add-reservation";
    	}

    	reservationRepository.save(reservation);
    	model.addAttribute("reservations", reservationRepository.findAll());
    	return "reservations";
	}

	@GetMapping("/reservation/edit/{id}")
	public String showUpdateReservationForm(@PathVariable("id") long id, Model model) {
   	 Reservation reservation = reservationRepository.findById(id).orElseThrow(() -> new IllegalArgumentException("Invalid reservation Id:" + id));
    	model.addAttribute("reservation", reservation);
    	return "update-reservation";
	}

	@PostMapping("/reservation/update/{id}")
	public String updateReservation(@PathVariable("id") long id, @Valid Reservation reservation, BindingResult result, Model model) {
    	if (result.hasErrors()) {
        	reservation.setId(id);
        	return "update-reservation";
    	}

    	reservationRepository.save(reservation);
    	model.addAttribute("reservations", reservationRepository.findAll());
    	return "reservations";
	}

	@GetMapping("/reservation/delete/{id}")
	public String deleteReservation(@PathVariable("id") long id, Model model) {
    	Reservation reservation = reservationRepository.findById(id).orElseThrow(() -> new IllegalArgumentException("Invalid reservation Id:" + id));
    	reservationRepository.delete(reservation);
    	model.addAttribute("reservations", reservationRepository.findAll());
    	return "reservations";
	}

	 @RequestMapping("/reservations")
	 public String reservationsForm(Model model) {
		 model.addAttribute("reservations", reservationRepository.findAll());
		 return "reservations";
	 }
}
Let's take a closer look at this. One key annotation is this:
@Autowired
	public ReservationController(ReservationRepository reservationRepository) {
    	this.reservationRepository = reservationRepository;
	}
This is how Spring Boot will connect the appropriate data (reservation) to this controller:
Another key annotation is @GetMapping("/some-page-name"), which connects an event (button click) to a corresponding handler in the controller. The controller then queries the data store (if necessary) and prepares the data for handling, back to Spring Boot. The corresponding page is then displayed.
Try It Out For Yourself
To challenge yourself, make a similar set of modifications to the client area of the application by adding various client.html files, a ClientRepository.java file, and a ClientController.java file.
You can check out the solution on this GitHub project.
Now let’s add a little more functionality to our controller. Remember our last user story from Part 1:
As the accounting manager, I want to see a list of clients with outstanding balances so that I can give them a reminder phone call.
With all the architecture work we've already done, we can easily add a button that shows those clients who have an outstanding balance.
First, add a button to the clients.html page:
<a href="/clients/owe" class="btn btn-primary">Owe</i></a></p>Then add the query to our ClientRepository:
@Query("SELECT c FROM Client c WHERE c.outstandingBalance > ?1")
    List<Client> findByOustandingBalanceGreaterThan(double value);
And lastly, a page handler to our ClientController class:
 @RequestMapping("/clients/owe")
	 public String clientOwe( Model model) {
    	model.addAttribute("clients", clientRepository.findByOustandingBalanceGreaterThan(0.0));
		 return "clients";
	 }
Back to our major use cases for our airline application. You'll remember that a couple of the new use cases we are supporting is (1) a maintenance issue is added by the pilot:
As a pilot, I want to capture a minor maintenance issue as soon as I have landed so that it can be fixed quickly.
And then (2), the issue is updated by a mechanic:
As an aircraft mechanic, I want to update a maintenance issue as soon as it has been addressed so the airplane can be considered ready for flight.
Let's break down how that works.:
So first, the pilot enters the date it was detected, the area of concern, and a description.
Later, a mechanic fixes the problem.
They then go into the system, change the "fixed on" date, and add more information about the problem. The maintenance issue controller brings up the appropriate screens and validates the fields.
Based on that description and what we've already done, can you try and implement these elements into our application?
Try It Out For Yourself
Now that you are ready, add the various maintenance.html (view), MaintenanceIssue.java (model), MaintenanceResposity.java (data layer), and MaintenanceController.java (controller) files as well!
You can check out the solution on this GitHub project.
Let's Recap!
The controller glues the view, model, and data layers together.
Create controller classes for each screen.
Use an MVC framework to make the work easier.
Now that you've separated the layers of your application using MVC, you're ready to test your knowledge with the end-of-part quiz!
