Configure Role-Based Access Control
Authorization is a safeguard to ensure you’re accessing the pages you are supposed to. If you’re logging in as a regular user, you shouldn’t access an admin page. Well, the way to set up who can access what page is by creating roles. You would create a user role to access user pages and the admin role to access admin pages. This is called role-based access control because you’re controlling access to different parts of a web app based on the roles of the people using it!
Access control is a crucial subject area and is used for both physical and software security. Access control is essentially setting up at least one safeguard to prevent access to the wrong people. Like a security guard checking badges, you use it when you log into a website to access your account. Whether you need a badge or a password to get in, it all falls under access control.
Guess where you manage the roles in your web application?
The Spring Security filter chain. Let's make it happen!
Set Up Your Spring Security Filter Chain
Now that you understand authentication and authorization let’s use it on your Spring Boot web app with Spring Security. Right now, you are going to use it to create a login form.
Spring Security offers a method called loginForm() to create a default login page, so you don’t have to create anything. When setting up the custom filter chain, there is a bit of manual coding, but not much, and it’s easy to add and remove different methods.
First, you need to create a file for your new super impressive custom-built Spring Security configuration. So far, you have your main class, SpringSecurityAuthApplication.java, and you should have that in your src/main/java folder.
Let’s create a new class for your Spring Security configuration file in the same folder that holds the SpringSecurityAuthApplication.java file.
Right-click on the the com.openclassrooms package for your java files and create a new package.
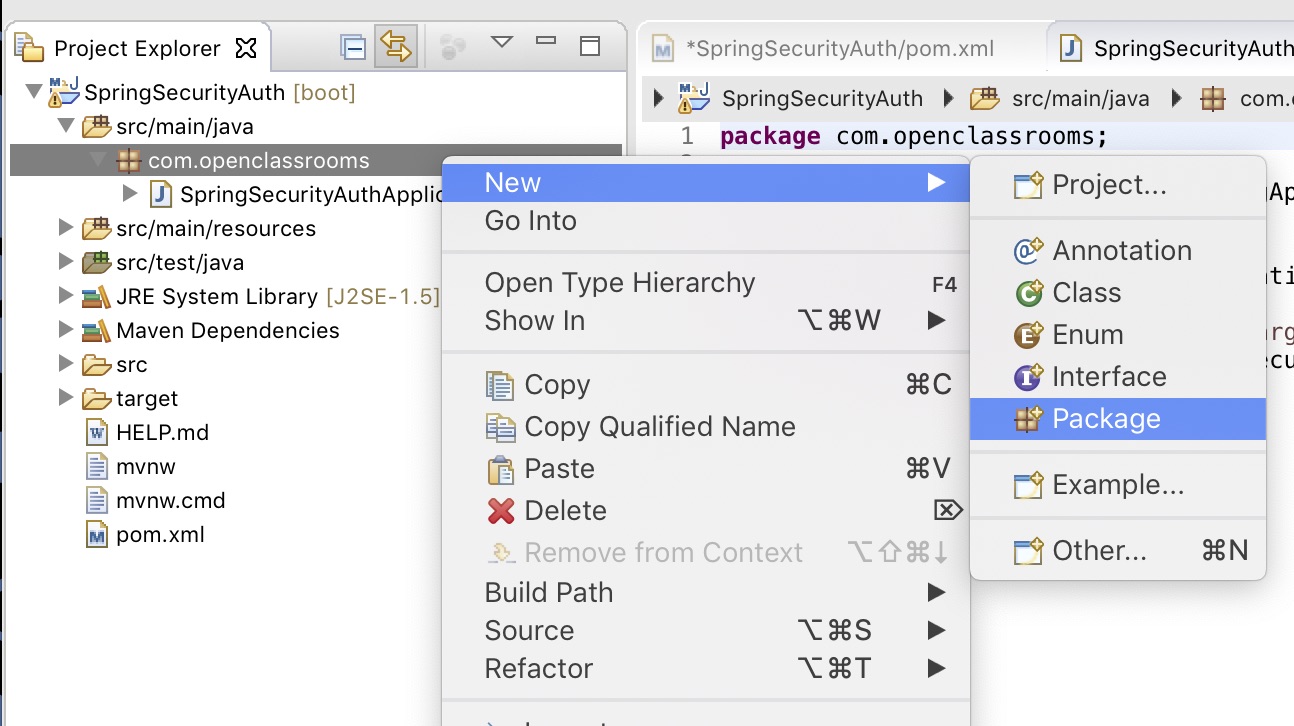
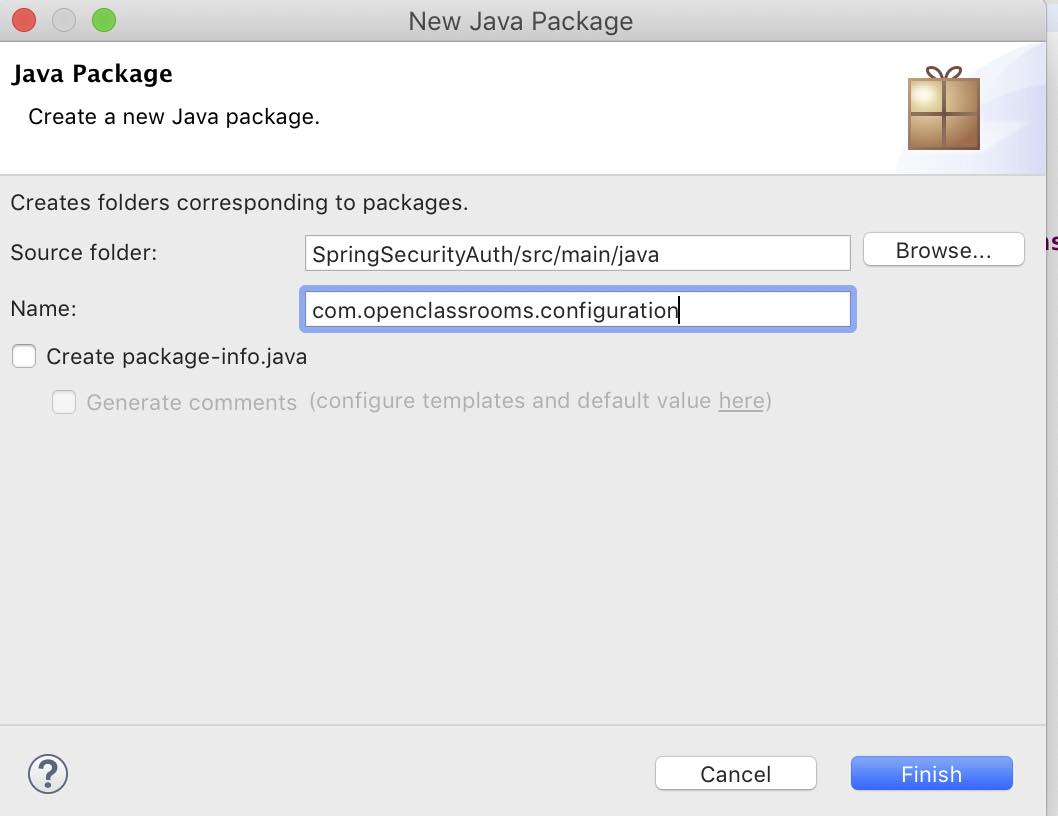
Add the configuration extension on the package name so it will now be called com.openclassrooms.configuration.
Create a new class in that package called SpringSecurityConfig. Right-click on the com.openclassrooms.configuration package -> New -> Class:
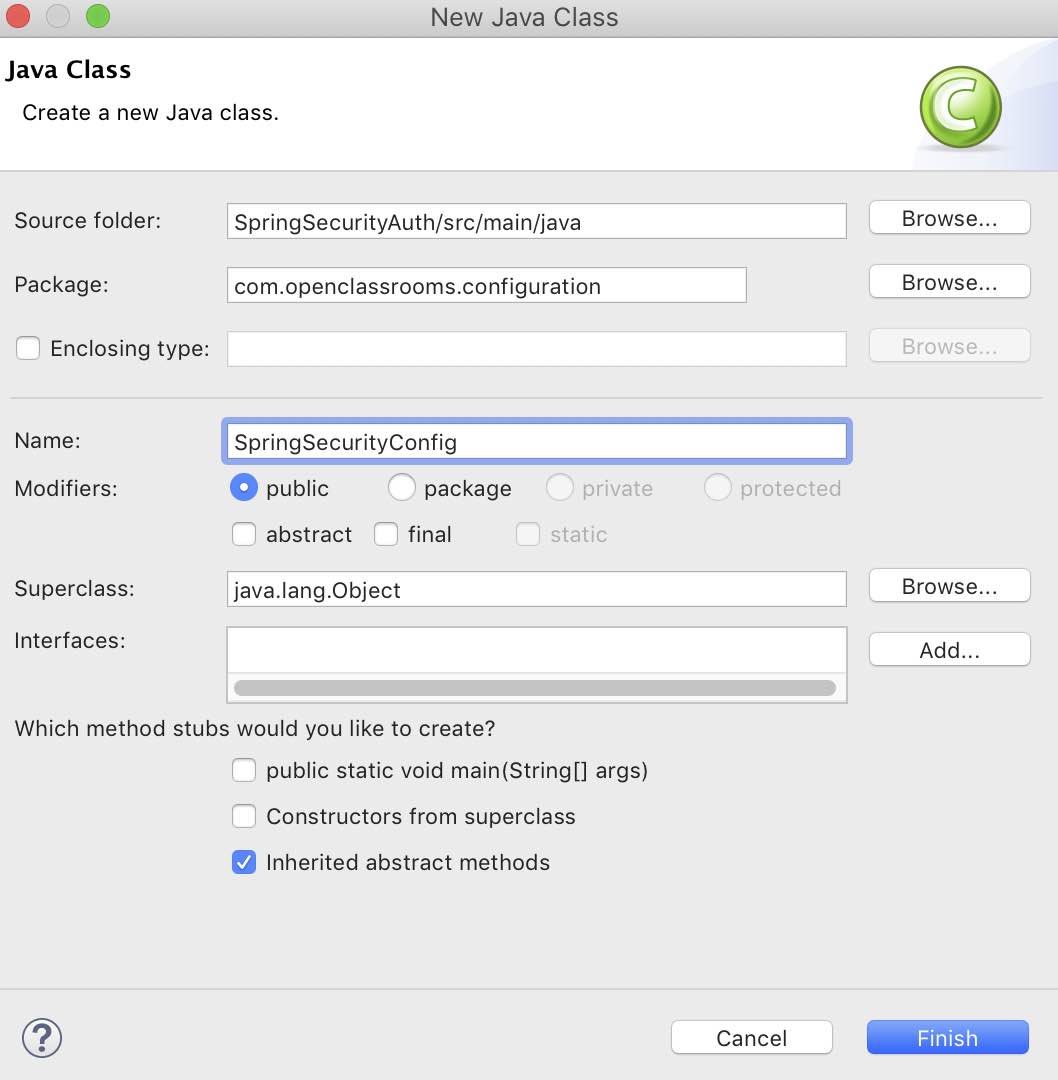
Let’s be creative and call the new file SpringSecurityConfig. 😎 The only thing you need to add is the class name, so put in SpringSecurityConfig for the Name. You can leave the defaults as they are for a new public class, and click Finish.
Now you should have a new class called SpringSecurityConfig to start your custom web configurations for a secure web application. Let’s begin with the fun stuff!
Build the Security Filter Chain
Now that you are good to go with the new class, let’s use Spring Security’s powerhouse class to initiate your very own custom security filter chain. Remember what security filter chains are? They are the file in which you add and remove security filters based on what you need for your web application.
Follow these steps to build your security filter chain:
Add the Configuration and EnableWebSecurity classes to designate the SpringSecurityConfig class as the security filter chain configuration class for the Spring Boot app and to create the security filter chain, respectively.
Add the
configure()method with AuthenticationManagerBuilder class to handle the authentication ruleset.Add the
configure()method to the HTTPSecurity class to push all HTTP requests through the security filter chain and configure the default login page with theformLogin()method.
Now let’s take a look at each of these steps in detail.
Add the Configuration Class
Now that you know what this class does for your Spring app, let me show you how to implement it in your SpringSecurityConfig.java file. You don’t want your compiler to scream at you, so import the required library for this class to work:
import org.springframework.context.annotation.Configuration;
Then add @Configuration to your web application above your class declaration.
Add WebSecurityConfigurerAdapter
Now extend your SpringSecurityConfig class with the WebSecurityConfigurerAdapter. This designates the SpringSecurityConfig class as a Spring Security configuration. To use WebSecurityConfigurerAdapter, add another import:
import org.springframework.security.config.annotation.web.configuration.WebSecurityConfigurerAdapter;
Extend WebSecurityConfigurerAdapter to your SpringSecurityConfig class like this:
@Configuration
public class SpringSecurityConfig extends WebSecurityConfigurerAdapter {

}
Add EnableWebSecurity
Now add EnableWebSecurity as your final step. This will ensure that the Spring web application knows to import your custom Spring Security configuration. So guess what you need to do to add it? An import for the EnableWebSecurity libraries:
import org.springframework.security.config.annotation.web.configuration.EnableWebSecurity;
Next, add @EnableWebSecurity above your class declaration.
@Configuration
@EnableWebSecurity
public class SpringSecurityConfig extends WebSecurityConfigurerAdapter {
}
Now use Spring Security’s configure() method to hold your actual security filter chain. It's the meat of it, so pay attention!
Add HTTPSecurity
To add some functionality, create a login page with buttons. You can do that in the Spring Security configuration file you are making with HTTPSecurity. This class is invoked to run the security filter chain on HTTP requests. By default, it runs security on all of the HTTP requests unless specified in this security filter chain.
This is where you build your security filter chain. So first, guess what you add? The library!
import org.springframework.security.config.annotation.web.builders.HttpSecurity;
Take a look at this code here. You can start with configure() method for all HTTP requests that are the inputs:
@Override
public void configure(HttpSecurity http) throws Exception {
}
So here’s an extra special security bonus for you: if you add @Override before the configure() method declaration, you can override the defaults that are normally configured into the app with Spring Security.
Why would you want to do that? That sounds like double the work.
Well, this makes it more difficult for a hacker to fingerprint your Spring Security app! The less a hacker knows about your app, the better. It looks something like this:
package com.openclassrooms.configuration


import org.springframework.context.annotation.Configuration;
import org.springframework.security.config.annotation.web.configuration.WebSecurityConfigurerAdapter;

import org.springframework.security.config.annotation.web.builders.HttpSecurity;

import org.springframework.security.config.annotation.web.configuration.EnableWebSecurity;


@Configuration
@EnableWebSecurity
public class SpringSecurityConfig extends WebSecurityConfigurerAdapter {

    @Override
    protected void configure(HttpSecurity http) throws Exception {

    }

}
Default Security Headers for Spring Security
When you add the Spring Security dependency, it comes with a default configuration that makes it pretty secure out of the box. Let’s take a look at what it has:
Cache-Control: no-cache, no-store, max-age=0, must-revalidate
Pragma: no-cache
Expires: 0
X-Content-Type-Options: nosniff
Strict-Transport-Security: max-age=31536000 ; includeSubDomains
X-Frame-Options: DENY
X-XSS-Protection: 1; mode=block
Alright, so what does all this mean? Let's walk through it:
Cache-Control - if you’ve authenticated onto a site, your browser may save a cached copy, potentially allowing a malicious user to view the cached page even after you’ve logged out. Cache-control prevents the storage of a cached copy of that page.
Content-Type - the nosniff flag means that a malicious user cannot guess the content type of a request or execute a random XSS (Cross-site scripting) attack. Content-type is the type of file and can be a PDF, mp3, Docx, etc.
HTTP Strict Transport Security (HSTS) - means that anyone who types the URL in the box is automatically taken to the HTTPS version of the website. Using HTTPS throughout your site for encrypted querying is recommended practice.
X-Frame-Options - Many sites have iframes, which allow a hacker to hijack your site by adding a URL to a malicious host server, download files onto your browser, and access your computer through exploit kits. Typically, a victim of clickjacking accidentally clicks on the bad URL and gets pwned! The
DENYflag prevents this sort of clickjacking attackX-XSS-Protection - mode=block blocks malicious JavaScript from executing on your site and therefore prevents suspected XSS attacks.
These defaults are pretty significant. However, you may need to customize or remove them altogether. You can change the default security headers in your configure() method if you use @Override.
With that said, let’s build a Spring Security login form using these out-of-the-box Spring Security features described above. You’ll learn how to customize some of the features later in the course.
Now, let’s look at how you can invoke the default login form with Spring Security.
Configure a Custom Login Page With Spring Security
Now let’s configure your Spring Security filter chain for authentication and authorization. You can add a few filters to this function block to make this page do something useful. Start with a default Spring Security form using the formLogin() method.
@Override
public void configure(HttpSecurity http) throws Exception {
       http
           .formLogin();
    }
Add a User and Admin Role to Your Filter Chain
Spring Security provides filters that can be used to authenticate different types of roles. Give yourself two roles in your Spring Boot app: user and administrator. Once they authenticate, Spring Security plays a crucial role in handling authorization for controlling access to data based on roles.
First, add the authorizeRequests() method to set up the roles after it. Then add the antMatchers() method to provide a mapping for the USER and the ADMIN roles. This ensures the authorization portion of the landing page for your users. The ADMIN role gets a homepage specific for admin, which is /admin, but also has access to /users, and the USER role gets the /users homepage and should not have access to the /admin homepage. Add anyRequest().authenticated() so the form below will be used for authentication.
Do this by adding this code snippet to your configure() method that handles the HTTP requests.
@Override
public void configure(HttpSecurity http) throws Exception {
        http
            .authorizeRequests()
            .antMatchers("/admin").hasRole("ADMIN")
            .antMatchers("/user").hasRole("USER")
            .anyRequest().authenticated()
            .and()
            .formLogin();
}
OK, so now you have the security filter chain for your HTTP requests taken care of with HTTPSecurity. Let’s create a security filter chain for the authentication portion of your masterpiece. You do this with AuthenticationManagerBuilder.
Add AuthenticationManagerBuilder
Let’s try out a simple login page to test out role-based access using Spring Security. Use the AuthenticationManagerBuilder to create a user and an admin, and assign them to roles. This filter not only creates encrypted credentials, but it also sets them up with roles.
Next, you see auth.inMemoryAuthentication. This means that created credentials are stored in memory, rather than a token or database like JDBC.
Here is the library for AuthenticationManagerBuilder.
import org.springframework.security.config.annotation.authentication.builders.AuthenticationManagerBuilder
@Override
protected void configure(AuthenticationManagerBuilder auth) throws Exception {
        auth.inMemoryAuthentication()
            .withUser("springuser").password(passwordEncoder().encode("spring123")).roles("USER")
            .and()
            .withUser("springadmin").password(passwordEncoder().encode("admin123")).roles("ADMIN", "USER");
}
I set up a user and admin you can log in with. These are the credentials:
USER role: user: springuser password: spring123
ADMIN role: user: springadmin password: admin123
I have also added encryption for the passwords. That means that even though I have hardcoded in some easy passwords, the encode() method will encrypt them.
As the last method in the SpringSecurityConfig class, add a bean with the passwordEncoder() method. The cool thing about the PasswordEncoder class is that you can choose the type of hash algorithm you want to encrypt your password. For this example, I chose BCrypt because it is one of the best-rated encryption algorithms out there for password encryption. You should use it as well.
To add this functionality, add three libraries to your imports:
import org.springframework.context.annotation.Bean;
import org.springframework.security.crypto.bcrypt.BCryptPasswordEncoder;
import org.springframework.security.crypto.password.PasswordEncoder;
Add the following code in your SpringSecurityConfig class:
@Bean
public PasswordEncoder passwordEncoder() {
return new BCryptPasswordEncoder();
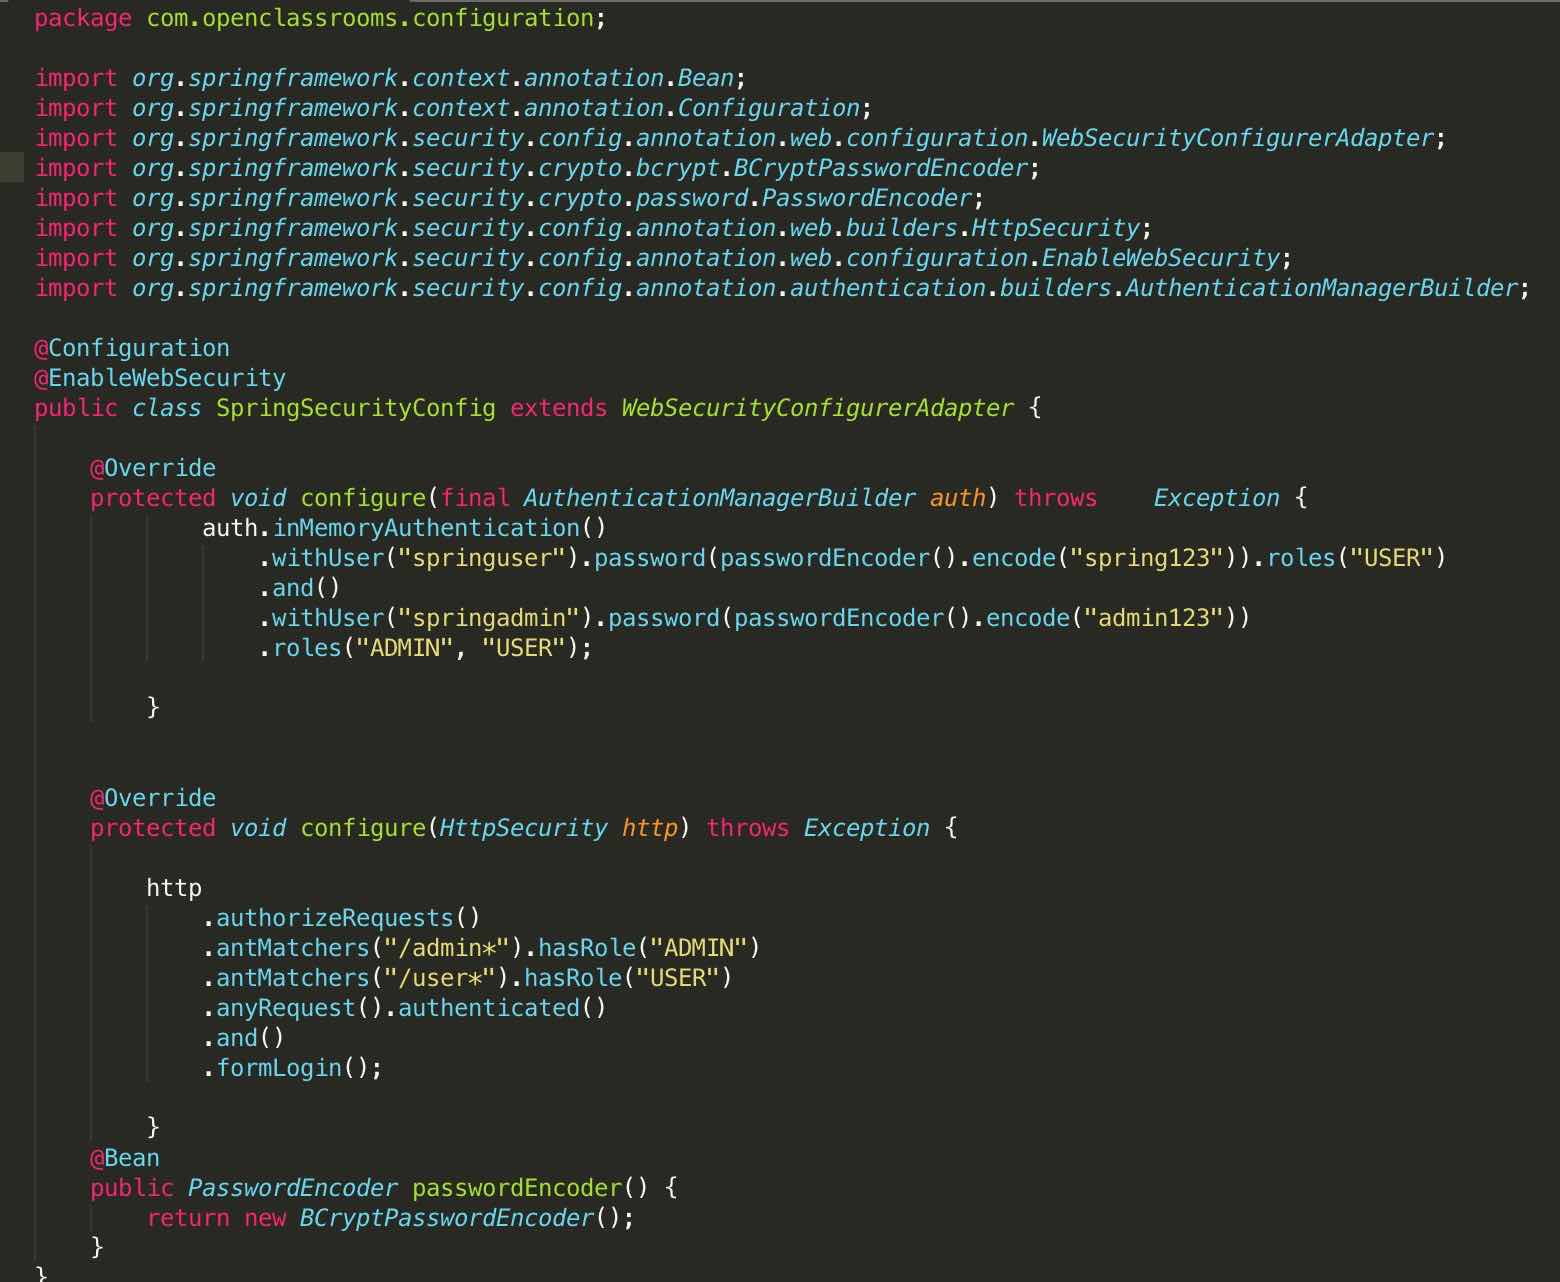
}Review Your Security Filter Chain
Let’s go over the SpringSecurityconfig.java file you completed. It should look a little like this if you followed along - pay attention to the formatting: 🙂
Set Up Your Controller
Next, you're going to set up a REST controller to create your homepages for you. To make sure your REST controller will work, ensure you have updated Maven and have the Maven plugin as your dependency. Eclipse makes it easy to do just that:
Go find that pom.xml file that holds your dependencies.
Right-click on pom.xml -> Maven -> Update project.
You also need to add the Maven plugin for additional web support.
Right-click on pom.xml-> Maven -> Add Plugin.
Type in
spring-boot-maven-plugin.
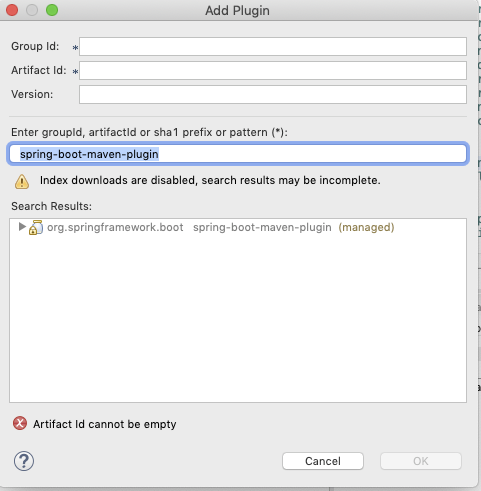
Once you add the plugin, it should show in your pom.xml file. It should update the libraries you need to make your REST controller work. It is also vital to create a new package for your controller. It ensures that your web application knows where to find it.
Right-click on your package com.openclassrooms -> New -> Package.
For the name of the package, add the word controller to your main package name. Mine is called com.openclassrooms.controller.
Now, right-click on the package you just made com.openclassrooms.controller -> New -> Class.
Name your controller class LoginController.java.
Add the
@RestControllerannotation for library support of your REST Controller.
Then create a different method for each role using the @RolesAllowed class and @RequestMapping for the URL mapping to that role:
package com.test.controller;

import javax.annotation.security.RolesAllowed;
import org.springframework.web.bind.annotation.RequestMapping;
import org.springframework.web.bind.annotation.RestController;

@RestController
public class LoginController

{
    @RolesAllowed("USER")
    @RequestMapping("/*")
    public String getUser()
    {
        return "Welcome User";
    }

    @RolesAllowed({"USER","ADMIN"})
    @RequestMapping("/admin")
    public String getAdmin()
    {
        return "Welcome Admin";
    }
}
This REST controller is pretty awesome. Instead of having to create a whole new homepage for the admin and the user, at the /admin and /user URL, the controller dynamically creates the pages for you. Easy peasy!
So now that you’ve set up all this stuff, let’s look at your handiwork on the browser.
Set Up Your Web Server
When you run your standalone Spring app, you can pull up your login page on your browser using Apache Tomcat as your web server. There's no configuration needed; this happens automatically when you compile and run your code.
Step 1: On Eclipse, go to the folder in your Project Explorer that shows you the name of your app. It will say [boot] after it in brackets. Click Run As -> Spring Boot App.
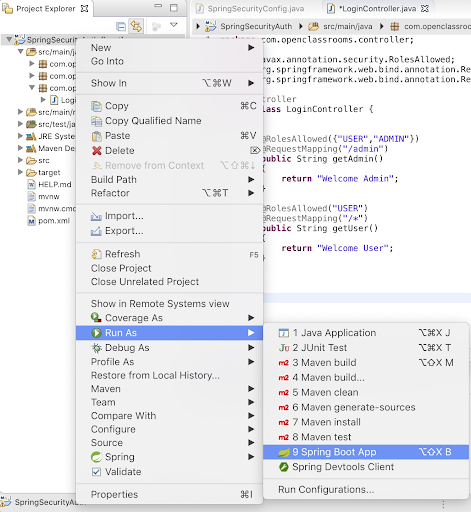
You can see your code compile in the console, and once it is complete, you can open up your web application in the browser.
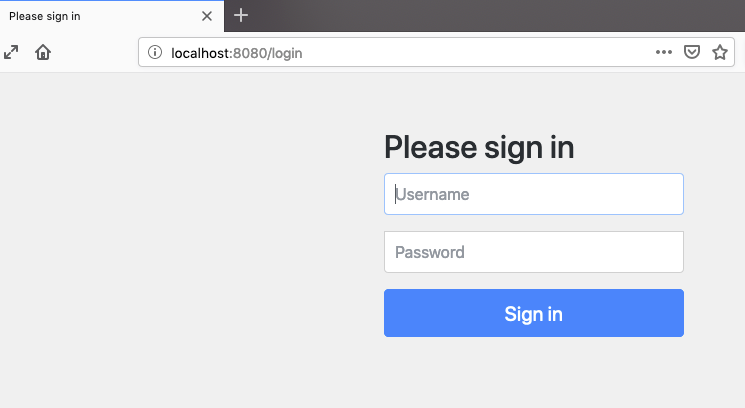
Step 2: Open up your favorite browser and type in this URL: http://localhost:8080.
Now log in as the user to see what happens:
Alright, it works! Here are some additional things to try out to make sure you set it up correctly:
What happens when you put in the wrong password?
What happens if you try to go into the /admin page when you are logged in as a user?
If you run into any issues, check all of your code and dependencies to ensure you have everything set up correctly. Eclipse is pretty good at finding errors so you can work through the issues as they come.
Let’s Recap!
You have accomplished quite a bit so far. You learned how to:
Create a Spring Security configuration file by adding the configuration, EnableWebSecurity, and HTTPSecurity classes.
Put your Spring Security filter chain in the Spring Security configuration file using the
configure()method and adding filters for your HTTP requests.Create filters such as
authorizeRequests()andantMatchers()to demonstrate role-based access to different URLs.Configure role-based users using the AuthenticationManagerBuilder class.
Create a login form by adding the
loginForm()filter.Set up methods using RolesAllowed and RequestMapping classes to create dynamic landing pages for your users.
Looks like you are good to go with your Spring Security authentication page.
In the next part, you'll create a login form using OAuth. OAuth lets you log in with Facebook, Google, and more. To dig deeper into what OAuth is and why we love it, let’s meet back up after a short quiz. 😄
