Share State Between Different Components
 Great work – we now have local state in our components. Our cart lets us add cheese plants, and the cart total adds up accordingly.
But how can we alter how a component reacts to the state in another component? For example, if we want to add a link between our Cart and our ShoppingList component. We can create an Add to cart button in each PlantItem. But how do we get it to update our cart accordingly?
Lift State Up and Update From Child Components
Just as its name suggests, local state is just local. Neither parents nor children can manipulate a component’s local state (they’re not technically able to).
So how do we share a state element between several components?
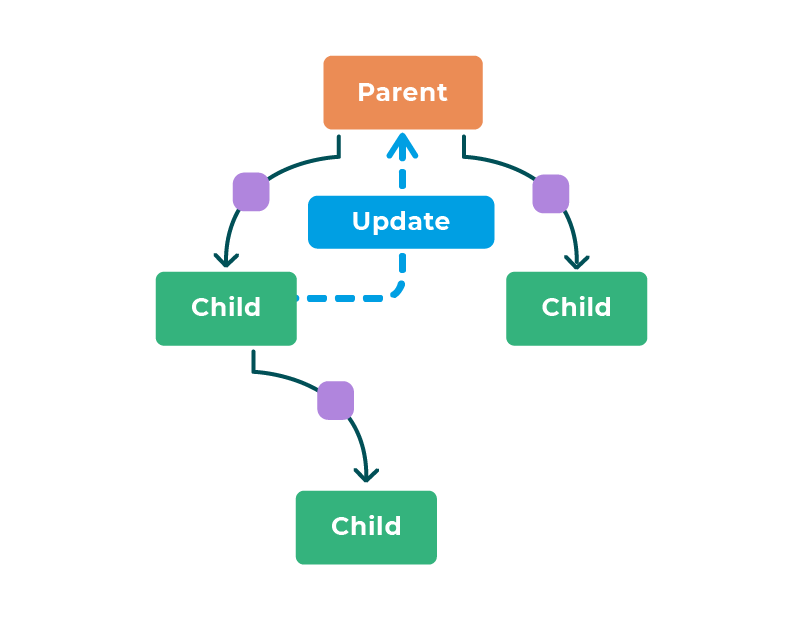
We need to lift this data up to the local state of the closest common ancestor's component and keep the state there. From there, can do the following:
Pass the information down in props to the components that need it.
Lift up update requests, still in props. To do this, we can use the update function of the state that we get in useState, passing it as props to the components that need it.
Let’s apply this to our example.
Start by lifting up cart to App.js :
function App() {
    const [cart, updateCart] = useState([])

    return (
        <div>
            <Banner>
                <img src={logo} alt='Jungle House' className='jh-logo' />
                <h1 className='jh-title'>Jungle House</h1>
            </Banner>
            <div className='jh-layout-inner'>
                <Cart cart={cart} updateCart={updateCart} />
                <ShoppingList cart={cart} updateCart={updateCart} />
            </div>
            <Footer />
        </div>
    )
}

export default App
And still in App.js in the JSX, pass cart and updateCart as props:
<Cart cart={cart} updateCart={updateCart} />That we get in Cart.js . Remember destructuring? We’ll use that to get our prop in one line.
This is a good time to remove the Add button from Cart.js .
That leaves the cart looking a bit empty:
function Cart({ cart, updateCart }) {
    const monsteraPrice = 8
    const [isOpen, setIsOpen] = useState(true)

    return isOpen ? (
        <div className='jh-cart'>
            <button
                className='jh-cart-toggle-button'
                onClick={() => setIsOpen(false)}
            >
                Close
            </button>
            <h2>Cart</h2>
            <h3>Total: {monsteraPrice * cart}€</h3>
            <button onClick={() => updateCart(0)}>Clear cart</button>
        </div>
) : (
        <div className='jh-cart-closed'>
            <button
                className='jh-cart-toggle-button'
                onClick={() => setIsOpen(true)}
            >
                Open cart
            </button>
        </div>
    )
}

export default Cart
Let's pass updateCart to our ShoppingList that we can then get in ShoppingList .
Next, change our list of plants to get (still in ShoppingList.js ):
function ShoppingList({ cart, updateCart }) {
// Small detail: categories come from the previous part to recover all the unique categories of plants.

const categories = plantList.reduce(
        (acc, elem) =>
            acc.includes(elem.category) ? acc : acc.concat(elem.category),
            []
    )

    return (
        <div className='jh-shopping-list'>
            <ul>
                {categories.map((cat) => (
                <li key={cat}>{cat}</li>
                ))}
            </ul>
            <ul className='jh-plant-list'>
                {plantList.map(({ id, cover, name, water, light }) => (
                    <div key={id}>
                        <PlantItem cover={cover} name={name} water={water} light={light} />
                        <button onClick={() => updateCart(cart + 1)}>Add</button>
                    </div>
                ))}
            </ul>
        </div>
    )
}

export default ShoppingList
And there you go! You can now update the cart by simply clicking on a button for each plant. 🥳
As you can see, it’s not hard. You just have to:
Lift your state up.
Pass down the contents of your state and the function that updates it.
Trigger your state to update with a user interaction (clicking on a button).
You’ve seen how to share state elements between several components. In the video below, I’m going to change our app so that the cart behaves more realistically.
The idea is for our state to store which types of plants have been added, and how many, and to update the cart total accordingly.
Let’s go!
Our cart now contains a list of selected items and updates the total according to the selected plants and prices.
Give It a Go!
 It’s time to put everything you’ve learned in this chapter into practice. You’ll find the codebase on branch P3C2-Begin.
The goal is to go back over the list of categories, improving it with state. Here’s your task:
Create a separate
Categoriescomponent to manage the categories.Display the list in a menu unrolling <select /> with <options />:
Each category becomes an option. It is possible to select a category.
On selecting a category, only the plants within the selected category are displayed.
Create another button labeled "reset." This button will reinitialize your state and display all plant categories.
You could also add an option with an empty string value for when no category is selected.
You can find the solution on branch P3C2-Solution.
Let's Recap!
To use the same state in several components, you have to:
Lift the state up to the closest common ancestor.
Pass down the state variable and the function to update this state in the props.
In the next chapter, you’ll learn how to use the Effect Hook to choose when to run an action, e.g., saving our cart in our browser’s localStorage. See you there!
