Write out suites and specs
Let's get you set up with Jasmine real quick before jumping into the details!
You have two options:
Download the source files here ("BowlingWithJasmine.zip"), though the Jasmine version might be out of date, or;
Download the standalone version yourself from the Jasmine release page.
If you opt for the second route:
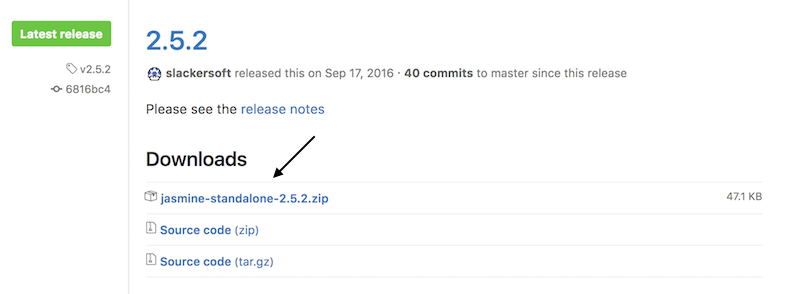
1. Visit the Jasmine releases page on GitHub and download the latest standalone version.
Within the file you download, you'll see the following file structure:
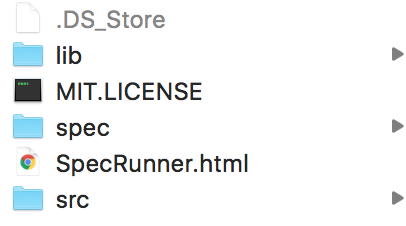
2. One of the folders is called spec . Open up the spec folder, and, inside, create a new file called BowlingGameSpec.js .
3. Another folder is called src . Inside the src folder, create a new file called BowlingGame.js .
4. Lastly, you need to link up the test file with the code file. Open SpecRunner.html in your text editor, remove everything, paste the following contents, and save the file:
<!DOCTYPE html>
<html>
<head>
  <meta charset="utf-8">
  <title>Jasmine Spec Runner v2.4.1</title>

  <link rel="shortcut icon" type="image/png" href="lib/jasmine-2.4.1/jasmine_favicon.png">
  <link rel="stylesheet" href="lib/jasmine-2.4.1/jasmine.css">

  <script src="lib/jasmine-2.4.1/jasmine.js"></script>
  <script src="lib/jasmine-2.4.1/jasmine-html.js"></script>
  <script src="lib/jasmine-2.4.1/boot.js"></script>

  <!-- include source files here... -->
  <script src="src/BowlingGame.js"></script>

  <!-- include spec files here... -->
  <script src="spec/BowlingGameSpec.js"></script>

</head>

<body>
</body>
</html>
Otherwise, just download the source files linked at the top of the chapter ("BowlingWithJasmine.zip").
Now that you're set up with this file structure, let's get started with writing the first step: tests!
Suites
Suites and specs are the two required elements for setting up your tests. Despite their different names, they're both just functions to which you can give human-readable names.
You've already seen both suites and specs earlier in this course, even if you didn't realize it!
A test suite refers to a group of tests that will test the same general functionality.
For example, you might have a test suite that tests a video player.

What should you test? 🤔
Does the video automatically play as it should when the page loads?
Does the video start playing when someone clicks the play button?
These multiple micro-functionalities are associated with the act of playing a video, and you should test them.
You also might test the functionality of stopping the video.
Does clicking the stop button indeed stop the video playback?
Does the video player stop once the video ends?
Likewise, you should test these multiple micro-functionalities are associated with the act of stopping a video.
Describe blocks
In Jasmine, you set up testing of different functionalities by first creating a describe block. describe is simply a function to which you pass a string.
Each describe block will test the micro-behaviors associated with the overall feature!
Here's an example of a describe block, or suite as it's called:
describe("when video is played", function() {

    // test video playing functionality here

});
You see the keyword describe and open parentheses, standard for any function call in JavaScript. Next, you see a string that describes the thing being tested. This can be in regular old English!
You can also have suites within suites, for example:
describe("Video player", function() {
    describe("when the page loads", function() {
    // test that the video plays upon page load
    });
    describe("when user clicks the play button", function() {
    // test that when a user clicks the play button, the video plays
    });
});
Now let's take a look at specs, the crucial other half to suites!
Specs
Specs are written using similar syntax, except instead of the word describe , you use it , also a global Jasmine function!
Similarly to describe , it takes a string and a function. The string is the test's title, which should be specific and readable. The function contains the test itself.
While describe simply describes the functionality that will be tested, the spec details what should or should not happen!
Taking the video player example above, you can fill in the suites with some specs.
describe("Video player", function() {
    describe("when the page loads", function() {
        it("should automatically play the video", function() {
        };
    });
    describe("when user clicks the play button", function() {
        it("should play the video", function() {
        };
    });
});
Suites and specs let you have a great test structure organized by feature and functionality. With this standard structure, your tests will always be organized and delightful.
Bowling example
It's time to revisit the files you created in the first part of this chapter! Open up BowlingGameSpec.js ; you're shortly going to add some tests inside.
Let's move away from the video player example now and see how you could set up another set of specs and suites. Throughout the next few chapters, we'll use the example of a bowling game to describe and write tests. 🎳
You'll see how to test that:
scores are calculated properly, like if someone hits no pins the whole game (ouch), their final score should be zero.
strikes and spares are considered differently than normal rolls.
a game has 10 frames.
And more!

In order to write code that mimics a bowling game, let's start with the simplest concept. A player rolls the ball!
For each "turn" in bowling, a player gets two rolls.
We'll cover two broad scenarios that could arise when a player rolls:
Player knocks down impressive pins (a spare or a strike)
Player knocks down 0 pins
Bowling suites
Let's start with the easiest scenario: knocking down pins. Go ahead and write out a spec in BowlingGameSpec.js , such as:
describe("Bowling game", function() {
    // tests
});
In the first line, I set up a spec for the entire group of tests. This can generally be called Bowling game or whatever your functionality is called.
Bowling specs
I mentioned that when knocking down pins, a player's score should increase based on the number of pins they knock down, right? The player's score should depend on the number of pins they knocked down and how.
Include that as part of your spec (see line #3 below).
describe("Bowling game", function() {

    it("should properly calculate a gutter game", function() {
        // test
    });

    it("should properly calculate a strike", function () {
        // test
    });

    it("should properly calculate a spare", function () {
        // test
    });

});Here, you've got a great setup for writing 3 of your first tests. To recap, you'll write tests (and code) for when a player:
hits zero pins the whole game.
rolls a strike.
rolls a spare.
In the next chapter, let's define what we expect to happen in each of these scenarios.
