Write Your Backup Script With Restic
Have you successfully installed Restic? Great! Let’s design and test a scripted backup service. First, we must identify what we want to backup, then clarify where to send it, and finally, adapt the frequency.

Identify What You Want to Back Up

Just as before, we have to know what we want to back up! PiraSTEM will need to find out where their intellectual property is on the Linux workstation to make sure that all relevant locations are covered by the backup.
We’ll see how to backup the Linux system log files in the video below. More precisely, we’ll backup the syslog files. Let’s dive in.
In the video, the backup source files were specified as /var/log/syslog*
If you later decide to use Restic to backup your Linux computer, you’ll probably want to make sure it covers your Home folder (usually /home/YourUsername) and anywhere else that contains important personal data and perhaps all or some of the configuration files in /etc.
Clarify Where You Want to Send Your Backup

Just as before, use your USB stick as a practice location for your backups, so with it inserted into your computer (or passed through to your Linux virtual machine), you just need to find its mount point:
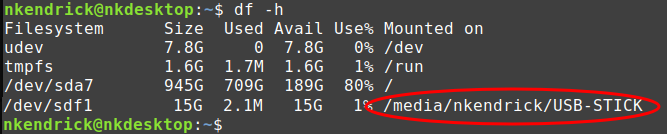
From a terminal window, type df -h and press ENTER.
Look for a separately-mounted (non-main disk) device as per the example below and you’ve found it!
For Restic to operate, we need to create a repository on your USB stick. A repository is a storage entity for the backups, and each backup is known as a snapshot.
To create a repository, type the following command on your computer (or Linux virtual machine), remembering to type the mount point of your USB stick in the right place and adding the /backups sub-folder as shown below:
sudo restic init --repo /media/nkendrick/USB-STICK/backups

Write down your password! Without it, you can’t access your repository.
We want to send the test backup to our USB stick, but Restic will also allow backups to be sent to other local or remote locations, including cloud services from Amazon, Microsoft, and Google.
Let’s try a local backup of the system logs typing the command:
sudo restic -r /media/nkendrick/USB-STICK/backups --verbose backup /var/log/syslog*
Remember to use the correct mount point for your USB stick. Let’s see what happens in more detail in the next video:
Adapt the Frequency of Your Backup

So far, we have performed manual backups, but wouldn’t you like them to be automated? Just like Windows, Linux has a scheduler system to allow tasks to \run at specific times or frequencies. The Linux scheduler is called cron, and it picks up things to do from a cron table (a list of jobs), known as crontab for short.
Script Your Backup
Automating our backups requires that we write a script containing the command to be run. To simplify the setup and running of this script, we will create it in the administrator home folder of our computer. In Linux terms, this is the root user. Find out the different steps to schedule your backup in the video below:
Once in the root user mode, type the command sudo su - to set up cron as if you were the root user. This is so our cron job can be done with full access to all the files and folders on the computer, which will always cover the ones we want to back up.
Since cron runs scripts, we have to put our backup command in one called mybackup.sh, which contains the following:
#! /bin/bash
restic --verbose -p /root/mypassword.txt -r /media/nkendrick/USB-STICK/backups backup
/var/log/syslog* 2>&1 | tee -a /root/restic-log-$(date -d "today" +"%Y%m%d%H%M").log
Things to know about this script:
The top line is a helper line for the command line interpreter. It says that this script should be interpreted, or run, using the bash shell. That’s the Linux program that gives you the blinky cursor where you can type in commands. Putting that as the first line leaves no room for confusion about how this script should be handled.
The
-poption points to a file that contains the password for the repository. This means the script can run without waiting for us to type it.The
2>&1 | tee -a rstlogpart tells bash that all program informational and error messages should be sent to both the screen (console) and to a file - and that’s how we get our log file!Finally, the dollar sign and all that follows construct a log file name that includes a timestamp. This is very handy for future log analysis. To see how this part gets evaluated, try this on a command line:
echo $(date -d "today" +"%Y%m%d%H%M")
Automate your backup
Time to add our script to crontab!
While running as the root user via sudo su -, we edited crontab using the command crontab -e , where we added the line below before saving our work:
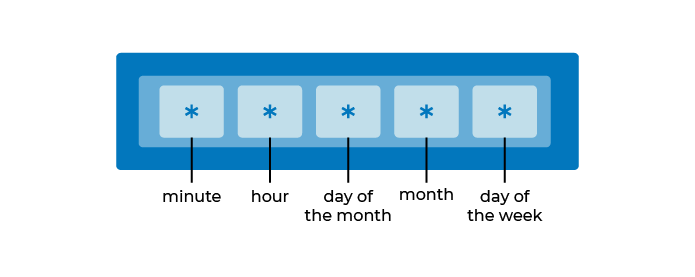
*/5 * * * * /root/mybackup.sh
As you saw in the video, a crontab entry is useful to run a task on a scheduled basis. The five asterisks may be confusing at first, but it is actually quite simple. The format is minute, hour, day-of-month, month, day-of-week, with a parameter for each value, or an asterisk ‘*’ to represent any value. Make sure you put the right number of values with a space between each one.
The / before the 5 told crontab to run the script every five minutes, which is great for testing. However, if you forgot the slash and just put the five, that would mean at 5 minutes past the hour, and that would run the script once per hour, so you might have a long wait for a test run! After testing, you’ll probably want to edit crontab again and specify a more realistic schedule.
If you want to make sure you are running your script at the right interval you can use online tools that tell you in words what your syntax will achieve. Try it here!
Let’s Recap!
Restic creates storage entities, called repositories, for its backups, and each backup is known as a snapshot.
Restic’s repositories are password and encryption protected by default.
After the first full backup, Restic makes differential backups to save space.
We can create scripts to run Restic commands upon request.
Linux scripts have to be made e(x)ecutable with the
chmodcommand in order to be run.
You’re really making progress with Restic and scripting now! The next challenge is to see how you can make your scripts run on a schedule and ensure they are doing what you want.
