Back Up Your Unix/Linux Environments with rsync

Gwenaelle really enjoyed installing and using a professional solution like Veeam Backup.
However, you also want to show her another solution that can be implemented on their GNU/Linux servers.
The solution you’ve chosen to present is rsync.
Discover the Rsync Utility
Rsync (short for Remote Synchronization) is one of the most widely used file copy and synchronization tools on Linux systems.
One of its key features is its use of an algorithm that transfers only the differences between files.
For simplicity’s sake, rsync splits each file into data blocks and checks whether each block already exists on the destination. If a block is missing, it is copied. The file is then rebuilt using both old and new blocks.
This is not the only advantage or special feature of rsync. Here are a few others:
Preservation of file attributes: rsync preserves permissions, creation or modification dates, and symbolic links.
File filtering: You can include or exclude files and directories. This is especially useful for avoiding the synchronization of cache data. Filtering can be applied using paths or patterns.
Data compression: rsync can compress data during transfer, reducing bandwidth usage and transfer time.
Simulation mode: One of the most useful features when designing a backup solution. Rsync behaves as if data were copied—without actually copying it—allowing you to analyze volume and file changes.
Rsync has two operating modes:
Server mode (“daemon”): Ideal for setting up a backup server. By default, the server listens on port 873 (configurable) and waits for rsync client connections. Transfers can be encrypted using SSH, although this is not enabled by default.
Client mode (“remote shell”): Enables synchronization between rsync clients over an SSH connection (port 22 by default). This mode is secure and encrypted.
Deploy Rsync in Your Environment
To demonstrate rsync to Gwenaelle, Coffecao’s IT technician, start by installing two Debian 12 test virtual machines.
The first, called source, will contain the data. The second, called destination, will receive it.
Prepare the Source Virtual Machine
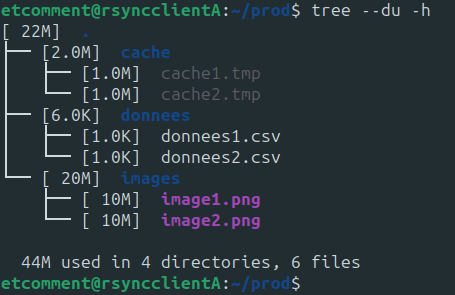
On the source VM, create several folders and files of varying sizes to simulate Coffecao’s production data.
First, prepare the directory structure:
cd /home/etcomment/
mkdir prod && cd prod
mkdir donnees cache images
Now generate the following files:
Two 1 KB CSV files in the donnees folder
dd if=/dev/urandom of=donnees/donnees1.csv bs=1K count=1
dd if=/dev/urandom of=donnees/donnees2.csv bs=1K count=1
Two temporary 1 MB files in the cache folder
dd if=/dev/urandom of=cache/cache1.tmp bs=1M count=1
dd if=/dev/urandom of=cache/cache2.tmp bs=1M count=1
Two larger 10 MB PNG files in the images folder
dd if=/dev/urandom of=images/image1.png bs=1M count=10
dd if=/dev/urandom of=images/image2.png bs=1M count=10
You now have a simple directory tree with three folders, each containing two files.
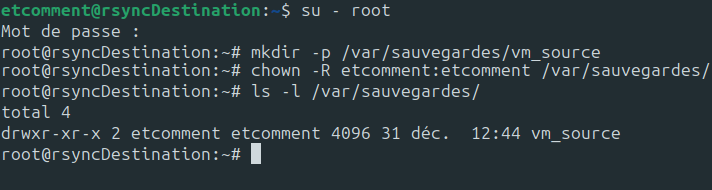
Prepare the Destination Virtual Machine
Now prepare the destination virtual machine.
It will contain a single vm_source directory under /var/sauvegardes, with permissions granted to the test user.
su - root
mkdir -p /var/sauvegardes/vm_source
chown -R etcomment:etcomment /var/sauvegardes/
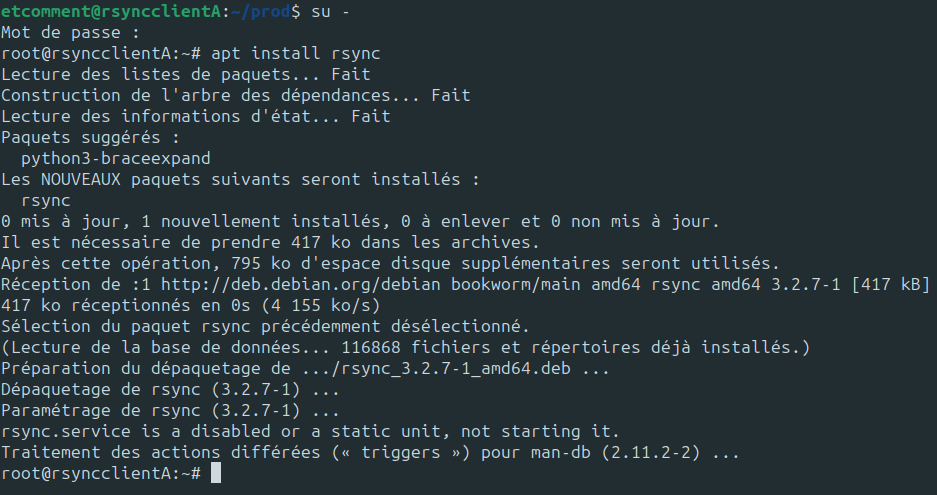
Now install rsync on both virtual machines:
apt install rsync
You can now show Gwenaelle the basic usage of rsync, starting with local synchronization and then remote synchronization.
Synchronize a Folder Locally
Gwenaelle mentions that local copies currently use the cp command.
Why would rsync be better?
Rsync uses a differential copy algorithm, improving transfer speed and reliability.
rsync -av /home/etcomment/prod/donnees /home/etcomment/montages/
The -a (archive) and -v (verbose) options preserve metadata and provide detailed output.
Synchronize a Remote Folder
rsync -av -e 'ssh -p 22' /home/etcomment/prod etcomment@rsyncDestination:/var/sauvegardes/vm_source/
Schedule the Backup with Crontab
Backups must be automated to ensure reliability—and to let Gwenaelle take vacations.
crontab -e
Example: run the rsync backup every weekday at 7:00 PM:
0 19 * * 1-5 rsync -av -e 'ssh -p 22' /home/etcomment/prod etcomment@rsyncDestination:/var/sauvegardes/vm_source/ >> /home/etcomment/sauvegardes.log
Restore Data from the Backup Server
To restore data, simply reverse the source and destination.
Over to You!

Context
You are implementing a backup for one of EthicalIT’s NAS systems in its new Indian subsidiary.
The backup must run on the first Saturday of each month and be stored in an Amazon S3 bucket.
Instructions
Write the rsync command for file backup.
Define the crontab schedule.
Write the rsync command to restore a file.
Summary
Rsync is a powerful file synchronization tool.
It supports differential and incremental backups.
Rsync works unidirectionally; restoring requires reversing source and destination.
--include and --exclude options allow fine-grained control.
Crontab enables automated backup scheduling.
You’ve demonstrated how to use rsync on a Linux-based system. Next, you’ll explore how to achieve the same goal on Windows using PowerShell.
