Set Up Your Network Adapter
 Your workstation is installed, but you’re going to have to configure your network adapter to start using it.
After that, you’ll be able to connect to the internet and communicate with other company devices.
Set Up Your DHCP Connection
Without configuring the network adapter correctly, your computer will only access resources local to that device. There may be some occasions where you want a local device, but in this more connected world, it is crucial to understand how to connect devices to each other and the internet.
Let’s take a look!
If your company’s network has a DHCP server, you must configure the adapter on your computer to use it. Let’s see how to do this.
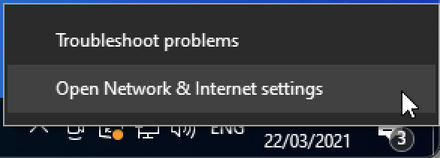
To change the settings of your network adapter (Wi-Fi or Ethernet), right-click the network icon in the bottom right-hand corner of the screen and click on Open Network & Internet Settings.
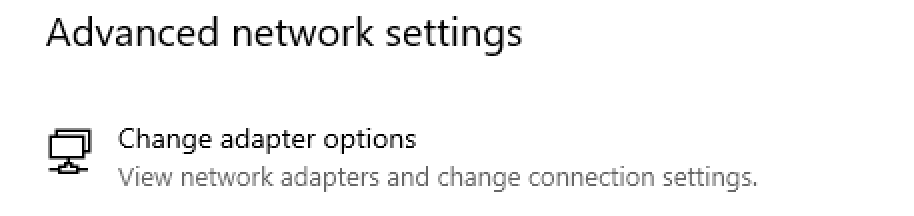
Click on Change adapter options. All of your network connections: Bluetooth, Wi-Fi, Ethernets, and VPNs, should appear.
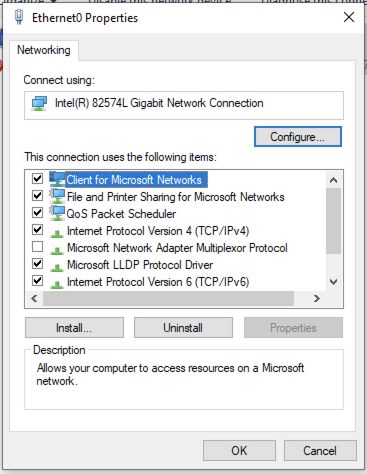
Choose which network you wish to modify. To modify the settings of this network connection, click on Properties and then Internet Protocol Version 4:
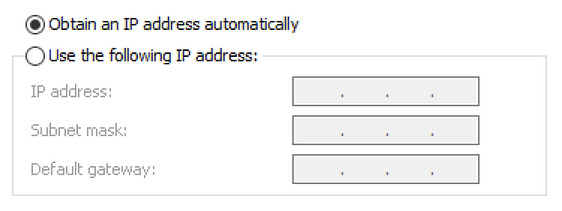
Then click Obtain an IP address automatically.
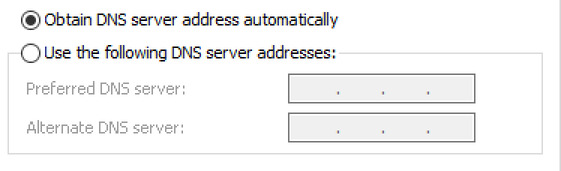
That’s all there is to it. If your DHCP server is configured correctly, your network adapter will receive an IP address, a subnet mask, a default gateway, and two DNS server addresses.
Let’s now look at how to do the same operation with a static IP address.
Set Up Your Network Adapter With a Static IP Address
To set up a static IP on your network adapter, go into Internet Protocol Version 4.
This time, click on Use the following IP address. The fields shown below will become available, allowing you to enter the required information:
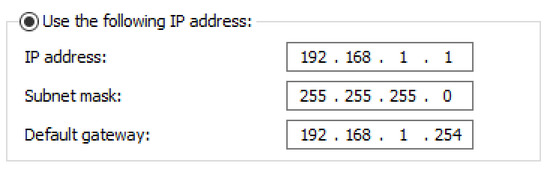
In this example, my computer is on network 192.168.1.0/24, and its default gateway is 192.168.1.254. In most companies, the default gateway will be the company’s router.
Do the same for the DNS servers:
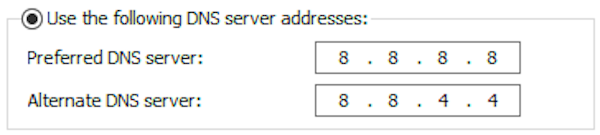
This example uses Google DNS servers, the most widely used global DNS providers, due to their reliability and high level of security.
You should now be able to connect your computer to the internet and the other devices connected to the same internal network.
Let's Recap!
If your company’s network has a DHCP server, you must configure the adapter on your computer.
You can choose to obtain an IP address and DNS server address automatically or enter them manually, if the companies information is available to you.
When modifying the network settings, make sure to select Internet Protocol Version 4 and not Internet Protocol Version 6.
Google DNS servers is the most widely used global DNS provider.
In the next chapter, you will learn about keeping Windows 10 updated and taking advantage of Microsoft’s most recent developments and security product.
