Now that Room (our ORM) is installed, we’ll be able to begin representing our data in the form of models via simple POJO classes.
Define your entities
Our goal will be to model the feature Things to do in our TodoListActivity screen. For the sake of clarity, we’ll go back to this screen to better visualize our needs and the models we have to create.
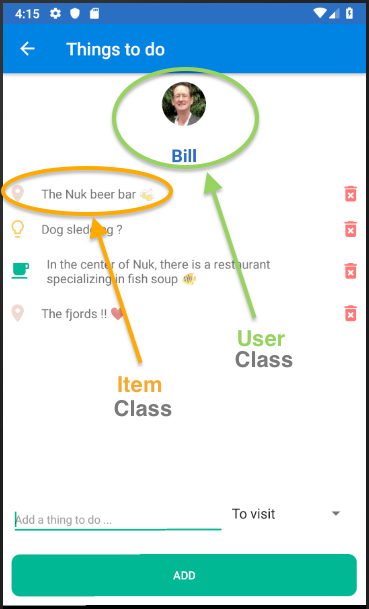
I've chosen to model this feature in the following way:
The class
User: Will represent the user currently logged in to our application. That user will have a name and a profile picture.The class
Item: Will represent a thing to do. It will have a title and a category, and will have the option to be marked as done. It will also keep the created user login in memory.
Now, let’s create the corresponding classes in Kotlin. 😊 To do this, create a new package called models/, then add the classes Item.kt and User.kt to it.
Class Item.kt :
class Item {
   var id: Long = 0,
   var text: String = "",
   var category: Int = 0,
   var selected: Boolean = false,
   var userId: Long = 0
}
Class User.kt:
class User {
   var id: Long = 0;
   var username: String = "";
   var urlPicture: String = "";
}
For now, we’ve created these two basic objects, but we will add details soon.
These class models might be quite simple, but how do we save them in a database?
To help us, I first created a Physical Data Model (PDM) to better represent the relationships between these objects, which will later become... tables!
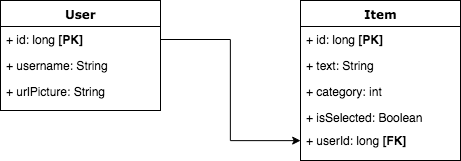
Here, we have two tables corresponding to our two previous models:
The table user:
Primary key (PK): The field id representing our user’s unique identifier.
The table item:
Primary key (PK): The field
idrepresenting the unique identifier of a thing to do.Foreign key (FK): The field
userIdrepresenting the unique identifier of the user who created the thing to do.
Now that we have a slightly more advanced representation of our database's structure, we will edit our two classes of models to define them as tables in the eyes of Room.
Excerpt from User.kt:
@Entity
class User {
   @PrimaryKey
   var id: Long = 0,

   ...
}
To make our lives easier, Room offers a lot of annotations to facilitate its configuration. Thus, here we've defined our class User as a table using the annotation @Entity. A table must have at least one primary key, so we define the id property as being the primary key of the table User thanks to the annotation @PrimaryKey. Fast and efficient, right?
Excerpt from Item.kt:
@Entity(foreignKeys = arrayOf(ForeignKey(entity = User::class,
        parentColumns = arrayOf("id"),
        childColumns = arrayOf("userId"))),
        indices = arrayOf(Index("userId")))

class Item (

   @PrimaryKey(autoGenerate = true)
   var id: Long = 0,
   ...
}
The table item is a little different, because we have added the foreign-key/key-primary relationship inside the annotation@Entity, using the annotation foreignKey. We’ve also defined a primary index to speed up querying this table using the indices annotation.
As you may have noticed, we’ve added the parameter autoGenerate = true to the annotation @PrimaryKey: This will allow Room to automatically generate a unique identifier for each item saved. 😀
Nicely done! Now I’ll give you the content of the adapter and ViewHolder that we will use subsequently through the RecyclerView of the activity TodoListActivity.
As you can imagine, the RecyclerView will contain a list...of items! 😁 Put these classes in the package todolist/. This class represents each line in the RecyclerView:
Class todolist/ItemViewHolder.kt:
class ItemViewHolder(itemView: View) : RecyclerView.ViewHolder(itemView), View.OnClickListener {

   var textView: TextView
   var imageView: ImageView
   var imageButton: ImageButton

   init {

      textView = itemView.findViewById<View>(R.id.activity_todo_list_item_text) as TextView
      imageView = itemView.findViewById<View>(R.id.activity_todo_list_item_image) as ImageView
      imageButton = itemView.findViewById<View>(R.id.activity_todo_list_item_remove) as ImageButton
   }

   // FOR DATA

   private var callbackWeakRef: WeakReference<ItemAdapter.Listener>? = null

   fun updateWithItem(item: Item, callback: ItemAdapter.Listener) {

       callbackWeakRef = WeakReference(callback)
       textView.text = item.text
       imageButton.setOnClickListener(this)

       when (item.category) {
            // TO VISIT
            0 -> imageView.setBackgroundResource(R.drawable.ic_room_black_24px)
            // IDEAS
            1 -> imageView.setBackgroundResource(R.drawable.ic_lightbulb_outline_black_24px)
            // RESTAURANTS
            2 -> imageView.setBackgroundResource(R.drawable.ic_local_cafe_black_24px)
       }

       if (item.selected) {
            textView.paintFlags = textView.paintFlags or Paint.STRIKE_THRU_TEXT_FLAG
       } else {
            textView.paintFlags = textView.paintFlags and Paint.STRIKE_THRU_TEXT_FLAG.inv()
       }
   }

   override fun onClick(view: View) {
        val callback = callbackWeakRef!!.get()
        callback?.onClickDeleteButton(adapterPosition)
   }
}
This class represents the adapter, making the link between the RecyclerView and the ViewHolder:
Class todolist/ItemAdapter.kt:
class ItemAdapter(private val callback: Listener) : RecyclerView.Adapter<ItemViewHolder>() {

    // FOR DATA
    private lateinit var items: List<Item>

    // CALLBACK
    interface Listener {
        fun onClickDeleteButton(position: Int)
    }

    init {
        this.items = ArrayList()
    }

    override fun onCreateViewHolder(parent: ViewGroup, viewType: Int): ItemViewHolder {
        val context = parent.context
        val inflater = LayoutInflater.from(context)
        val view = inflater.inflate(R.layout.activity_todo_list_item, parent, false)
        return ItemViewHolder(view)
    }

    override fun onBindViewHolder(viewHolder: ItemViewHolder, position: Int) {
        viewHolder.updateWithItem(this.items[position], this.callback)
    }

    override fun getItemCount(): Int {
        return this.items.size
    }

    fun getItem(position: Int): Item {
        return this.items[position]
    }

    fun updateData(items: List<Item> {
        this.items = items
        this.notifyDataSetChanged()
    }
}
Everything seems ready! In the next chapter, you'll see how to create your first SQL queries on an SQLite database.😉
Let's recap!
Use the annotation
@Entityto define a class as a table.Use the annotation
@PrimaryKeyto define an id property as the primary key for a table.Use the parameter
autoGenerate = trueto the annotation@PrimaryKeyto allow Room to automatically generate a unique identifier for each item you save.
