Set Up a New Project With Django’s Command-Line Utility

Generate the Boilerplate Code for a Django Project
Before diving into building the Merch Exchange app, a handful of project files need to be in place.
It would be tedious and error-prone to type out these files every time you start a new Django project. Django provides a command-line utility to automate this task (and many others).
Navigate to the django-web-app directory if you’re not already there, and then issue the following command in the terminal:
(env) ~/projects/django-web-app
→ django-admin startproject merchex
It looks as if nothing happened, but take a look at the directory contents now:
(env) ~/projects/django-web-app
→ ls
merchex     requirements.txt
There's a new directory, merchex . Let’s use the code editor to look inside:
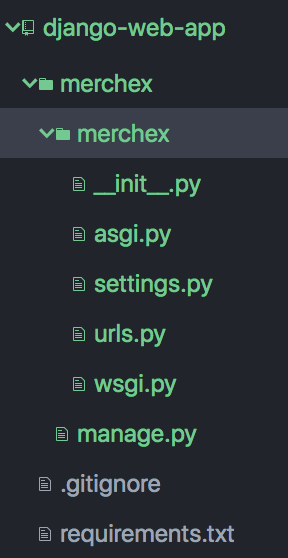
You can see that some new files have been created.
What did you do there?
I automatically generated Django boilerplate code.
Boilerplate code is template code (or starter code) - it’s the barebones code you need for a working, but empty, Django project.
To generate the boilerplate code, issue the command name django-admin , followed by the subcommand startproject , and passing the argument merchex as the name to use for the project.
This name is used for the top-level directory. Let’s step into that directory and list its contents:
(env) ~/projects/django-web-app
→ cd merchex
(env) ~/projects/django-web-app/merchex
→ ls
merchex     manage.py
There's another directory inside called merchex , which we’ll discuss later in the chapter. There's also a Python script called manage.py .
From now on, whenever we use the Django command-line utility, we’ll be calling it via manage.py instead of django-admin as we did before. This is because manage.py is tailored to work with our project specifically, while django-admin is a more generic version of the utility.
With the boilerplate code in place, we have everything to launch the site for the first time.
Run the Development Server
Let’s call the command-line utility again, this time via manage.py , and issue the subcommand runserver .
(env) ~/projects/django-web-app/merchex
→ python manage.py runserver
Watching for file changes with StatReloader
Performing system checks...

System check identified no issues (0 silenced).

You have 18 unapplied migration(s). Your project may not work properly until you apply the migrations for app(s): admin, auth, contenttypes, sessions.
Run 'python manage.py migrate' to apply them.
February 07, 2021 - 17:58:59
Django version 3.1.6, using settings 'merchex.settings'
Starting development server at http://127.0.0.1:8000/
Quit the server with CONTROL-C.
The utility tells you that the development server has started at http://127.0.0.1:8000/. Let’s take a look at that address in the browser.

And the Django site is running!
Take a moment to marvel at the default Django page, and then take another look at your terminal:
...
[07/Feb/2021 18:12:43] "GET / HTTP/1.1" 200 16351
[07/Feb/2021 18:12:43] "GET /static/admin/css/fonts.css HTTP/1.1" 200 423
...
While you browse the pages of your web app, you’ll see log messages appear here in the terminal. These can come in handy for troubleshooting, as you’ll see throughout the course.
Create the Project’s Database
Let’s look back at a message that appeared when we ran the runserver subcommand:
You have 18 unapplied migration(s). Your project may not work properly until you apply the migrations for app(s): admin, auth, contenttypes, sessions.
Run 'python manage.py migrate' to apply them.
What are migrations?
You’ll be learning a lot about migrations throughout the course, but for now, you just need to understand that migrations are a way to set up your application’s database.
Let’s now use the command-line utility to create the database.
In the terminal, type Ctrl-C to stop the server and get back to a prompt:
^C
(env) ~/projects/django-web-app/merchex
→
Run the migrate subcommand:
(env) ~/projects/django-web-app/merchex
→ python manage.py migrate
Operations to perform:
Apply all migrations: admin, auth, contenttypes, sessions
Running migrations:
Applying ...
Now list the contents of the directory, and you’ll see that a database file has been created, called db.sqlite3 :
(env) ~/projects/django-web-app/merchex
→ ls
merchex     db.sqlite3  manage.py
This database will eventually contain all the data for the application, so it’s good that we’ve created it now.
Generate the Boilerplate Code for a Django App
Next, we’re going to create what Django calls an “app.”
That might sound like an odd thing to say - after all, this entire course is about creating an app - a web application. So let’s talk about what an app is in the context of Django.
In Django, an app is a subsection of your overall project. Django encourages you to compartmentalize your overall Django project into apps for two main reasons:
It helps keep your project organized and manageable as it grows over time.
It means an app can possibly be reused across multiple projects.
Now, as this is your first ever Django project, it’s going to be small enough for the code to fit comfortably inside a single app.
Each app should have an appropriate name that represents the concept that it is responsible for. And the first concept we want to track in Merch Exchange is merchandise listings. So we’ll name the first app “listings.”
Let’s create the app now using the startapp subcommand of the command-line utility:
(env) ~/projects/django-web-app/merchex
→ python manage.py startapp listings
As before with the startproject subcommand, it seems like nothing has happened until you look at the project structure:
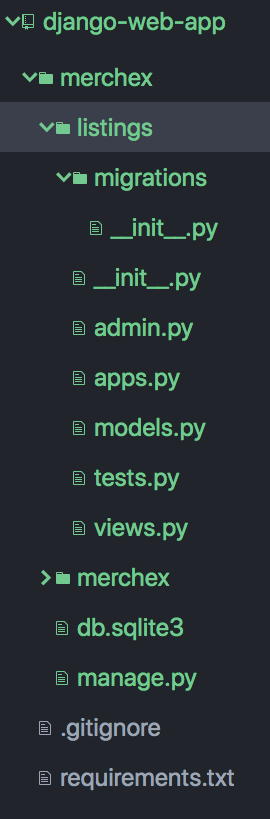
The new directory, called listings, contains several files of boilerplate code. This is the app directory, and it will contain all of the code related to bands.
As a final step in adding the listings app to the merchex project, we need to install the app.
When we generated our project boilerplate code, one of the files created was called settings.py. Open that file now, and find a Python list called INSTALLED_APPS. Then, to the bottom of that list, add the string ’listings’ :
# ~/projects/django-web-app/merchex/merchex/settings.py

INSTALLED_APPS = [
'django.contrib.admin',
...
'django.contrib.staticfiles',

'listings',
]
Great, I’ve installed my app into my Django project! But what are all of those other apps on the list?
By default, the Django boilerplate code installs some useful apps that most projects will probably use at some point. These include django.contrib.admin , which we’ll use later in the course.
So, even though the code you write during this course will fit inside one app, you will still be able to witness the power of including multiple reusable apps inside a project.
Review the Project Structure
We’ve generated a lot of files in this chapter, so let’s take some time to review the project's structure:
django-web-app/ - the root directory of our repo.
.gitignore
requirements.txt - a list of required packages.
merchex/ - the directory containing our Django project, app, database, and command-line utility
manage.py - the Django command-line utility script
db.sqlite3 - the Django database file
merchex/ - the project directory, generated by `django-admin startproject merchex` - the “mission control” of our project
settings.py - project-wide configuration
...and other project-wide files.
listings/ - an app directory, generated by `python manage.py startapp listings`
...app-specific files that we’ll explore throughout the course.
Wow, that’s a lot of information for one chapter! There’s a lot of work in the terminal here, and sometimes it helps to watch it in action - so watch this screencast to make sure you’ve understood.
Let’s Recap!
When starting a new Django project, install the latest version of Django with
pip install django.Generate boilerplate code, initialize your database, and start the development server using the Django command-line utility.
Verify that everything is working as it should be by browsing to the front end of the site at http://127.0.0.1:8000/.
Now that you’ve created a barebones project and app and verified your local environment is ready for development, you’re ready to create your application’s first web page.
