Share Your Data With Context and useContext
Context in React
You’re now going to learn to work with the member of the hooks family that lets you easily use React Context.
What’s React Context? 🤔
Context is a way of easily sharing props between components. It’s native to React, so there is no need to install anything else.
If you took the previous course, you’d have seen how to pass simple props between parent and child components and how to use props to lift state up. But can you imagine what that would be like in a complex application, where to pass a prop to a child component, you’d have to go through dozens of parent components that don’t need it?
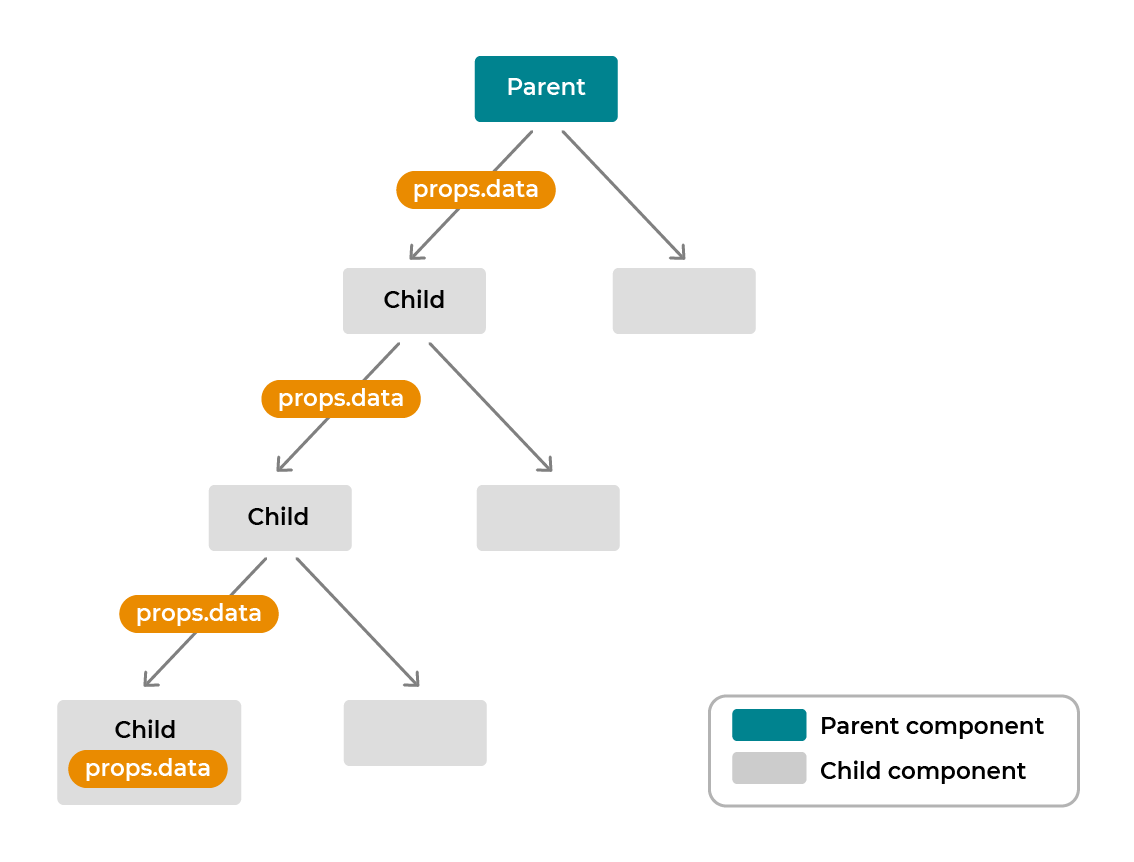
Enter React Context, which lets you get your data without having to pass it manually. To do this, wrap the parent component that is highest up in the component tree with a Provider . All child components will then be able to connect to the Provider , thereby accessing the props without having to go through all of the components in between. These child components are known as Consumers .
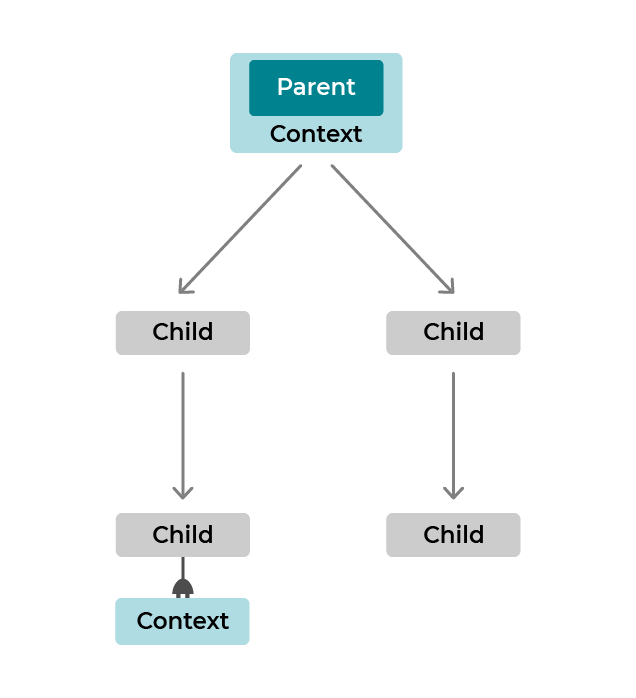
The notion of quickly passing data between components is at the heart of many issues, ensuring code performs well and is readable. In particular, there are many discussions on how to manage state in a comprehensible way that performs well. This is known as state management. Ring any bells?
Before hooks came along, using context was much more difficult. Count yourself lucky that the useContext hook exists! 😍
Get the Most out of Context and useContext
Now that you know what context is, let’s put it to work in the Shiny application.
Set Up Context
What data should we put in the context?
React’s documentation states that “Context is designed to share data that can be considered global,” for example, current authenticated user, theme, or preferred language.
Let’s start by creating a dark mode for the app. As you’ll know, this is a theme using darker colors that gives your eyes a rest when looking at the screen.
To set this up, create a footer in which you add a button. In /components , create a Footer/index.jsx file that works in quite a basic way:
import styled from 'styled-components'
import colors from '../../utils/style/colors'

const FooterContainer = styled.footer`
   display: flex;
   flex-direction: row;
   align-items: center;
   justify-content: center;
   padding-top: 60px;
`

const NightModeButton = styled.button`
   background-color: transparent;
   border: none;
   cursor: pointer;
   color: ${colors.secondary};
`

function Footer() {
   return (
      <FooterContainer>
         <NightModeButton>Switch mode</NightModeButton>
      </FooterContainer>
   )
}

export default Footer
Use this button in the footer to switch to dark mode in the app. Now create the context provider for the theme. To do this, make a folder especially for context in utils/context . Then create an index.jsx file .
To start, import { createContext } from react , and set up the context for the theme with:
export const ThemeContext = createContext()Next use ThemeContext :
export const ThemeProvider = ({ children }) => {
   const [theme, setTheme] = useState('light')
   const toggleTheme = () => {
      setTheme(theme === 'light' ? 'dark' : 'light')
   }

   return (
      <ThemeContext.Provider value={{ theme, toggleTheme }}>
         {children}
      </ThemeContext.Provider>
   )
}
We’ve created a component that wraps the parent component with the theme Provider . The theme state and the function to modify it, setTheme , are passed in the values . This means that all the child components wrapped by the Provider will be able to access theme and setTheme .
It’s now time to use the Provider at the highest level where components will need access to the context. Put it in index.jsx at the /src root . That gives you:
ReactDOM.render(
   <React.StrictMode>
      <Router>
         <ThemeProvider>
            <GlobalStyle />
            <Header />
            <Switch>
               <Route exact path="/">
                  <Home />
               </Route>
               <Route path="/survey/:questionNumber">
                  <Survey />
                </Route>
                <Route path="/results">
                   <Results />
                </Route>
                <Route path="/freelancers">
                   Freelancers />
               </Route>
               <Route>
                  <Error />
               </Route>
            </Switch>
            <Footer />
         </ThemeProvider>
      </Router>
   </React.StrictMode>,
   document.getElementById('root')
)
Does this mean that we have to put the Provider at the level of the router ? 🤔
Well, not necessarily! As its name suggests, context “contextualizes” your data. Certain parts of the application need to know about certain parts of state, while others don’t. It’s up to you to decide where best to put it.
Access Your Data With useContext
But wait, what’s useContext ?
useContext is a hook used for “hooking” from a child component that has been wrapped by a Provider , providing easy access to the shared state.
Let’s give it a go.
First, use the theme to make a very visible modification: changing the background-color across the whole application.
Before, GlobalStyle was in the index.jsx file at the /src root, but now move it into a separate file in /utils/style/GlobalStyle.jsx . You’re also going to change GlobalStyle to a function component that allows you to use hooks (before, it was just a styled-component). That gives you:
function GlobalStyle() {
   return <StyledGlobalStyle />
}
Next, import ThemeContext and useContext with:
import { useContext } from 'react'
import { ThemeContext } from '../context/ThemeProvider'
Which lets you get the theme:
function GlobalStyle() {
   const { theme } = useContext(ThemeContext)

   return <StyledGlobalStyle isDarkMode={theme === 'dark'} />
}
Pass an isDarkModeprop according to the theme activated.
In Style , use it like this:
const StyledGlobalStyle = createGlobalStyle`
   * {
      font-family: 'Trebuchet MS', Helvetica, sans-serif;
   }

   body {
      /* Here this syntax goes back to the same as
      background-color: ${({ props }) =>
      props.isDarkMode ? '#2F2E41' : 'white'};
      */
      background-color: ${({ isDarkMode }) => (isDarkMode ? 'black' : 'white')};
      margin: 0;
   }
`
All that remains now is to tackle the final piece of the puzzle: implementing the button changes modes. ☀️/🌙
So let’s go back to Footer/index.jsx . Just like earlier, import ThemeContext and useContext .
Then get the action toggleTheme and theme with:
const { toggleTheme, theme } = useContext(ThemeContext)You can use it just underneath:
function Footer() {
const { toggleTheme, theme } = useContext(ThemeContext)
   return (
      <FooterContainer>
      <NightModeButton onClick={() => toggleTheme()}>
         Switch mode : {theme === 'light' ? '☀️' : '🌙'}
      </NightModeButton>
      </FooterContainer>
   )
}
Let’s test it out.
Amazing! 🤩
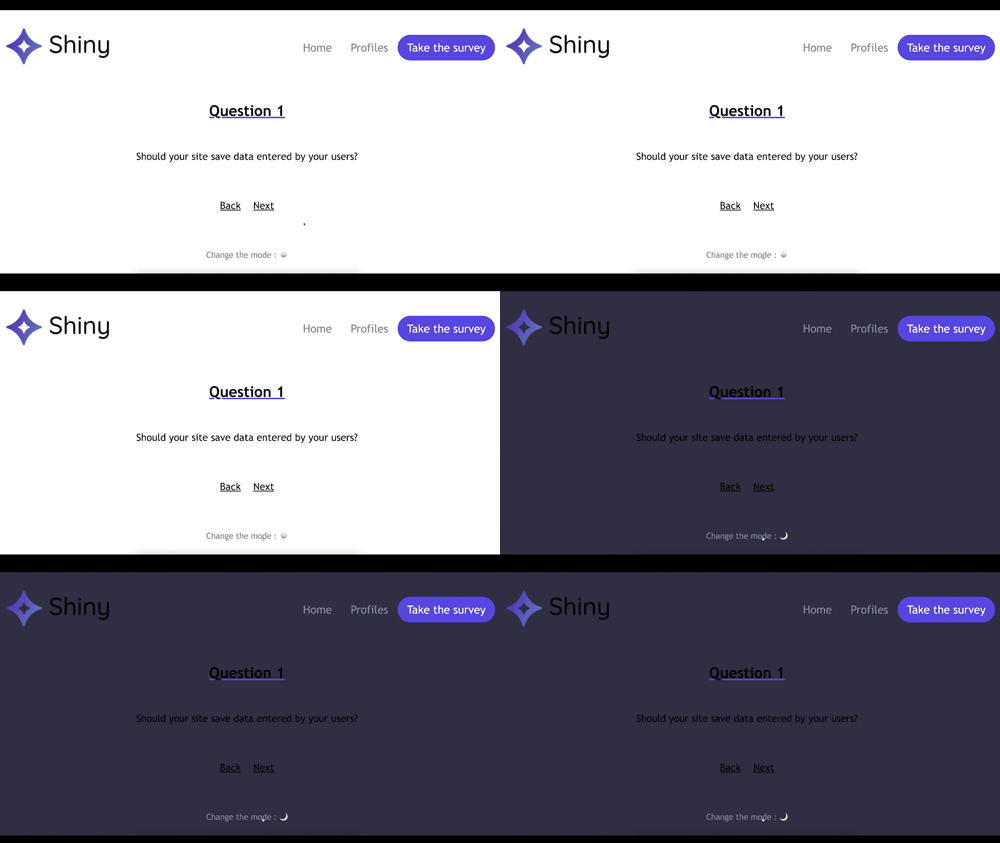
Great work: you’ve just created a context and used it with useContext to create a dark mode in your application. 🎉
As I’ve said, you’re lucky. Before hooks came along, context was much harder to implement. Watch the demonstration below to see how it used to work. 👇
Give It a Go!
 It’s time to put all of this into practice. For this exercise, you’ll use context to get the results of your survey between pages.
Start the exercise on branch P2C2-begin. In context/index.jsx , you’ll find a ready-to-use SurveyProvider .
In /Survey/index.jsx , you’ll find the codebase for storing user responses in the context and buttons for entering responses.
Like in the first course, you’re using the spread operator to store the object. Remember learning that state is immutable in the chapter “Share State Between Different Components”? For this exercise, do the following:
Use
useThemein yourFooter/index.jsx.Use your
SurveyProviderinsrc/index.jsx.Save the results in your state from
pages/Survey/index.jsx.Get the results in
/pages/results.jsxwithuseContext, and display them in a simpleconsole.log().
If you struggle, you’ll find all of the code for the solution on branch P2C2-solution.
Let’s Recap!
Context is a React feature for sharing state between several parent and child components with the help of a provider.
useContextis a hook that lets you easily “hook into” context, thereby accessing shared state.Using context is one method of state management, which can be combined with other methods such as Redux.
So, how was using context in your application with the useContext hook?
In the next chapter, you’ll learn more about hooks by creating your own custom ones. You’ll even see how to create your own useFetch hook to call an API. Sounds like fun, doesn’t it? 😎