Write Modular Code With Components in JSX

In the previous chapter, you learned how to create your first component and how to use that within an HTML form that you turned into a React app. 🥳
It’s now time we looked a bit more closely at components.
Think in Components
It’s only been two chapters, and you're already ready the word components 20 times (yes – I’ve counted 🤓 ). So as you can see, components are fundamental to React.
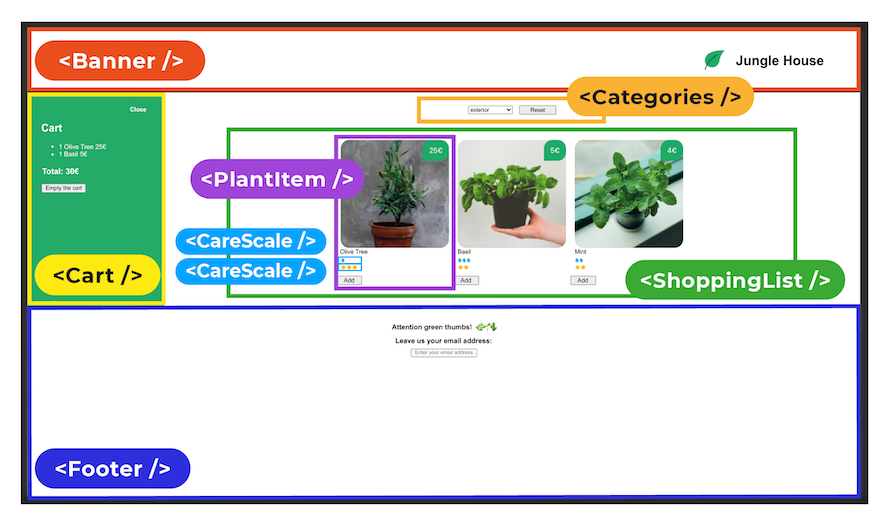
Every interface is made up of different elements: buttons, lists, headings, sub-headings. Altogether, these elements make up a user interface, or UI. Using the mock-up of our plant-shop website as an example, you can see the menu bar, the cart, and each item’s name, photo, and description.
With React, each of these reusable parts is a component. They contain everything they need to function correctly: structure, styles, and behavior (e.g., an action triggered when clicked).
Components mean you can reuse the same data structure, filling it out with different datasets. However many plants you plan to include on the Jungle House site, components make displaying your data effortless. And if in the future, you need to create a new site with the same layout, you can reuse the same component. Are you starting to understand their power?
Therefore, it is every React developer’s mission to split each user interface into reusable elements, all nested within one another. Most components are created by combining other, simpler ones.
Understand What Components Are Made Of
So you just have to write components with the correct syntax, and you have a user interface? 🧐
Well, not quite. Behind each bit of technology, you have a certain logic or methodology - opinions about how things should be done. For this reason, you could call frameworks opinionated. So if you’re going to use React in your projects, you have to do things the way React expects!
You know that HTML is a sequence of instructions that the browser has to follow to build the DOM. React directly modifies the DOM for you: you have to tell it what you want it to do.
Using React.createElement, React first creates elements in the virtual DOM and then warns the DOM when it is being created: “Hey, add an h1 tag with the text Jungle House inside it.”
Here is the translated component from the previous chapter in the CodePen: P1C3 - React component. If you make a console.log of your component, this is what you get:
{$$typeof: Symbol(react.element), type: "h1", key: null, ref: null, props: {...}, ...}
    $$typeof: Symbol(react.element)
    key: null
    props: {children: "Jungle House"}
    ref: null
    type: "h1"
    _owner: null
    __proto__: Object
Header is a React element, created by React. Specifically, it’s a big object. Each component generates trees of React elements and other components that will then be translated into elements in the DOM.
Discover JSX
You’ve seen that elements return objects with a whole set of specific properties and that React creates them with createElement. However, as you might suspect, React developers don’t manipulate these objects directly. Certainly not! Instead, they use JSX.
JSX is a JavaScript extension created by React, which means you can use syntax in the form of tags directly in the JavaScript code.
When you have this:
function Header() {
    return (<div>
        <h1>Jungle House</h1>
    </div>)
}
You can reuse it with <Header /> .
You might think this looks a lot like HTML. It does look similar, but it’s JSX! And yes, JSX is the most easy-understandable way of writing React components in an application, so this method is used almost exclusively. It's a special feature of React: unlike other frameworks where you write enriched HTML, React teams have created JSX, their own JavaScript-based syntax that allows you to mix HTML and JS.
Like HTML, JSX is a markup language. You’ll find yourself using the keys < , > and / quite a lot.
Arrange Your Components
Let’s go back to the <Header /> component. It’s looking a bit lonely up there!
Let’s add a <Description /> component:
function Description() {
    return (<p>The place to buy all the plants you've ever wanted 🌵🌱🎍</p>)
}
And add that to the render:
ReactDOM.render(<Header /><Description />, document.getElementById("root"))What’s going on?! Nothing appears apart from a little exclamation mark surrounded by red. We’ve got an error. 😤
It’s just that two components must always be wrapped in a single parent component.
So, if you write...
ReactDOM.render(<div><Header /><Description /></div>, document.getElementById("root"))...the problem is solved.
React wants you to reuse components. Therefore, you must structure your interface in component trees.
Let’s group Header and Description together in a banner:
function Banner() {
    return (<div>
        <Header />
        <Description />
    </div>
}
See? Everything is working as expected.
It is also possible to encapsulate components and then use them as many times as you want, like this:
<Parent>
    <Child />
    <Child />
    <Child />
</Parent>Manipulate Data Within JSX Components
In React, curly braces { and } are also useful. Use them whenever you’re working with JavaScript expressions.
They allow you to apply JavaScript expressions directly to JSX for:
Doing math:
<div>The answer to life, the universe, and everything is { 6 * 7 } </div>
Modifying strings:
<div>{ alexia.toUpperCase() }</div>
Using ternaries:
<div>{ 2 > 0 ? 'Two is greater than zero' : 'This will never appear }</div>
Rending a JS variable for a string:
<div>{ myTitle }</div>
Rending a JS variable for a number:
<div>{ 42 }</div>
For example, if you put a description text into a variable:
function Description() {
    const text = "The place to buy all the plants you've ever wanted"
    return (<p>{ text }</p>)
}
It renders as expected.
You can apply a JavaScript function on top of this, and put a few emojis afterwards:
function Description() {
    const text = "The place to buy all the plants you've ever wanted"
    const emojis = "🤑🤑🤑"
    return (<p>{text.slice(0, 11) + emojis}</p>)
}
It may not be a great sales argument, but you get the idea!
Give It a Go!
 You’ve learned a lot in this chapter! It’s now time to put all that knowledge into practice. Here is a CodePen link for starting the exercise: P1C3 - Begin. Here’s what you need to do:
Reuse the
Bannercomponent from this chapter displaying the name of our shop. Output the heading in a JavaScript variable: it should initially be written lowercase and then transformed to uppercase with JavaScript.Create a
<Cart />component to appear under the heading.The cart contains three plants: monstera, ivy, and a bunch of flowers.
Create three variables for the plant prices: the monstera costs 8€, the ivy costs 10€, and the bunch of flowers costs 15€. (We'll assume a European market and thus use euros for the currency, but feel free to use your country's currency in your own application!)
The cart contains a list (
<ul>), and each element has the name of the item and the price.The cart total adds up the three prices.
You can find the solution here: P1C3 - Solution.
Let’s Recap!
You’ve reached the end of this chapter on JSX components. 😎 You now know that:
A user interface (or UI) is made up of multiple React components that:
Can be reused – e.g., a button, an item on a list, or a heading.
Group together the structure, styles, and behavior of an element.
Are translated by React into big objects, which are then grafted to the DOM.
JSX is a syntax created by React which allows you to write JavaScript. There are certain rules you have to follow:
Two components must always be wrapped in a single parent component.
Component names must start with a capital letter.
Component tags must be closed.
Congratulations! You’ve completed the first part of this course. You’re now ready to take the first quiz. Give it everything you’ve got!
In the next part of the course, you’ll create your first complete application using Create React App.
