Identify Points of Entry on the Target Server

We’ve seen how you can search for associated targets if your defined scope permits this. We’re now going to turn our attention back to our main target: the application.
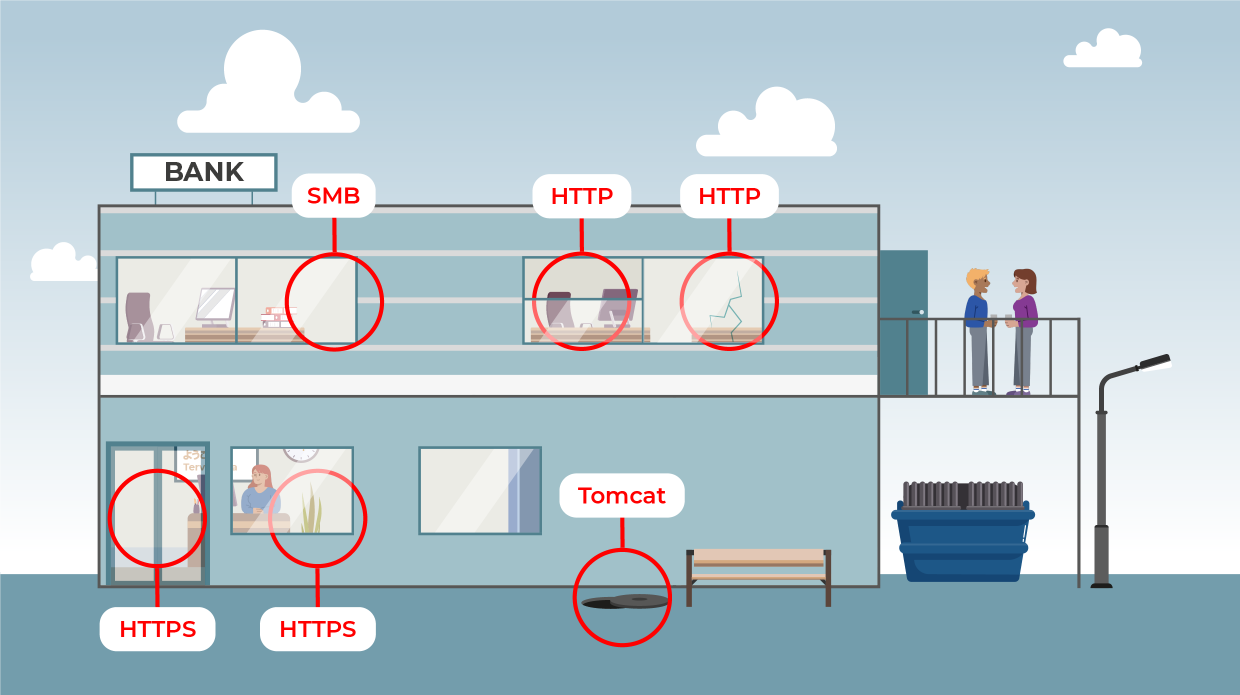
Let’s return to our bank robbery metaphor.
Unfortunately, you haven’t found any branches, premises, or deposit facilities for your target. Everything seems to happen at a single address, in a single building. The only question now is how to get into this building. Through the main entrance? Or is there a service entrance, windows, a skylight on the roof, or pipes you can climb through?
These points of entry into the building where the target is located (inside the bank) are equivalent to the listening services on the host server for the web application we’re testing.
To identify the points of entry, we’ll need to perform a port scan. This is because the server itself won’t tell you which services are exposed to the internet.
Perform a Port Scan
We’ll be using Nmap for our example, as it’s the most widely used. In its most basic form, Nmap is relatively straightforward:
❯ nmap app.preprod.example.com
This command gives us the following result:
Starting Nmap 7.92 ( https://nmap.org ) at 2022-04-22 07:40 AST
Nmap scan report for app.preprod.example.com (<IP_address>;)
Host is up (0.14s latency).
Not shown: 998 closed tcp ports (conn-refused)
PORT   STATE SERVICE
22/tcp open  ssh
80/tcp open  http

Nmap done: 1 IP address (1 host up) scanned in 36.24 seconds
From this first command, we already know a number of useful details:
The host in question is online, as “Host is up” tells us.
Two of the 1,000 most popular ports are open.
It’s probably a Linux server (the SSH port is open).
A web server is listening (port 80 is open).
But what exactly happened when you entered this command?
With its default configuration, Nmap:
resolves the host’s DNS name.
pings the host.
performs a SYN scan if the host responds.
scans only the first 1,000 most popular ports out of a possible total of 65,535.
does not detect the listening service.
This usually has very little impact on newer systems, but it can affect more fragile systems. Remember my anecdote about causing a network outage? Well, this was one of the reasons. Since the requests were never closed, the firewall waited while I continued to fill its connection table, causing it to become saturated.
Let’s examine how this might affect what we’re trying to do:
We’re not being thorough enough (only 1,000 ports scanned out of 65,535 available).
We don’t know for sure which service is behind each port.
To tell Nmap to scan all possible ports, you need to specify this with the-p <ports or range>option.
The syntax of this option is very flexible, but the easiest way to scan all ports is to specify the-p-option, which is the equivalent of-p 0-65535.
Most of the time, you’ll find standard services on the ports where you expect them to be:
SSH on port
22HTTPS on port
443SMB on port
445, etc.
But if the server admins want, they can choose to mix things up and run the SSH service on port 443 and HTTPS on port 22 !
Some IT professionals even recommend changing the default port for administration services (e.g., changing SSH to run on a port other than 22 ). This prevents it from being detected too easily by mass scanning campaigns.
Last but not least, the scans we perform are very conspicuous. If you want to be more discreet, you’ll have to learn a lot more about the tool and port scanning in general! But that’s beyond the scope of this course, so we won’t go into detail here.
Over to You!

Challenge
To take part in this challenge, you’ll first need to create a free account on Root Me.
Log in to Root Me.
Click this link (CTF OpenClassrooms – DVWA) to start or join the environment.
Once on the page, wait for a green box like this to appear:

This will show the address to be scanned, so get started!
Here are your objectives:
Scan the machine to determine how exposed it is and how many ports are open.
Find out which service is listening on port 2121.
Solution
Identify Vulnerable Services
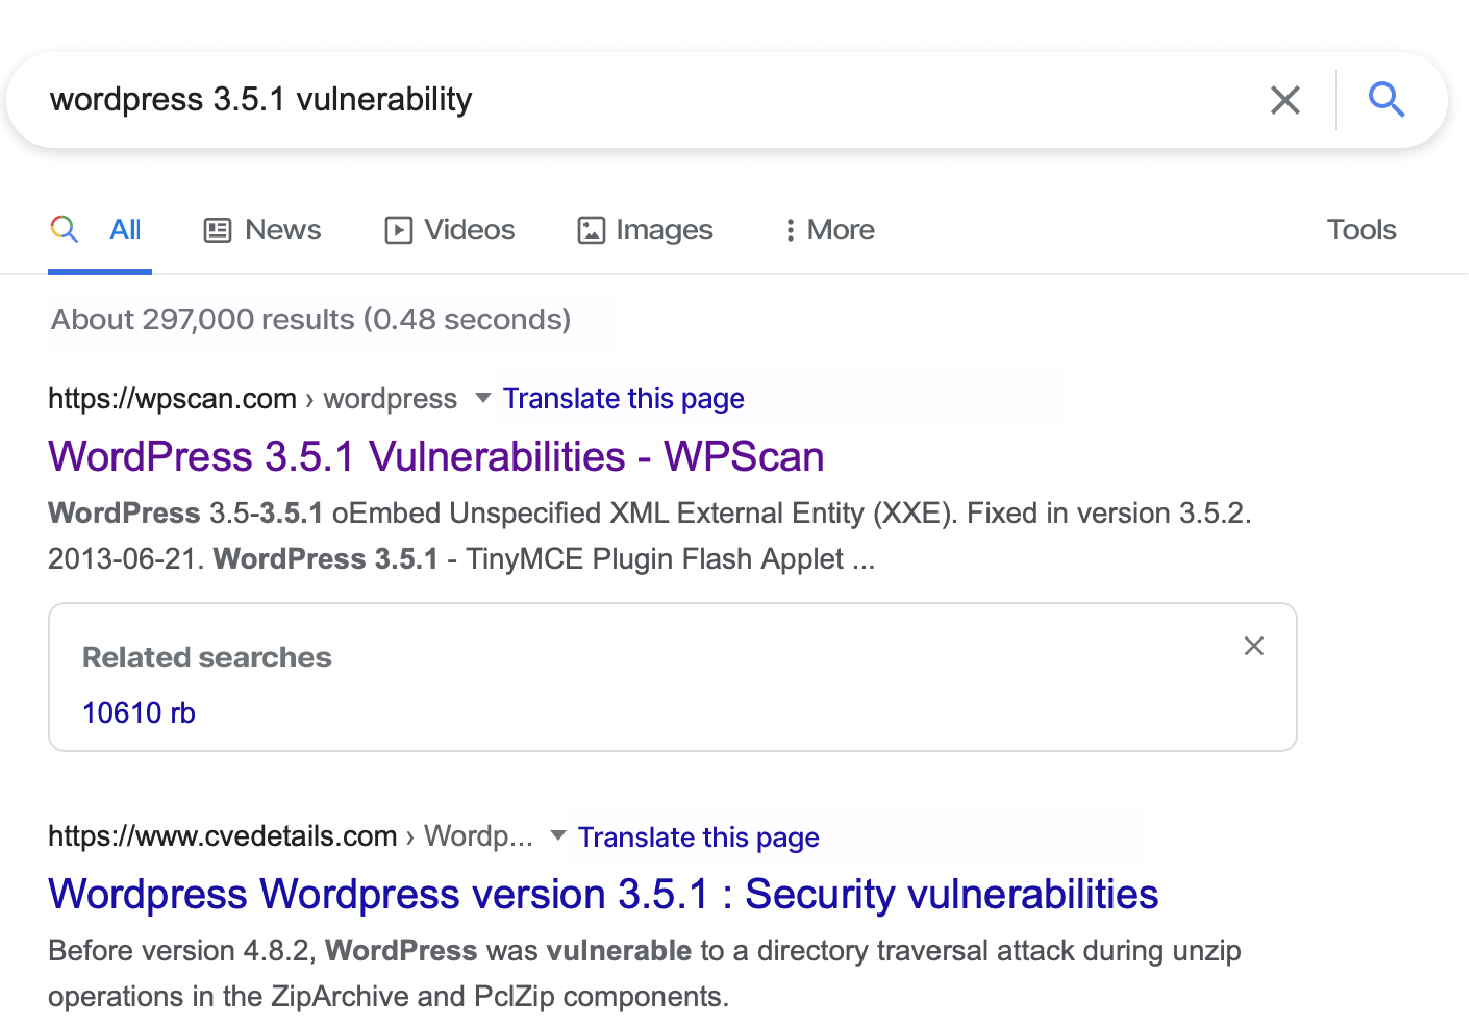
Once we’ve identified the services and their versions using Nmap (or an equivalent tool), we need to find out whether these services are vulnerable. For example, we could type wordpress 3.5.1 vulnerability into the Google search bar to find out what vulnerabilities exist in this version of WordPress.
Google is typically the first place we look. But it’s not a specialized database, so we might miss a vulnerability if Google hasn’t yet indexed the data or if the search is not correct.
You can perform comprehensive searches on the CVE Details site, which provides additional information that may be useful for a pentest, including the vulnerability’s CVSS score (we’ll cover this in part 4) and whether a public version of the executable code exists. However, you have to perform these searches manually, which isn’t very practical when you have lots of services or technologies to scan.
Vulnerability scanners are designed to save you time. They are especially useful for telling you whether the service detected is affected by a vulnerability, and particularly by a CVE. They usually focus on the detected version of the service, but they aren’t limited to that.
These products are very effective for quickly identifying:
whether a service is vulnerable.
whether a public “exploit” exists.
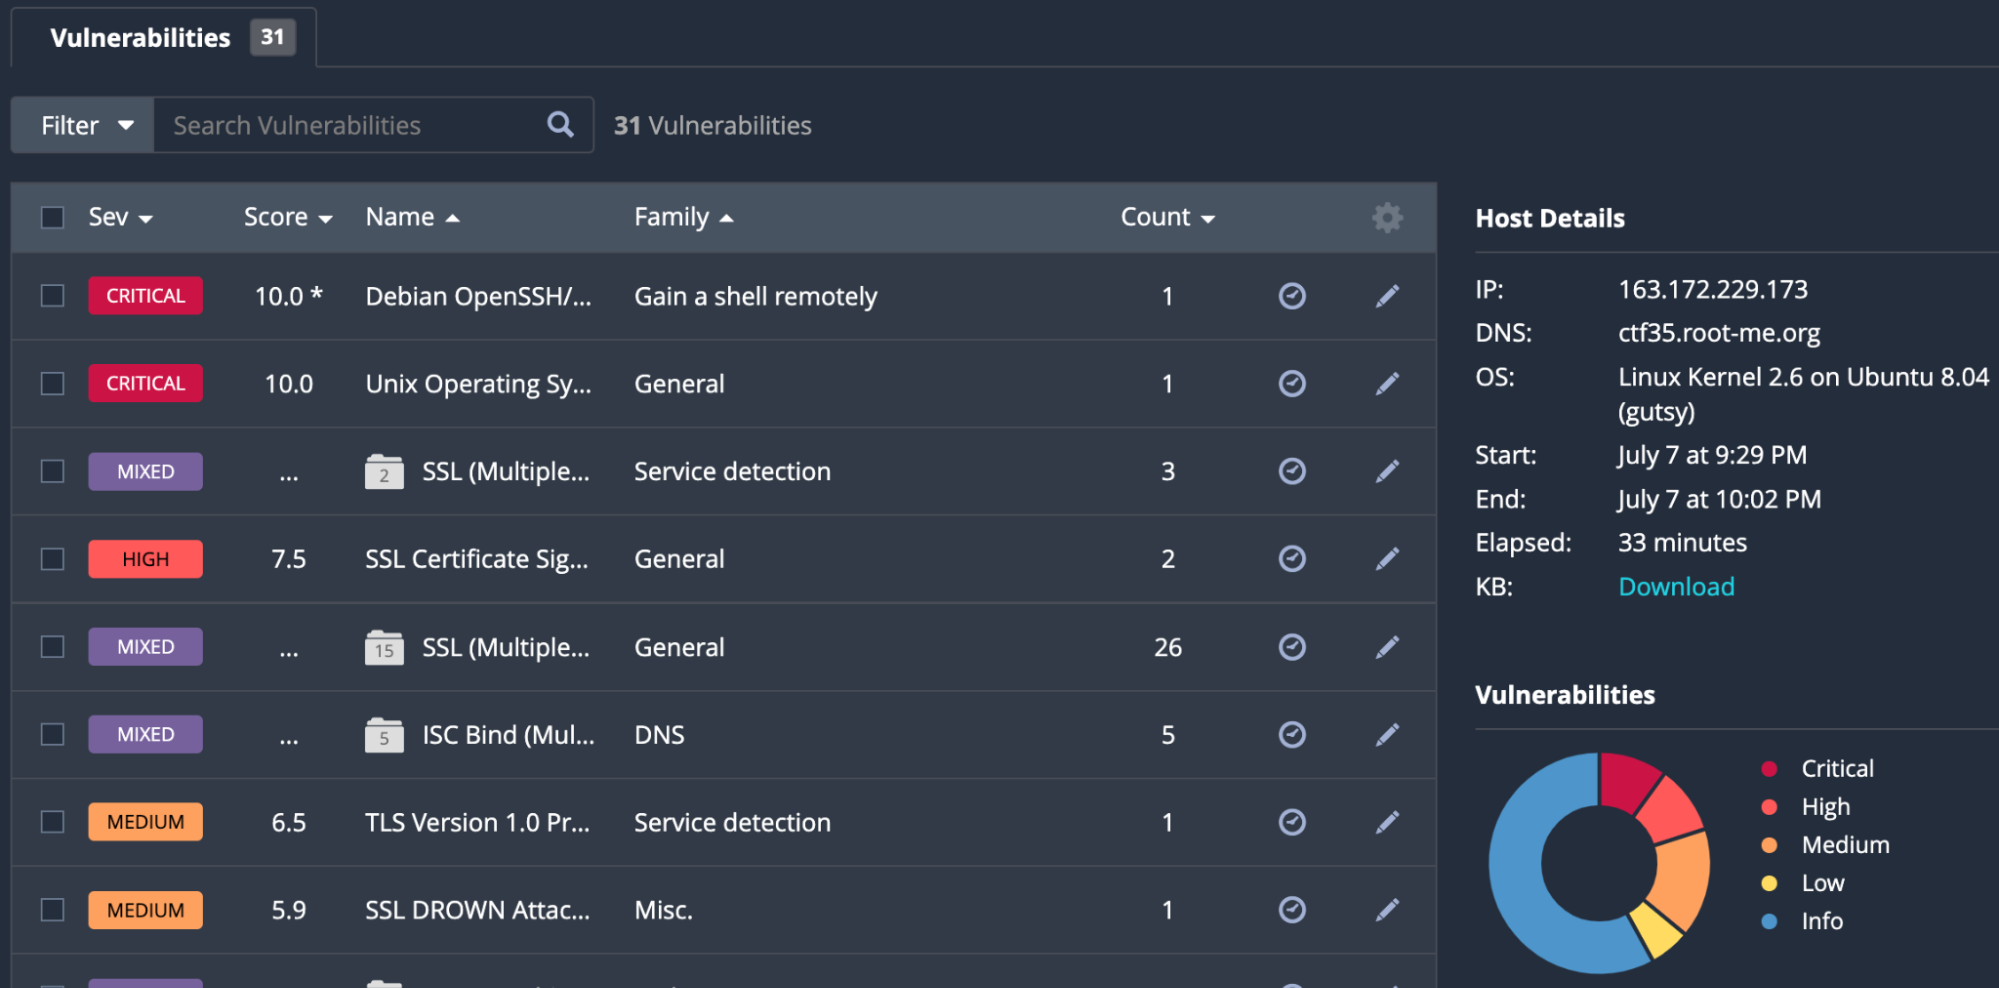
Here’s an example of a Nessus scan on the OpenClassrooms – DVWA VM:

The main tools on the market are the following:
Some of these offer free versions for personal use. In the open source category, Greenbone OpenVAS is the most popular.
These products can also scan web applications and find web-specific vulnerabilities such as XSS and SQL injections, the kind we’ll be looking at later in this course. However, this is not their core function, and they are generally less reliable at detecting these kinds of vulnerabilities. You’ll find out why later in the course.
This is why manual penetration testing, as taught in this course, is still relevant.
Interpret the Results and Reflect on the Exercise
Once you’ve completed the port scan, you need to interpret it. Otherwise, it will be of no use to the client.
Which ports are justified based on the client’s needs?
Are the ports you’ve identified normal, and do they belong on the server? For example, if you’ve identified that port 22 is open, is this normal in your opinion?
By default, no it’s not! For a web application, the only ports required are port 80 (HTTP) and port 443 (HTTPS), unless the application is listening on a non-standard port, but the client will usually tell you this during the scoping phase.
Having an SSH service listening on the server and accessible to the entire internet is not normal and increases the attack surface. What would happen if, tomorrow, someone published a critical vulnerability affecting the service providing the SSH connection? Most likely a massive attack by opportunistic hackers trying to gain access to the server and compromise it, either to steal information or turn it into a zombie for subsequent attacks.
If you’ve carried out a vulnerability scan and identified vulnerabilities, test them to check whether the server is actually vulnerable, as sometimes these are false positives!
Let’s Recap!
A server has many ports (65,535, to be precise) that can host services and even several web services on different ports.
As part of a penetration test, it’s important to know which ports are open to determine the server’s attack surface. Be careful, however, to stick to the scope defined with the client.
To detect open ports from outside the server, you need to perform a port scan.
Network scanning tools like Nmap feature a whole host of options that you need to understand fully to avoid misinterpretation.
Vulnerability scans are very useful for automating and speeding up searches for vulnerable services and components on a target, but these products are generally quite expensive.
Network scans are very sensitive to external factors, such as latency. When you’re performing a scan and want to be thorough, it’s best to take your time.
In the next chapter, we’ll be checking the quality of encryption on encrypted services.
