Verify Your Implementation by Testing Your Tokens
You should test throughout your entire development time with the debugger or adding small test methods to your web application to test functionality.
Set Up Your App for Testing
When you are testing, there are two types of bugs you will need to look out for. There is the obvious and the not so obvious.
Obvious: You build and execute your code, and it won’t compile because you have the wrong syntax or are missing a method somewhere.
Not so obvious: Your code compiles and executes, and then later you find out that when you log in, you end up on the wrong landing page.
One way to avoid many of these bugs is to create test methods for all of your methods during development to make sure everything works along the way. This type of testing is called subcutaneous testing because you are testing a specific functionality or method instead of the entire web application as a whole.
The great thing about the Spring Boot web app is that it already comes included with the test libraries that you need for your Spring Boot app and Spring Security methods. Let’s take a look at our pom.xml file.
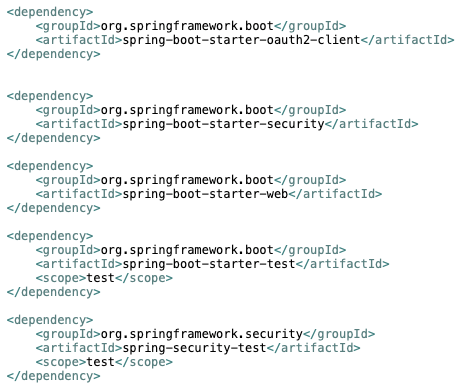
We have OAuth 2.0, Spring Web, and Spring Security dependencies, but did you notice the spring-boot-starter-test, and spring-security-test dependencies?
Using these dependencies, you can use some specially formulated libraries for Spring Web and Spring Security using Java’s JUnit test libraries.
You continuously get updates on your computer because of all the bugs found and fixed daily. Spring is no different. If you go to the Spring Framework GitHub page, you will see there are issues brought up and fixed daily. The framework is continuously changing with new options and updates, so you always have to make sure you have the latest updates on your IDE, especially when you start setting up your test methods.
Let's add the JUnit 5 test libraries:
Add the
junit-jupiter-enginedependency for additional JUnit 5 test libraries.Right-click on pom.xml -> Maven -> Add Dependency.
Type in
junit-jupiter-enginein the search box as shown below:
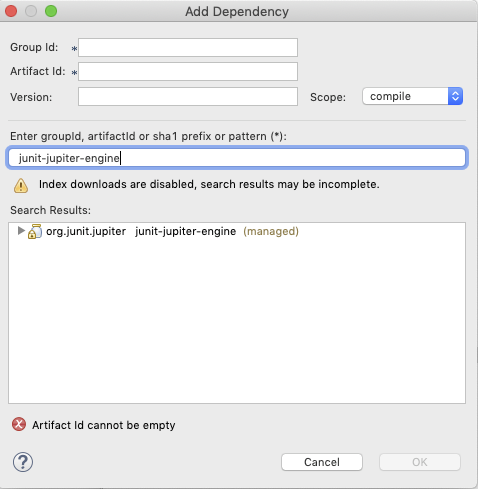
Click on the result for
junit-jupiter-engine, and OK.
The dependency and plugin should show up in your pom.xml file.
Test Your REST Controller With JUnit 5
Remember how I was pulling my hair out when I couldn’t get a homepage to show up after the user logged in? You can use a simple test class to see if your REST Controller opens up using JUnit.
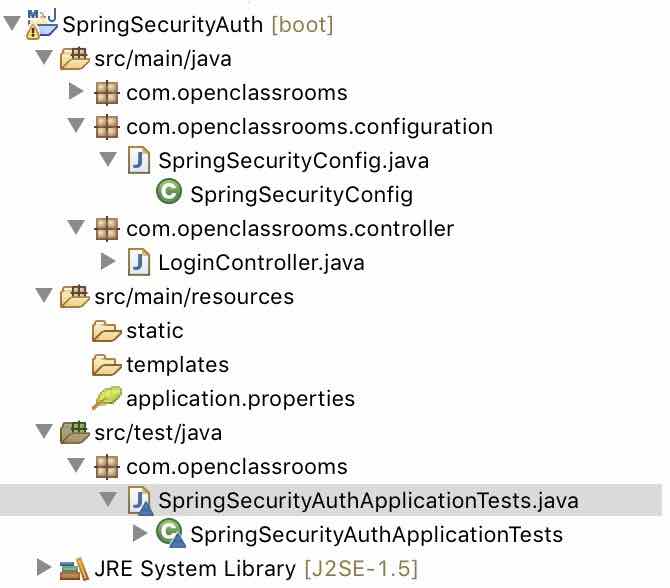
Go to your Project Explorer, and look for the src/test/java folder. It has been created to hold all of your test classes.
You see that Spring Boot has automatically generated a test file. Since the name of my main class file is SpringSecurityAuth, my test class is called SpringSecurityAuthApplicationTests.
Your generated file should look like this:

Notice the import files. Import org.junit.jupiter.api.Test corresponds to a test library in JUnit 5, and will allow you to use the @Test notation to designate your method as a test.
import org.springframework.boot.test.context.SpringBootTest is a test library for Spring Boot MVC applications. This will require the @SpringBootTest annotation.
What is contextLoads() about?
Whenever you open up your Spring Boot web application, you load an instance of the WebApplicationContext, which extends to your ApplicationContext. WebApplicationContext is a library that readies your servlets to create an instance of a web application. The ApplicationContext runs your Spring Boot web application from your main() method in your SpringSecurityApplication.java file. A test like @WebMvcTest injects the dependencies for the web layer and loads the WebApplicationContext. @SpringBootTest integrates your application with the web layer, so it loads both the WebApplicationContext and the ApplicationContext.
This is important to know because if your ApplicationContext doesn’t load, your web application won’t open up at all.
Can you guess what I did wrong in the situation below?
Here is an example of this chaos:

So now let’s test the controller you created by making a small addition to the SpringSecurityAuthApplicationTests.java file.
First, let’s add these imports:
import org.junit.jupiter.api.Test;
import org.junit.jupiter.api.extension.ExtendWith;
import org.springframework.beans.factory.annotation.Autowired;
import org.springframework.boot.test.context.SpringBootTest;
import org.springframework.test.context.junit.jupiter.SpringExtension;
import com.openclassrooms.controller.LoginController;
Notice that I added the import for the controller with the package name (com.openclassrooms.controller), and the class name (LoginController). This is important because you are testing the REST controller in the LoginController.java class.
First, add the @ExtendWith(SpringExtension.class). The @ExtendWith notation adds JUnit 5’s extensive architecture to use for your tests. One of these is the SpringExtension class, which adds the test context. In short, it adds the dependencies to your tests, so you don’t have to. It should look like this now.
@ExtendWith(SpringExtension.class)
@SpringBootTest
public class SpringSecurityAuthApplicationTests {
    @Test
    public void contextLoads()  {
    }
}
You want to create an instance of the BasicController that you can test with the @Autowired annotation. Autowired will implicitly add the dependency injection for you to ensure smooth configuration without manually adding constructor arguments and property tags for the BasicController class.
@ExtendWith(SpringExtension.class)
@SpringBootTest
public class SpringSecurityAuthApplicationTests {

    @Autowired
    private LoginController controller;
    @Test
    public void contextLoads(){
    }
}
Now add the assertThat() method to your LoginController instance to match it to your desired result, which is isNotNull(). This means that when you run the instance of your controller, it should not be null.
package com.openclassrooms;

import static org.assertj.core.api.Assertions.assertThat;
import org.junit.jupiter.api.Test;
import org.springframework.beans.factory.annotation.Autowired;
import org.springframework.boot.test.context.SpringBootTest;
import com.openclassrooms.controller.LoginController;

@SpringBootTest
class SpringSecurityAuthApplicationTests {

@Autowired
private LoginController controller;

@Test
void contextLoads()throws Exception {
    assertThat(controller).isNotNull();
     }

 }
You can run this test on JUnit 5 by right-clicking on the main project -> Run as -> JUnit Test.
When you execute this code, your JUnit result should show in a tab next to your Console tab. A successful test would show no errors or failures.

So that was just a test to see if the controller worked. Let’s create a test of some of the methods for authentication on the default login page.
Test Authentication Using MockMvc
Now let’s look at a test using your login credentials. It’s a good test with the default formLogin() that you can use if you have users connected to a database. You can also create a dummy account to use for testing (remember to remove it for security before it goes into production).
Now route to your src/java/test folder where your other test class is. There should be a package already for your test files. Right-click on that package and New -> Class. You can call it MockMvcTests.
MockMVC creates a mock version of your web app and runs these methods in there, so it doesn’t interrupt the functionality of your web app. It uses the elements of SpringBootTest and JUnit 5, but now you can create an instance of your full web application configuration just for testing.
First, add the annotation for @ExtendWith(SpringExtension.class) and the @AutoconfigureMockMvc. This works best with SpringBootTest because we are testing the integration of the web application with the web server. I want to fine-tune it by injecting the dependencies for the MockMvc.
@ExtendWith(SpringExtension.class)
@SpringBootTest
@AutoConfigureMockMvc
public class MockMvcTests {
    @Autowired
    private MockMvc mvc;

    @Autowired
    private WebApplicationContext context;
}
Now set up @BeforeWith advice to build the mock copy before running the test methods. You need the mock copy of your web application to be created before you perform @Test annotated methods.
We are using the class MockMvcBuilders to evaluate the response codes on your test MVC app. The method is called setup(), and it uses the webAppContextSetup() to add the web layer, apply(springSecurity()) to add the Spring Security filter chain and build() methods to create a new instance of type MockMvc. Basically, this will create a web application you can use for tests.
As you can deduce, the Spring Security filter chain dependency is injected into this instance, hence adding the security ruleset for Spring Security to the MVC instance.
@BeforeWith
public void setup() {
     mvc = MockMvcBuilders
    .webAppContextSetup(context)
    .apply(springSecurity())
    .build();
}
Now let’s add a few methods to test it by creating three methods.
Test the mock object in the web layer.
Test that a correct login authenticates the user.
Test that the incorrect password keeps the user unauthenticated.
These tests use the perform(), andDo(), and andExpect() methods. They all have test response codes that will be fed into MockMvcBuilders to evaluate if its a pass, error, or failure.
The perform() method create a GET request out of the test method. The ResultActions class contains the andDo() to perform a general action, and andExpect() to expect a certain result. The SecurityMockMvcResultMatchers class checks ResultActions methods with the authenticated() and unauthenticated() methods.
Step 1: Test the mock object in the web layer.
@Test
public void shouldReturnDefaultMessage() throws Exception {
mvc.perform(get("/login")).andDo(print()).andExpect(status().isOk());
}
Step 2: Test authentication by adding correct credentials using the authenticated() method.
@Test
public void userLoginTest() throws Exception {
    mvc.perform(formLogin("/login").user("springuser").password("spring123")).andExpect(authenticated());
}
Step 3: Test that incorrect credentials leave user unauthenticated with unauthenticated() method.
@Test
public void userLoginFailed() throws Exception {
mvc.perform(formLogin("/login").user("springuser").password("wrongpassword")).andExpect(unauthenticated());
}
Now check and see if you get a pass for all three of your methods:
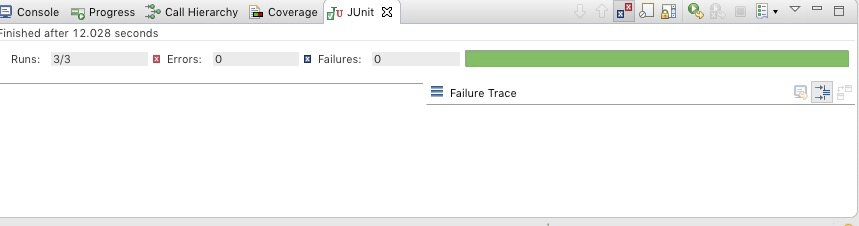
It's all green - nice work!
Let's Recap!
To make sure you do testing right, follow these steps:
Update your dependencies to have the latest JUnit library.
Use Spring Security and Spring Boot test methods.
Test your application and the web layer with SpringBootTest.
Use MockMvc to create a copy of your web application for tests.
Test your authentication using a MockMvc application.
In the next chapter, you will learn a very simple way to customize some of Spring Security's default exception handlers like a pro.
