Identify the Advantages & Applications of OAuth 2.0
Identify What OAuth Does
In the last part, you learned about authentication and authorization. We created a simple login form using Spring Security to show how to create separate pages for role-based access with an admin and a user. That was your initial demonstration on how to use authentication and authorization in-house.
But creating a secure login is easier said than done. Imagine you’re a web application developer for a small e-commerce company, and you have clients who log on and purchase things using their personal data. A majority of data breaches target small companies because they allocate less funding to handling proper data security measures. Wouldn’t it be helpful if you didn’t have to handle the personal data of the clients? Luckily there is a solution to this problem: OAuth!
Now that you’ve rolled that weird acronym off of your tongue, you’re probably wondering what it is:
OAuth is an authorization protocol designed to streamline secure login using stateless encrypted tokens to secure user sessions on a web client application.
Huh? 😨
Don’t worry. You'll learn what each of these technical details means as we progress in the chapter. For now, I'll give you a general idea. 😎
In simple terms, OAuth 2.0 allows your clients to create an account on your web application by logging into an account that belongs to an established company like Google, Facebook, Twitter, Okta, or GitHub. These companies have a select server configured for OAuth to make it possible.
At some time, you've probably registered on a site that allows you to create a profile by logging into your Google or a social media account like Twitter or Facebook.
This web application allows you to create an account with your Google or Facebook credentials. Many people find it easier and quicker to register this way. In this case, Google and Facebook are acting as an identity provider (IdP). An identity provider is used to authenticate and manage a user’s identity.
This sounds like authentication. Why is OAuth called an authorization protocol?
The established companies (ex. Google, Facebook) handle the authentication part on their servers, as identity providers. But when logging on to an app via an identity provider, OAuth delegates permissions within that process.
What do you mean by permissions?
Permissions refer to giving access to information. OAuth allows both the user and the server that manages their login (ex. Google) to authorize what user information the web app is allowed to use. For example, if you’ve already logged in via an external IdP, you might remember seeing some pop-ups asking you about allowing access to user information:
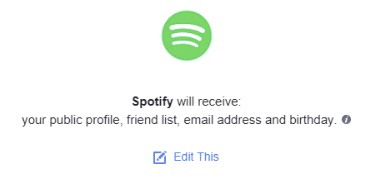
In this case, you permit Spotify to access your public profile, your friend list, email address, and birthday.
Facebook handles the login part, and you don’t have to sign up for another account. You don’t even give that website your Facebook login information. As a developer, you don’t have to worry about setting up a secure database to handle everyone’s login because OAuth is taking care of that.
Now that you’ve got an idea of what it is, let’s take a more in-depth look at how OAuth 2.0 works. Once you understand this, it will be much easier to implement into your code using Spring Security.
Describe the Auth 2.0 Authorization Code Workflow
This authorization protocol has many moving parts, so let’s walk through the actual workflow step by step. There are two types in OAuth 2.0: the authorization code flow and the implicit flow. The authorization flow is a secure workflow for web applications that allows for customization, which is what we'll be using in this course.
The implicit flow works best for single-page applications (SPA) and can be described here.
Step 1: Connect to Facebook Authorization Server
Let’s imagine that you want to login to OpenClassrooms. So far, you’ve encountered two key concepts:
User: That’s you, the person that’s logging into OpenClassrooms with OAuth.
Client: The web application that you are logging into with the ‘Connect to Facebook’ button.
You click to connect to Facebook:
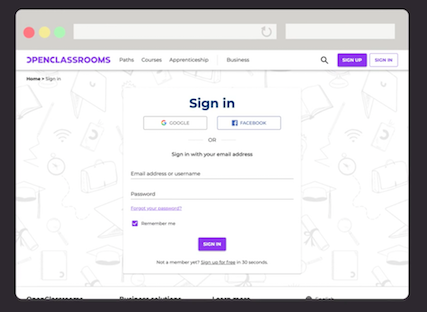
The client sends you to Facebook’s authorization server. The authorization server is the Facebook server that you log into with your Facebook credentials. This server registered with OpenClassrooms (which is why you’re allowed to click on the Log in with Facebook button and have it work).
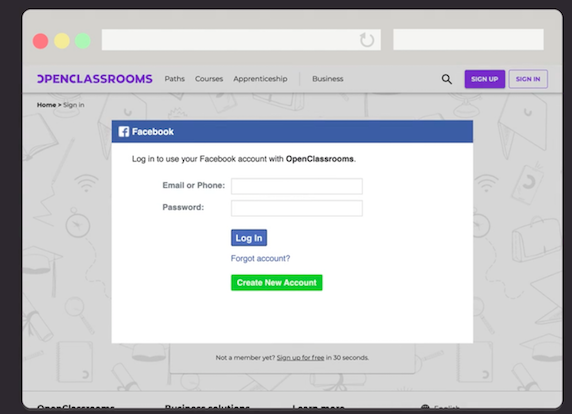
Step 2: Authorize With OAuth
Once you log in with your Facebook login credentials, you get a prompt that says, “Will you allow OpenClassrooms access to your contact list?” This is OAuth making sure that you accept the scope. Scope refers to personal information that the user authorizes for the client (contacts, name, bio, email address, etc.) - otherwise known as permissions! The specific data requested in the scope is called a claim. These claims can be attributes like personal user data, including full name, email address, etc. It can also be specific rights for authorization like read-only or delete access to specific claims like read-only: email.
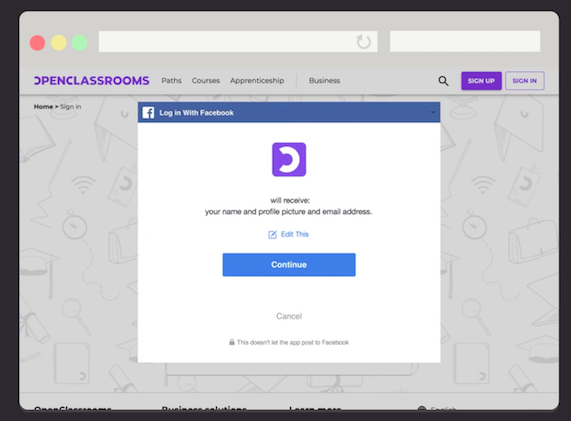
If you answer yes, you will be redirected back to the redirect URI with an authorization code. This is a temporary code that holds your information about your Facebook login.
Step 3: Send an Authorization Code in Exchange for an Access Token
The client sends the authorization code back to Facebook’s authorization server in exchange for an access token with your contact list. This token holds authorization information from Facebook.
Step 4: Validate With the Resource Server
This token is sent to Facebook’s API server, which in this workflow is called a resource server. This resource server checks the information on the access token and grants the client app access to the requested user data.
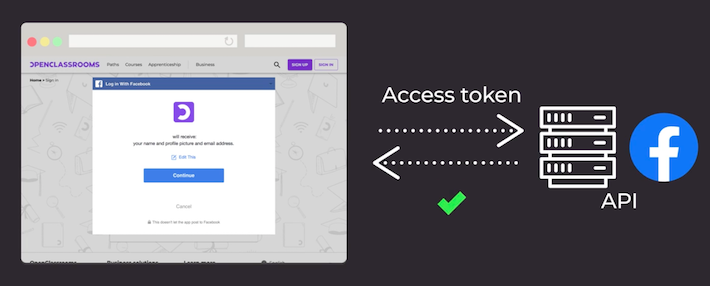
From now on, every time OpenClassrooms checks to see if you are logged in, it validates you and what information you authorized on Facebook’s resource server.
That’s it. You now know how OAuth 2.0 works!
Understand OpenID Connect (OIDC)
While OAuth 2.0 works with external IdPs who provide secure authentication, the OAuth 2.0 process deals primarily with authorization. But what if frenchcheese.crom needed more information like a verified full name and email address?
What's a verified full name and email address?
When you register on specific sites and provide them your email address, your registration is not fully verified until you’ve completed email verification. Usually, you verify once you click on the email verification link, and then you are officially registered. This is one way for an IdP to prove verification of your personal data.
So how does this translate with OAuth 2.0?
OAuth 2.0 is an authorization protocol that returns a principal and grant authority object in an access token to validate you after you’ve logged into the IdP and authorized requested personal data. The principal is information about you that the IdP sends back. The grant authority is an object that allows your client access to some of your data based on what you authorized when logging into your IdP. It also identifies your role on the client web app.
For the client web app, OAuth 2.0 is good for authorization information but doesn’t authenticate you on the client web app. Sure, you’ve authenticated on the IdP, but you haven’t authenticated on the client web app, have you?
How can you fix this problem so the client web app has proven and verifiable information to authenticate you? Enter (drumroll, please) this awesome OAuth 2.0 add-on called OpenID Connect (OIDC). OIDC can tack on the authentication piece that OAuth 2.0 was not able to do.
So how does it work?
Remember how authentication is essentially proving that you are whom you say you are? Well, with OIDC, the client can get your encrypted personal data from Facebook’s resource server like a verified email, hence authenticating you.
This encrypted personal data comes in the form of a Base64 encrypted ID token with the access token sent back to the client web app. The ID token holds protected claim information, which is the requested user details from the OpenID scope.
How is it used? Here are three ways in which OIDC solves the authentication problem by adding security and authentically adding the identity in the external identity provider.
Due to Base64 encryption with the IdP’s private key,
when authentication requires OIDC, a rogue hacker can’t inject false principal information back to the client because the ID token, access token, and refresh token are sent encrypted via HTTPS.The ID token is short-lived, so authentication is continuously verified. The OAuth 2.0 access token stays valid for 24 hours and can be reinstated with a refresh token, which makes it more challenging to keep up with the validity of a user’s authentication. You can change the access token expiration period like this.
OIDC uses very specific scopes to work with OAuth 2.0 scope attributes. They are
openid,profile,email,phone, andaddress. It works with OAuth 2.0 to return this information in a protected part of the access token with the regular OAuth 2.0 authorization request.
Let’s look at an example where an ID token is used to validate that a user is authenticated.
Your enterprise company uses OAuth 2.0 with Amazon Web Services (AWS) as the IdP and single sign-on (SSO) to authenticate users to several company application programming interfaces (APIs). You can use OpenID Connect for SSO, which is used to validate the users on all of the company APIs without having to authenticate several times. The access token is used to validate the users across several APIs and platforms making authentication management secure and simple.
What is an access token vs an ID token?
OAuth uses access tokens because they are more secure than session cookies. Tokens don’t reveal information about the user’s credentials and session information. Access tokens have a username and authorization information. They are not always encrypted or JWT tokens, so buyer beware, they are not guaranteed to be entirely secure.
ID tokens are JWT tokens encrypted with Base64 and an IdP-provided private key. Since the IdP holds the private key, it can only be decoded with the IdP’s permission!
How does adding OIDC change my OAuth workflow?
Here’s how your OAuth workflow looks when you add OIDC
The only things that change are Step 1 and Step 3 from the OAuth 2.0 workflow.
In Step 1, you click on “Log in with Facebook,” and behind the scenes of the OAuth 2.0 workflow with OIDC, the client sends you to the Facebook authorization server with a redirect URI and a scope. This scope is for OIDC and defines specific claims made by the client application.
In Step 3 of the OAuth 2.0 workflow, the client sends the authorization code back to the Facebook authorization server in exchange for the access token. In Step 3 of the OAuth 2.0 workflow with OIDC, an access token is returned to the client with an ID token. This ID token contains the requested claim information.
Now you know about how OAuth 2.0 authorization works and the benefits of adding OIDC authentication!
Let’s Recap!
OAuth is an authorization protocol designed to streamline secure login using stateless encrypted tokens to secure user sessions on a web client application.
OAuth works with identify providers, which handle authentication. OAuth handles the authorization of permissions by the user and the identity provider servers.
OIDC can be added to the scope (permissions) so the client can authenticate the user with an ID token and additional verified personal data - called claims.
I don’t know about you, but I’m ready to code this into my client web app. In the next chapter, we will add the default OAuth 2.0 login form using GitHub, and learn to add on OIDC.
