Create Accessible Multimedia Content
Caption Videos
You may have heard the terms closed captions and open captions. Very likely you’ve come across both on the web.
Closed captions refer to text on a screen that is separate from the video and can be enabled or disabled by the viewer. They function similarly to subtitles, the main difference being that subtitles are usually intended for viewers who speak a different language than those with hearing loss, so they don’t typically include non-speech information.
Open captions are embedded within the video and offer less flexibility because they cannot be turned off or offer different language options.
These days, many video players, like YouTube and Facebook, allow you to automatically add captions to your content. The audio in the video gets processed by speech recognition software and adds it to your video.
The issue with automated captions is that they don’t follow best practices for creating an easy reading experience. They don’t include punctuation, often have incorrect spelling, and sometimes get the text entirely wrong.
The benefit of automated captions is that they do a lot of the grunt work for you. As long as you see it as a very rough draft, it’s a great place to start. But before publishing the video, make sure that you quality check your captions for accuracy, add punctuation, adjust breaking points where needed, and add important non-speech information.
Captioning Best Practices
Ensure captions are accurate. Transcribe the audio verbatim. This doesn’t mean that you need to include every "um" and vocalization in your captions, but don’t edit the written text to the point where it differs from the spoken audio. Especially for people who have some hearing, it can make the captions very difficult to follow. Similarly, make sure that the captions are in sync with the video. Don’t let the text give away what’s going to happen prematurely, or lag behind so that the captions appear long after something has already been said.
Use correct spelling for names and places. Especially for names that sound different from how they are spelled, there is a high chance that the speech won’t be recognized accurately.
Keep captions consistent. Things like line length and style should be consistent throughout the video. Once you’ve picked a particular convention, such as using square brackets to identify non-speech information, stick to it.
Don’t use too much text per screen. Use up to two lines of text and up to 32 characters per line, per screen. We’ve inherited these guidelines from television requirements, and even though the original technical limitations may not apply, staying within these limits will help ensure that people can follow along and that the text doesn’t cover up too much content on screen.
Break up text at logical breaking points.
Don’t separate modifiers from the words they are modifying.
Don’t break lines after a conjunction.
Don’t break auxiliary verbs from the accompanying main verb.
Don’t finish and start another sentence on the same line.
These rules may sound a bit technical, but you would notice if they weren't followed. For example, which of the following is difficult to read?
Their most compelling
discovery was that a robotic arm could be moved by brainwaves.Their most compelling discovery
was that a robotic arm could be moved by brainwaves.
The first example separates a modifier (compelling) from the word it is modifying (discovery), making the reading experience less fluid.
To accommodate the 32 character limit, you should also break up the last line into two. Once again, be mindful that you don’t break up modifiers from the words they are modifying (robotic+arm), or auxiliary verbs from the verbs they accompany (could+moved). The result should look like this:
Screen 1:
Their most compelling discovery
was that a robotic armScreen 2:
could be moved by brainwaves.
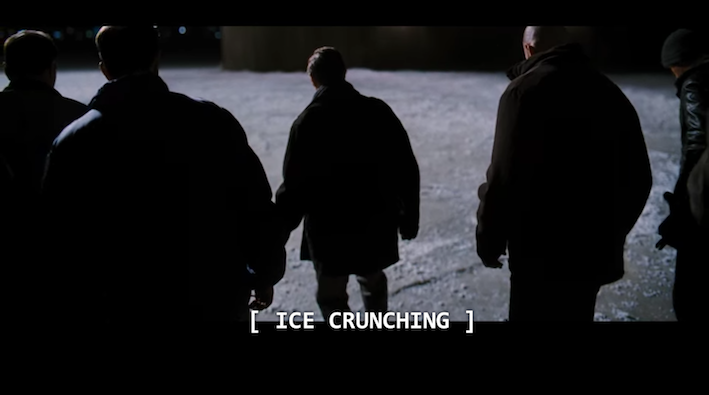
Include important non-speech information. Speech isn’t the only important auditory information. Imagine a suspenseful action scene where a loud explosion is heard off-screen. All of a sudden, people in the film are running and screaming, but without hearing the explosion, it’s not clear why.
For example, in the following scene, a group of men is seen walking onto a snowy surface. You might think they’re just having a stroll. But as soon as you hear the sound of ice creaking under their feet, you realize they’re actually in grave danger.
This auditory information is essential for setting up the scene.
In addition to any speaking, include the following information when it provides important information:
Speaker information. Especially if the speaker is off-screen, specify if it’s the narrator, audience, pilot, etc.
Language identifiers. Either identify the language, such as [speaking in German], or if the language is not meant to be clear to the viewer [in foreign language].
Sound effects. E.g., explosion, applause, siren wails, car honks.
Paralanguage. E.g., laughter, crying, screaming.
Manner of speaking. If the manner is important to the tone, for example [whispering] or [screaming angrily].
Music. Depending on what you want to convey about the music, you may want to include the type of music [melancholy music playing], lyrics [♪ Yesterday, all my troubles seemed so far away ♪], song name [Jimmy Hendrix’s “All Along the Watchtower” playing], or stick to musical notation icons, [♪♪♪].
Provide Transcripts for Audio and Video
Audio Transcripts
Include a transcript to make the content available for users who can’t hear if you have any audio recordings on your site. In addition to the spoken content, include other auditory information, such as the name of the speaker, and other important non-speech information. Audio file transcript considerations are similar to captions. And similarly to captions, you can include information in square brackets to indicate that it is not part of the spoken audio itself, but may still be useful for context.
You can add headings to organize and segment the content. You can also include timestamp information in some cases, but only if it’s necessary.
Describing Visuals in Video
If you’re providing a video transcript for users who can’t see, it’s not the same as just having a transcript of the audio. These transcripts are intended for users who are blind, as well as users who deaf and blind and would perceive the content by using a refreshable braille display. Since the transcript is an alternative to the video, in addition to the spoken content, it should include descriptions of any important visuals, like demonstrations or on-screen text.
You can organize descriptive transcripts in a table format, with audio content in one column, and descriptions of the corresponding visuals in another. It’s easier for users to reference which visuals and auditory information go together, and helps organize the content.
When visuals in a video are decorative and don’t add any relevant information beyond what’s communicated in the audio, a transcript isn’t needed to meet WCAG requirements. But one of the most common failures for this success criterion is when speakers are only introduced through text on the screen, like a lower third. If information about the speaker is only available visually, you will need to provide a transcript. If you consider accessibility from the start of the video creation process, you can ask the speaker to introduce themselves, or have a narrator introduce them. In that case, the visual information will also be heard in the audio, making it available to non-visual users. However, without a transcript, those who use a refreshable braille display will not be able to access the content in the video.
Exercise: Add Captions to a Video on YouTube or Create a Descriptive Transcript
For this chapter, you can apply what you learned in one of two ways (or both if you’re feeling inspired 😊 ):
If you have a video with spoken content that you can upload to YouTube, add captions to it by following the best practices we covered in this chapter. You can start by adding automated captions and then edit and polish them by changing breaking points, adding punctuation, and double-checking spelling. If you’ve never used the YouTube captions editor, start by watching this tutorial: How to Caption Your Videos on YouTube [CC].
Use any video if you don’t have your own content. Choose a video that is 2-3 minutes long, and set up a table (see table format example above) for audio and video descriptions.
Let’s Recap!
Always quality-check automated captions for accuracy and add punctuation.
Follow captioning best practices, such as using logical breaking points and adding important non-speech information.
Provide transcripts for audio content, and add descriptions of visuals to video transcripts.
Now that we have the content covered let’s look at the accessibility of your interactions. In the next chapter, you’ll learn about how to best support alternative navigation and assistive technology users in how you design your interactions.
