Create and use Sass Functions
Using functions
Right now, the heading-shadow mixin has a block of logic that controls how a color is manipulated based on it’s values.
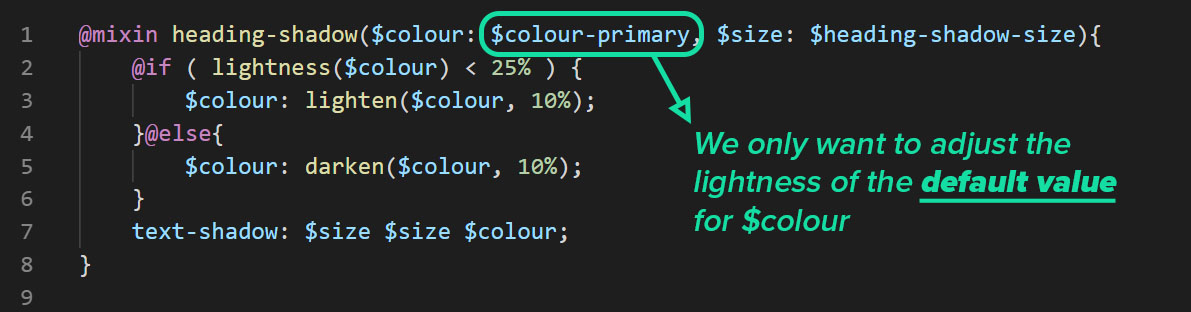
@mixin heading-shadow($colour: $colour-primary, $size: $heading-shadow-size){
    @if ( lightness($colour) < 25% ) {
        $colour: lighten($colour, 10%);
    }@else{
        $colour: darken($colour, 10%);
    }
    text-shadow: $size $size $colour;
}
Everything is working as you’d expect - only it’s not.
Our mixin always adjusts $colour, regardless of whether it’s the default color or one entered manually. But, if you’re keying in a color, it’s probably already one that you chose. What you really want is to automatically adjust the mixin’s default color value in relation to $colour-primary.
To control the lightness/darkness of the default color and not put them in manually, you need to change its value within the variable declaration in the argument. To do this, you need to move the if/else block of code within the argument for$colour:
@mixin heading-shadow($colour: @if ( lightness($colour) < 25% ) {
        $colour: lighten($colour, 10%);
    }@else{
        $colour: darken($colour, 10%);
    }, $size: $heading-shadow-size){

    text-shadow: $size $size $colour;
}
You shouldn't do this, though. It's confusing to look at. Where do the mixin's arguments end and content begin? All those curly braces make things look jumbled. And in reality, you can't do this, even if you wanted to, because Sass will throw an error for invalid syntax.
So, instead of trying to cram a bunch of messy code into your arguments, you should wrap it up into its own container that you can easily plug into the argument. That is called a function. You began using them a few chapters back to manipulate colors, but we never really delved into them in detail.
It's time to put on your goggles and nose plug, because we're about to dive into the deep-end and build your own function!
Making functions
A function is a block of code that performs a task when executed, like darkening a color, or retrieving its lightness, or converting RGB values into hexadecimal: rgb(21, 222,165). That’s right, whenever you write your colors as rgb() in.scss, you’re calling a function. You’ve been using them all along! Have I blown your mind? 💫
Let's take the if/else statement from your mixin and turn it into a function!
@function lightness-shift() {

}
Define a function by using the @function keyword, followed by its name, a pair of parentheses for arguments, and a set of curly braces to contain your code.
And, just like with mixins, you can include arguments. For lightness-shift(), you’ll need to include the color that you want to adjust as an argument:
@function lightness-shift($colour){

}
Now all your function needs is some code to execute! Let’s cut and paste the if/else statement inside the curly braces:
@function lightness-shift($colour){
    @if ( lightness($colour) < 25% ) {
        $colour: lighten($colour, 10%);
    }@else{
        $colour: darken($colour, 10%);
    }
}
You’re 99% done writing your first function. Returning a value is the only thing missing. You need your function to produce a color value that you can pass as your shadow’s default color. Right now, the function only updates the$colourwith a lighter or darker value. But in programming-speak, you want the function to return a new color value.
Forlightness-shift() to return a value, you need to tell the function what you want it to return when it’s executed. Rather than modifying $colour, have the function return the new color value directly:
@function lightness-shift($colour){
    @if ( lightness($colour) < 25% ) {
        @return lighten($colour, 10%);
    }@else{
        @return darken($colour, 10%);
    }
}
When you include @return, you're telling Sass that whatever follows is what you want returned when you invoke the function. So, if the lightness is less than 25%, you want to return a color that is 10% lighter, else you want to return a color that is 10% darker.
Now the function is done! Let’s plug it into our mixin, like when you call one of Sass' built-in functions:
@mixin heading-shadow($colour: lightness-shift($colour-primary), $size: $heading-shadow-size){
    @if ( lightness($colour) < 25% ) {
        $colour: lighten($colour, 10%);
    }@else{
        $colour: darken($colour, 10%);
    }
    text-shadow: $size $size $colour;
}
By encapsulating the if/else statement in a function, we’ve made the code much cleaner and easier to read. And it’s easier to maintain as well. We’ve grouped our logic into a single, comprehensive block, making reading, understanding, and updating the code much more convenient.
Try it out for yourself!
We’ve been using a lot of Sass’ built-in color functions, now let’s make a color function of our own! Rather than shifting the hue of our button when it’s being hovered over, let’s change its background color to a pastel version of the original color.
Pastel colors tend to have a saturation of 100% and a lightness of about 90%. So, we have the “s” and “l” values of the hsl() function, all that’s missing is the hue, which we can extract using Sass’ hue() function.
In this interactive exercise:
Declare a new function using the
@functionkeyword, and give it the name “pastel”Add an argument to our new
pastel()function called$clr, which will be the color that we want to turn into a pastel colorAdd the curly braces after the parentheses
Within the curly braces, declare a variable called
$hueand for a value, assign it the hue of$clrCreate a variable for the saturation of our pastel color called
$sat, and give it a value of100%Create a variable for the lightness of our pastel color called
$light, and give it a value of90%Create a variable for our new pastel color called
$pastel, and use thehsl()function to create its value, passing$hue,$sat, and$lightas its valuesNow it’s time to return our pastel color by using the
@returnkeyword followed by the value that we want to return,$pastelUse our new
pastel()function to set the background color of.btn:hover, passing.btn’s background color of$color-primaryas its argumentTo make the font more legible in the hover state, let’s set the font color of
.btn:hoverto the original$color-primaryvalue
Review the rendered site. When hovered over, the button should turn a pastel, mint-green with the original, bright mint-green of $color-primary as its font color. Check your solution against mine with this CodePen.
Congrats! Writing your own functions is a big deal and an important part of programming. While the syntax may differ between languages, the logic to defining functions is no different than what you’ve just learned. You can apply the techniques from the past few chapters to everything, from JavaScript to Python.
You thought you were just going to be learning how to build web pages, but in reality, you're becoming a solid programmer who specializes in front-end development.
That's pretty cool, right?
Let's recap!
Functions are blocks of code that perform a task when executed.
They provide a way to encapsulate a block of logic in a singular, reusable module, making for a cleaner, and more maintainable, codebase.
Functions are defined using the
@functionkeyword.If you want the function to return a value, you need to specify it by using the
@returnkeyword.
