Install Sass locally
Downloading the project files
We’ve split our Sass into logical chunks using the 7-1 file system, making things easy to locate and maintain. But you can’t just hop onto your machine and start working; right now, the entire project is living in the cloud. So you need to open a browser, navigate, login in, and then load the project. And then you need to have an internet connection to continue working and saving your progress.
What if you wanted to work while you’re on a plane? Or when you have spotty wifi coverage? Or, have it on your machine for the sake it? To do that, you’d need to download all of the source files and install Sass locally, allowing you to recompile your Sass to CSS whenever you make changes.
There’s a slew of different ways to install Sass on your machine, but for the sake of simplicity, we’re only going to cover one. But first, you should transfer the files for the site onto your machine so that you have something to work with.
Once the files have been downloaded, extract them to the directory where you’d like your project directory to live. In my case, I have a directory titled openclassrooms-courses where I’ve extracted my writing-sass project to. All of the files for our site are located inside of the writing-sass directory.
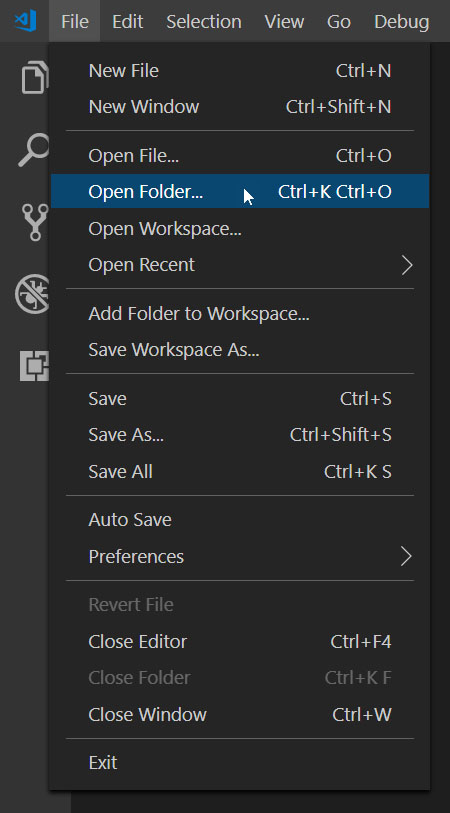
Fire up VS Code and open the project directory, via the “Open Folder” option of the file menu:
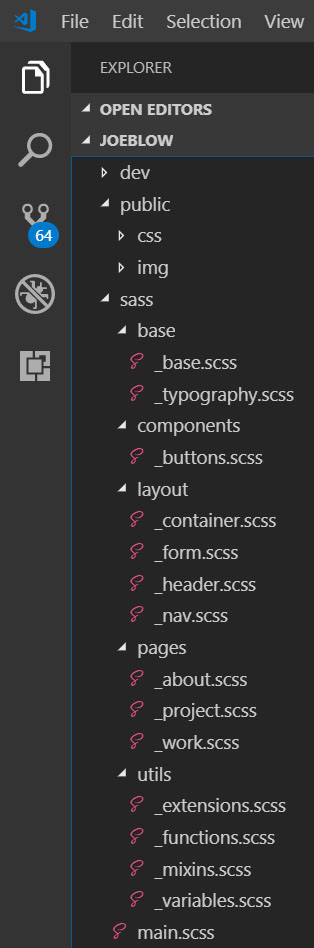
After navigating to and selecting your project directory, you’ll see the projects files in the explorer pane on the left side of VS Code:
If you click around, you’ll see that all of your HTML, CSS and a .scss files are where they should be. Our website now lives on your local machine! Now that you have a website to work on, install Sass.
Getting Sassy in Three Easy Steps!
1. Open a command line
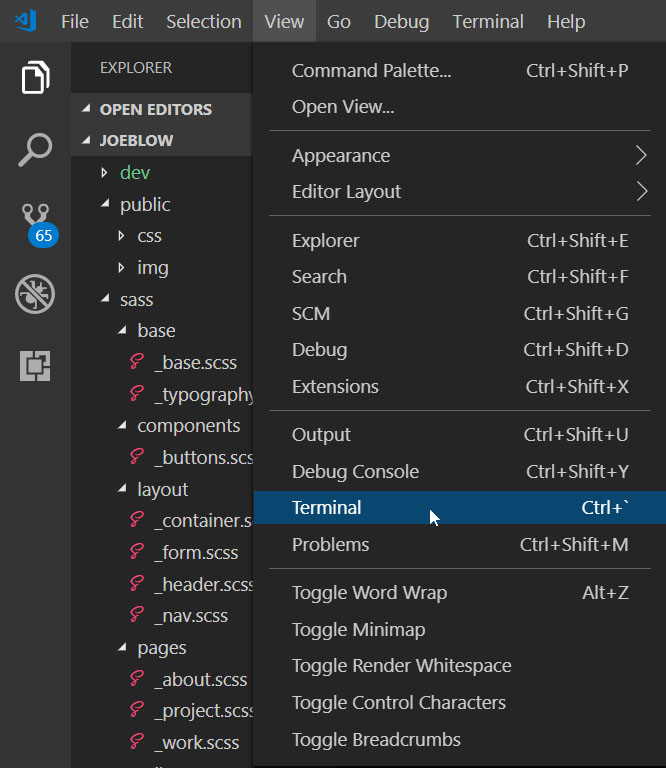
First, you’ll need a command line to make the magic happen. Inside of VS Code, go to View, and then choose Terminal, or use the keyboard shortcut Ctrl + `(the backtick):
And the bottom of VS Code is now occupied by a terminal window!

Step one: open a command line. Check. ✅
2. Initiate a npm package.json file
Now you're ready for step two: initiate a npm package.json file.
A what? 😰
package.json is a file that stores info about your project: its name, version number, author, licensing info, external dependencies, and more importantly, short snippets of code to execute! (Which, henceforth, we shall refer to as scripts). Think of package.json as an instruction manual for npm to use to re-assemble and run the site.
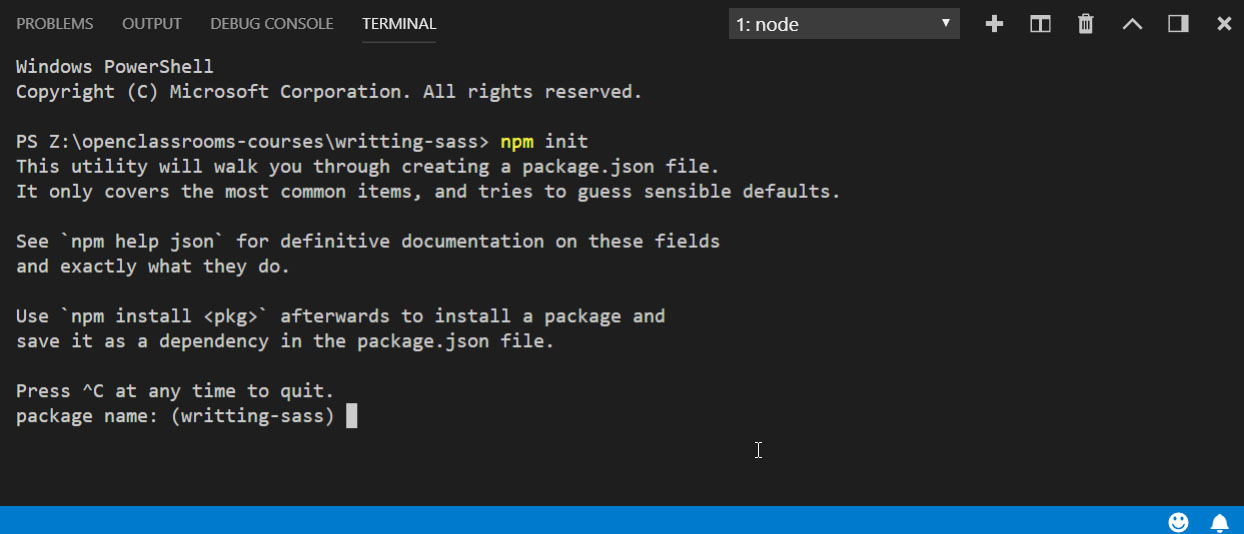
Let’s create a package file by typing npm init :
npm init
The command line will now prompt you for a bunch of info about your project. If you hit enter on any of the prompts without filling anything in, npm will fill it with the default value, which is shown in parenthesis. If there’s no parenthesis, skipping it will leave it blank:
Go ahead and fill in the prompts to your liking. Don’t worry about the git repository yet. Once all of the fields have been filled in, the command line will show you a preview of your package.json, asking you if it’s okay. Hit enter to approve.
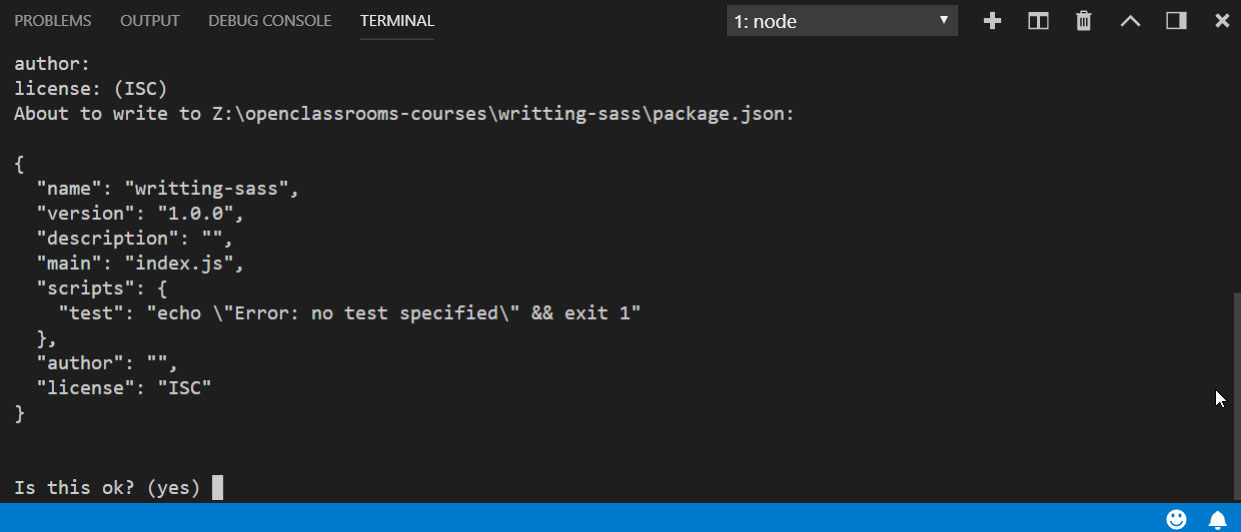
Just like that, a package.json file will appear in the explorer pane on left edge of VS Code. Click on it and check out what’s going on inside!
{
  "name": "writting-sass",
  "version": "1.0.0",
  "description": "",
  "main": "index.js",
  "scripts": {
    "test": "echo \"Error: no test specified\" && exit 1"
  },
  "author": "",
  "license": "ISC"
}
What you have is a JSON object with all of the data just entered. As you install packages, they’ll appear within the dependencies objects.
Okay, initialize a npm package: check! ✅ And now, for the third and final step: install Sass. Finally!
Install Sass
In the command line type the following: npm install sass -g .
npm install sass -g
You type npm to tell the command line that you want to execute npm commands. install is the npm command that you are executing. It will download and install the indicated package(s). In this case, it will install the sass package, along with any dependencies. -g is called a flag. It’s telling npm to install the package globally, rather for only our project. You’ll never need to install Sass again!
To test that you’ve got Sass installed on your system, type sass --version into the terminal:
sass --version
And the command line responds by telling you which version of Sass you have installed. If you'd messed up and didn't install it, you'd have gotten an error message telling you that Sass isn't recognized:

Step three: install Sass. Complete! ✅
🎉🎉🎉
How do you turn this thing on?
Okay. You have Sass installed - now how do you make it work?
You installed Sass via npm, which you can use to run Sass and compile your CSS. Going back to the package.json file, you may have noticed a “scripts” object:
{
  "name": "writting-sass",
  "version": "1.0.0",
  "description": "",
  "main": "index.js",
  "scripts": {
    "test": "echo \"Error: no test specified\" && exit 1"
  },
  "author": "",
  "license": "ISC"
}
This is where you’ll put your script to run Sass. We're not going to be doing any testing, so get rid of the test script and replace it with a new script: sass, followed by a colon and pair of quotes:
{
  "name": "writting-sass",
  "version": "1.0.0",
  "description": "",
  "main": "index.js",
  "scripts": {
    "sass": ""
  },
  "author": "",
  "license": "ISC",
}
Now you’ve defined a script for npm to run called sass, but it’s empty. If you tried running it, nothing would happen. Within the quotes type the following: sass --watch ./sass/main.scss:./css/style.css
{
  "name": "writting-sass",
  "version": "1.0.0",
  "description": "",
  "main": "index.js",
  "scripts": {
    "sass": "sass --watch ./sass/main.scss:./css/style.css"
  },
  "author": "",
  "license": "ISC",
}
Let’s unpack what you’ve just written:
sassis telling npm where to look to find the script to execute.--watchis a flag that npm uses to look for any changes in the Sass file. If it sees a change made, it will recompile and update the CSS file. Without the watch flag, you’d have to run the script every time you hit save. With the flag, it will automatically update as long as you have the script running in your terminal window../sass/main.scssis telling the script located in node-sass where to find the Sass file to compile.A colon
:separates the source path from the destination path../css/style.csstells the script where to compile the CSS to, and what to name it.
You’ve written a script, now it’s time to save the package.json file and fire up Sass! 🤘
In the terminal, type “npm run sass”:
npm run sass
It’s just like when you initialized the package file: npm tells the command line that you want to execute a npm command. run is the command. And sass is the name of the script that you want to run.
A moment later, the command line will echo the contents of the script and then compile your main.scss into CSS:
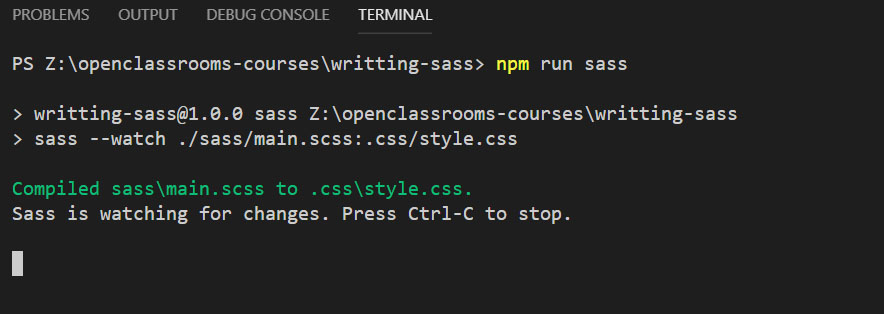
And you’re up and running!
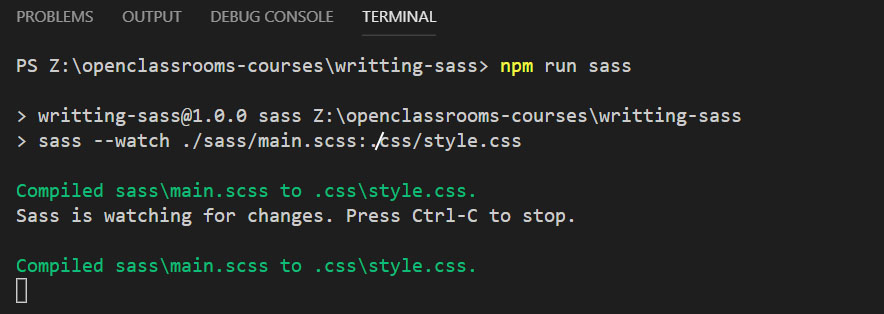
Now, as long as you don’t stop the process, either by typing Ctrl+C within the terminal, or clicking the trash can, the script will wait and watch for any changes to compile. Let’s test it by changing the color in one of our variables and saving.
If everything has worked properly, the command line will note the change, and then let us know that it has recompiled the CSS in green:
But if you make a mistake, such as a typo, Sass will send an error to the command line:
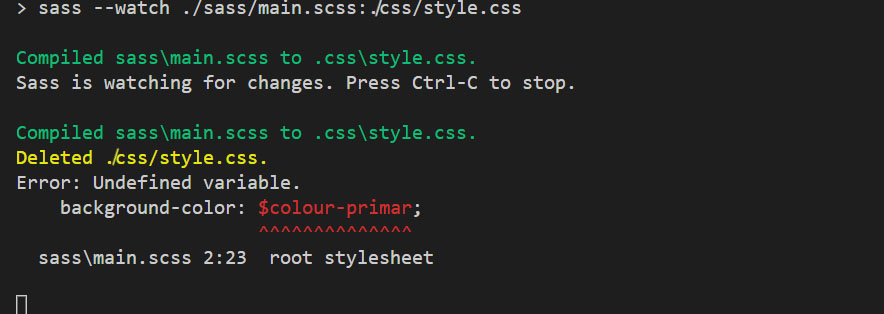
It look's like we missed a "y" at the end of $colour-primary . Let's fix it.

Sass sees that we've updated the file, and attempts to recompile it. This time we've fixed the typo and receive a green "success" message. You now have both the site and Sass up and running on your local machine, and you can work online or offline from anywhere!
Compiler Modes
Open up your newly compiled style.css sheet:
.form {
  width: 100%;
  padding-bottom: 1.5rem; }
  .form__heading {
    width: 100%;
    color: #fff;
    text-shadow: 0.55rem 0.55rem #11af82;
    background: #15DEA5;
    line-height: 5rem;
    padding: 1.5rem; }
  .form__field label {
    color: #D6FFF5;
    display: block;
    font-size: 2rem;
    line-height: 2rem;
    padding-top: 1.5rem; }
  .form__field input {
    width: 100%;
    background: #001534;
    border: 0.1rem solid #15DEA5;
    padding: 1.5rem;
    color: #D6FFF5;
    font-weight: 900;
    font-style: italic;
    font-size: 2.75rem; }
  .form__field textarea {
    width: 100%;
    color: #15DEA5;
    background: #001534;
    border: 0.1rem solid #15DEA5;
    outline: none;
    padding: 1.5rem;
    margin-bottom: 0.75rem; }
It looks a bit different than when we wrote CSS by hand; however, Sass has preserved the visual hierarchy of the nesting from .scss sheets. This is pretty handy, as you can scan through the CSS file and easily find relevant blocks of code.
Sass has four different compile modes, each rendering the CSS in a different fashion. The first, and default, is what you’ve just seen: Nested mode.
The second compile mode is called expanded, and it looks just like the CSS that you would normally write by hand:
.form {
  width: 100%;
  padding-bottom: 1.5rem;
}
.form__heading {
  width: 100%;
  color: #fff;
  text-shadow: 0.55rem 0.55rem #11af82;
  background: #15DEA5;
  line-height: 5rem;
  padding: 1.5rem;
}
.form__field label {
  color: #D6FFF5;
  display: block;
  font-size: 2rem;
  line-height: 2rem;
  padding-top: 1.5rem;
}
.form__field input {
  width: 100%;
  background: #001534;
  border: 0.1rem solid #15DEA5;
  padding: 1.5rem;
  color: #D6FFF5;
  font-weight: 900;
  font-style: italic;
  font-size: 2.75rem;
}
.form__field textarea {
  width: 100%;
  color: #15DEA5;
  background: #001534;
  border: 0.1rem solid #15DEA5;
  outline: none;
  padding: 1.5rem;
  margin-bottom: 0.75rem;
}
Some people prefer expanded over nested simply because it looks a bit more familiar to them.
The third mode is compact. It renders the CSS with one ruleset per line:
.form { width: 100%; padding-bottom: 1.5rem; }
.form__heading { width: 100%; color: #fff; text-shadow: 0.55rem 0.55rem #11af82; background: #15DEA5; line-height: 5rem; padding: 1.5rem; }
.form__field label { color: #D6FFF5; display: block; font-size: 2rem; line-height: 2rem; padding-top: 1.5rem; }
.form__field input { width: 100%; background: #001534; border: 0.1rem solid #15DEA5; padding: 1.5rem; color: #D6FFF5; font-weight: 900; font-style: italic; font-size: 2.75rem; }
.form__field textarea { width: 100%; color: #15DEA5; background: #001534; border: 0.1rem solid #15DEA5; outline: none; padding: 1.5rem; margin-bottom: 0.75rem; }
Compress is a shorter file, requiring less scrolling, and slightly reduced file sizes, but isn’t necessarily very easy to read.
The fourth and final compile mode is compressed. When Sass compiles the CSS sheet in compressed mode, it removes any unnecessary whitespace and line breaks:
.form{width:100%;padding-bottom:1.5rem}.form__heading{width:100%;color:#fff;text-shadow:.55rem .55rem #11af82;background:#15DEA5;line-height:5rem;padding:1.5rem}.form__field label{color:#D6FFF5;display:block;font-size:2rem;line-height:2rem;padding-top:1.5rem}.form__field input{width:100%;background:#001534;border:0.1rem solid #15DEA5;padding:1.5rem;color:#D6FFF5;font-weight:900;font-style:italic;font-size:2.75rem}.form__field textarea{width:100%;color:#15DEA5;background:#001534;border:0.1rem solid #15DEA5;outline:none;padding:1.5rem;margin-bottom:.75rem}The end result is pretty tough to read, but it's also a much smaller file. This is also known as a minified CSS file, and is typically used when deploying the live site. The smaller file size reduces the amount of data that needs to be served and downloaded, making load times faster, while reducing storage and data consumption.
Let’s update the script to compile your CSS in compressed mode!
Flying our flags: compiling in compressed mode
At the end of your script, you need to add a new flag: --style followed by the style that you want to compile to:compressed:
{
  "name": "writting-sass",
  "version": "1.0.0",
  "description": "",
  "main": "index.js",
  "scripts": {
    "sass": "sass --watch ./sass/main.scss:./css/style.css --style compressed"
  },
  "author": "",
  "license": "ISC",
}
After you’ve added the flag, hit to save to update your Sass file and force a recompile:
.form {
  width: 100%;
  padding-bottom: 1.5rem; }
  .form__heading {
    width: 100%;
    color: #fff;
    text-shadow: 0.55rem 0.55rem #11af82;
    background: #15DEA5;
    line-height: 5rem;
    padding: 1.5rem; }
  .form__field label {
    color: #D6FFF5;
    display: block;
    font-size: 2rem;
    line-height: 2rem;
    padding-top: 1.5rem; }
  .form__field input {
    width: 100%;
    background: #001534;
    border: 0.1rem solid #15DEA5;
    padding: 1.5rem;
    color: #D6FFF5;
    font-weight: 900;
    font-style: italic;
    font-size: 2.75rem; }
  .form__field textarea {
    width: 100%;
    color: #15DEA5;
    background: #001534;
    border: 0.1rem solid #15DEA5;
    outline: none;
    padding: 1.5rem;
    margin-bottom: 0.75rem; }
That’s not what we were looking for. It’s still nested! 😭
If you take a closer look at the command line output, you can see where we went wrong:
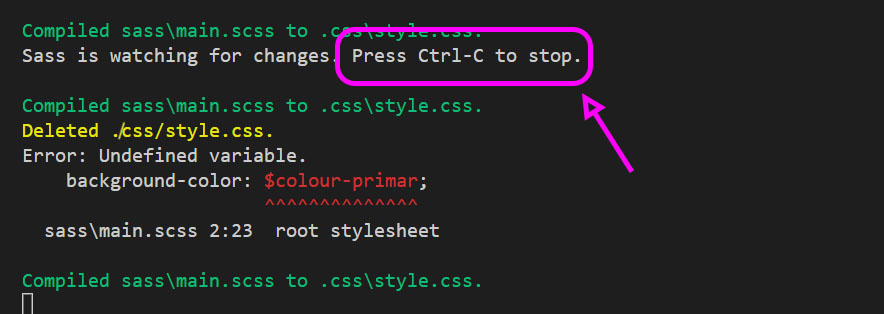
We never stopped the original Sass script. It’s still running!
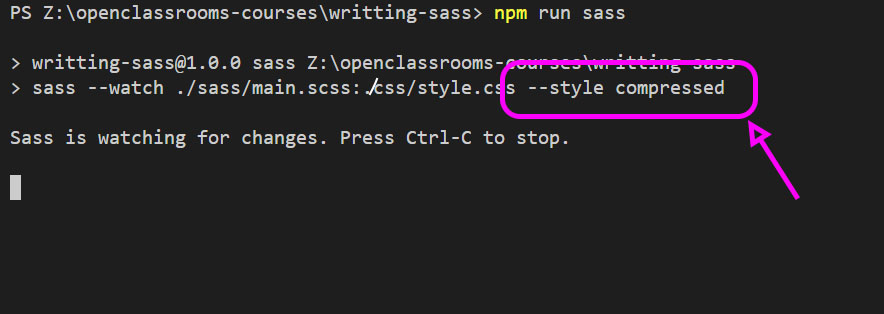
To compile using your newly modified script, you need to stop the old script by pressing Ctrl+C. Then, restart it by typingnpm run sass:
npm run sass
Our Sass script is up and running again, but now it includes our desired output style:
Hit save again and check out the compiled code:
.form{width:100%;padding-bottom:1.5rem}.form__heading{width:100%;color:#fff;text-shadow:.55rem .55rem #11af82;background:#15DEA5;line-height:5rem;padding:1.5rem}.form__field label{color:#D6FFF5;display:block;font-size:2rem;line-height:2rem;padding-top:1.5rem}.form__field input{width:100%;background:#001534;border:0.1rem solid #15DEA5;padding:1.5rem;color:#D6FFF5;font-weight:900;font-style:italic;font-size:2.75rem}.form__field textarea{width:100%;color:#15DEA5;background:#001534;border:0.1rem solid #15DEA5;outline:none;padding:1.5rem;margin-bottom:.75rem}You made it!
Organizing files and installing packages isn’t the most exciting stuff in the world, but it’s important nonetheless. Remember, you spend way more time reading code than writing it, so the cleaner and better organized you can keep your codebase, the quicker and easier it is to locate and understand blocks of code.
Keep this up, and future you is going to be downright smitten with present you.
In the next chapters we get back to the fun stuff; learning about Sass’ more advanced data types, and how to harness them to make your life even easier!
