Build an Isolated Network in AWS
In the previous chapter, we focused on theoretical concepts. Now we’re going to put this into practice by learning how to build a network in an AWS Region, using its different Availability Zones.
You Have a New Job
Today’s the first day of your new job! You’re the new cloud architect for Cat’s Eyes, a company that sells and markets vision products for pets, such as glasses for cats and contact lenses for dogs. The CTO has asked you to build a new network in the cloud, which means you’re responsible for choosing the right architecture to allow the company’s future EC2 instances to run in Amazon Web Services.
Create Your First VPC
Wait, what’s a VPC?
You can easily adapt the configuration of a network within your VPC. We’ll look at this in more detail in this chapter.
When you create a VPC, you need to specify a range of addresses for it in the form of a CIDR (Classless Inter-Domain Routing) block, for example, 10.0.0.0/16. This is the primary CIDR block for your VPC.
AWS recommends creating a VPC with a CIDR block with a /16 netmask (or smaller) of addresses taken from private IPv4 address ranges, as outlined in the RFC 1918 standard so that these can be clearly identified as private addresses which are non-routable outside your VPC by default. You can find more information on the IP addressing mechanism in the course Set Up TCP/IP Networks.
Here are the steps to create a VPC from scratch and add resources to it:
In the Services tab, select VPC in the Networking & Content Delivery section.
Click on Your VPCs and then Create VPC.
Choose a name, then an IP address range, as in this example:
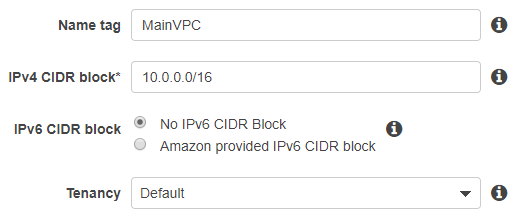
Click on Create.
Your VPC ID will be displayed. Click Close.
Your VPC is now present in the list of available VPCs: 
As you can see, it already has a default route table and a list of default network ACLs—we’ll come back to this.
Create Subnets
A VPC spans all the Availability Zones of a Region. Within a VPC, you can deploy one or several subnets in each Availability Zone.
You’re now going to create four subnets in your VPC.
What’s a subnet?
By default, all subnets are connected to each other. However, this parameter can be modified on-demand via the route tables.
Why create four subnets?
You need four subnets as you want:
At least one public subnet.
At least one private subnet.
A network is distributed between two Availability Zones, so you need to duplicate the above configuration.
Private? Public? What’s the difference?
In Amazon Web Services’ documentation and certifications, you’ll often come across public and private networks. There’s no fundamental difference between these two networks, except that:
A public subnet allows network traffic to be routed to and from the internet.
A private subnet does not allow network traffic to be routed to and from the internet.
Why duplicate public and private subnets?
If you’ve read the paragraph on Availability Zones earlier on in the course, you’ll know that in AWS, an Availability Zone is a separate data center. This means that if an incident affects one of the data centers in a Region, an availability area might become inaccessible. Therefore, to build a high availability network, you should deploy it in at least two different Availability Zones to protect the network in case one of the zones becomes unavailable.
How do I do that?
Don’t worry. You’re about to find out! To start, create a subnet in Availability Zone A. Let’s call this subnet private-a for ease of identification.
The VPC has the block 10.0.0.0/16, which means that it has a 16-bit network mask:
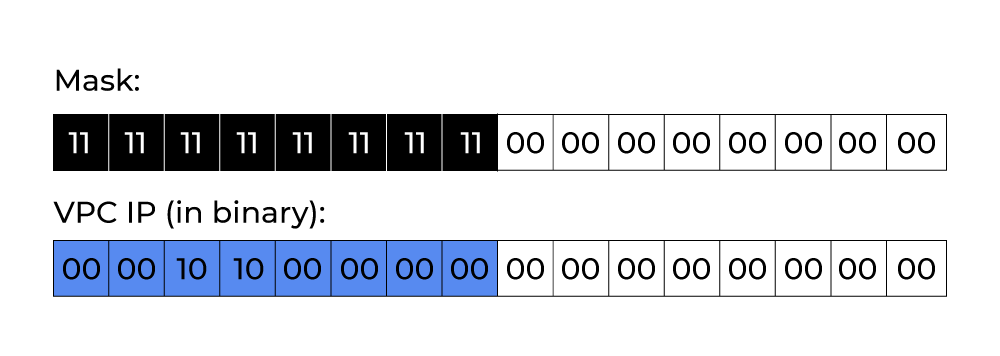
Possible IPs: All IPs in the format "10.0.xx.xx".
This leaves us with 16 bits available, which we’re going to divide up to give us 8 bits per subnet:
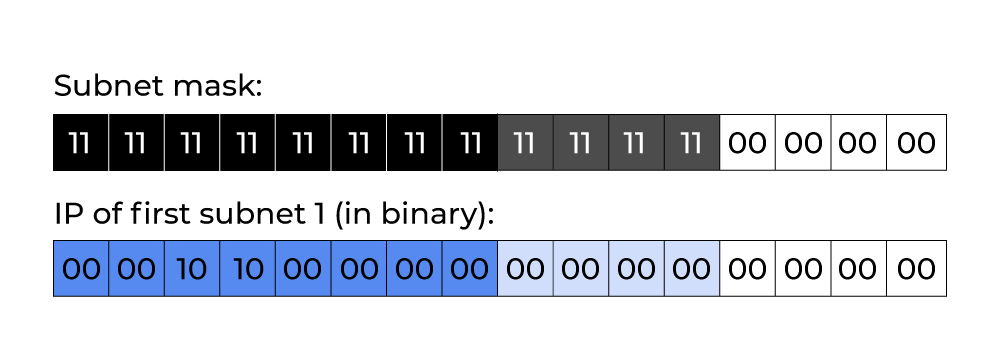
Possible IPs: All IPs in the format "10.0.0.xx".
Here’s how to create this sort of subnet in AWS:
Click on the Subnets button on the left.
Click on Create subnet.
Configure a subnet in the range 10.0.0.0/24, as below.
Click on Create.
Your Subnet ID will be displayed. Click on Close, and you’ll see your subnet appear in the interface.

You might have noticed that the VPC’s default route table and default network ACLs have been linked to the subnet. We’ll come back to this later.
Repeat this operation three times to create the following subnets:
xx-private-b
xx-public-a
xx-public-b
Each subnet should have different and unconnected address ranges (CIDR blocks).
You should see the four subnets appear as below in your subnet inventory:

Here I’ve chosen to number the private subnets starting from 0 and the public subnets starting from 100, but that’s of no importance for the next bit.
For the moment, the only difference between these subnets are the address ranges (CIDR), and none of them are really “public” as no gateways have been linked to the VPC, and there is no routing rule specifying which subnet traffic should be routed to.
Let’s Recap!
A virtual AWS network is known as a VPC (virtual private cloud).
Each VPC can contain many subnets.
A subnet configured to receive external connections is called a public subnet.
