Automate Your Cloud Systems
In the last chapter, you discovered how Auto Scaling groups and load balancers work in AWS. In a business context, you would have carried out all of these steps in CloudFormation.
In this course, you first learned to use the AWS web console to give you a visual insight into the different parts of the process. You’re now going to do all of that again, this time using CloudFormation.
Clean Up!
To start, destroy the resources you created previously, except the disk backup, AMI image, and database (the database contains the DotClear tables, which you want to keep). However, all the rest of the infrastructure will be re-created with CloudFormation. Therefore, you’ll need to destroy:
The Auto Scaling group.
The two launch configurations you created.
The target group.
The load balancer.
The security groups you created.
If it’s still running, the website EC2 instance.
You’re now going to create a stack in CloudFormation (i.e., a list of resources created automatically from code in a file called a template).
Create Your First Stack
In the first part of the course, many entities were created automatically by clicking Next in the web console. With CloudFormation, you have to create them all explicitly. We’re going to start by creating a security group to link to our load balancer.
Go to the CloudFormation service and click on Create Stack. Like in the previous part of the course, select “Template is ready” and upload the following template:
AWSTemplateFormatVersion:  2010-09-09
Description:  >-
  AWS CloudFormation infrastructure Template
Resources:
  WebsiteEC2SecurityGroup:
    Type:  AWS::EC2::SecurityGroup
    Properties:
      GroupDescription:  Website EC2 security group
      SecurityGroupEgress:
        - IpProtocol:  -1
          CidrIp:  0.0.0.0/0
      SecurityGroupIngress:
        - IpProtocol: tcp
          FromPort: 80
          ToPort: 80
          CidrIp: 0.0.0.0/0
      VpcId: vpc-xxx
This template creates a security group that opens port 80 to all IPv4 addresses in the world (0.0.0.0/0). Replace the value vpc-xxx with the ID of the VPC created in the previous step.
You may as well use the name of the VPC as a parameter in your stack. As in the previous part, add a parameter like this:
AWSTemplateFormatVersion:  2010-09-09
Description:  >-
  AWS CloudFormation infrastructure Template
Parameters:
  VpcIdentifier:
    Type:  String
    Description: The target VPC identifier.
Resources:
  WebsiteEC2SecurityGroup:
    Type: AWS::EC2::SecurityGroup
    Properties:
      GroupDescription: Website EC2 security group
      SecurityGroupEgress:
        - IpProtocol: -1
          CidrIp: 0.0.0.0/0
      SecurityGroupIngress:
        - IpProtocol: tcp
          FromPort: 80
          ToPort: 80
          CidrIp: 0.0.0.0/0
      VpcId: !Ref VpcIdentifier
For your future load balancer to direct traffic towards the instances, they must be in an Auto Scaling group. You need to create a launch configuration with CloudFormation to put machines in this group.
Create Launch Configurations with CloudFormation
Add the following code to create the launch configuration. If you really want to do things properly, you can add the AMI ID as a parameter of your stack.
WebsiteLaunchConfig:
Type: AWS::AutoScaling::LaunchConfiguration
Properties:
AssociatePublicIpAddress:false
ImageId: !Ref AmiIdentifier
InstanceType: t2.micro
SecurityGroups:
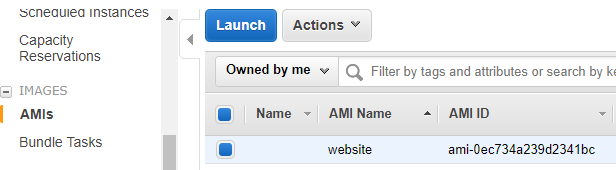
- !Ref WebsiteEC2SecurityGroupNow try to update the existing stack with this new template. To do this, copy the AMI ID from the EC2 service, like below, to enter it as a variable in the stack.
You’ll notice that we haven’t linked access keys to the configuration. This means that the machines will start without an SSH key! If you want to access the machines, you’ll need to enter a public key. In our case, the machine is self-contained, so you don’t need to enter one. As a result, you won’t have access to the machine, and you’ll need to use automated maintenance mechanisms—this is known as immutable infrastructure.
Previously, you added UserData when starting instances and had to make a copy of your configuration to change it. The advantage of full automation is that CloudFormation manages deletion and replacement of the launch configuration, and you no longer have to copy it yourself. Here’s the content of the updated template:
 WebsiteLaunchConfig:
    Type: AWS::AutoScaling::LaunchConfiguration
    Properties:
      AssociatePublicIpAddress:  false
      ImageId: !Ref AmiIdentifier
      InstanceType: t2.micro
      SecurityGroups:
        - !Ref WebsiteEC2SecurityGroup
      UserData:
        Fn::Base64: !Sub |
          #!/bin/bash
          sudo systemctl start httpd
Fn::Base64: !Sub |? What’s that?
It’s a syntax conversion. The content to be sent to UserData is converted into base64, and the result is written over several lines. Here’s the detail of the different functions:
Fn::Base64 encodes an inbound entity in base64.
Fn::Sub concatenates strings by inserting variables. Here, as there are no variables to add, you could also have used Fn::Join.
Fn::Sub is written in the template in its short form !Sub. This makes it quicker to write.
Why isn’t the short form of Fn::Base64 used?
This is a limitation in AWS. You can’t use the short form of these two functions together. The full function name must be used for at least one of them.
Download a complete copy of the template with launch configuration details here.
You’re now going to add the Auto Scaling group and, finally, the load balancer.
Create an Auto Scaling Group With CloudFormation
To create an Auto Scaling group, you must reference the launch configuration and specify the Availability Zones.
You’ve come across Fn::Select, which selects an item from a list, and now you’re going to use Fn::GetAZs to list the Availability Zones in a Region automatically, and !Ref AWS::Region to find the name of the Region where the stack is running.
Now add the following to your template’s code:
 WebsiteScalingGroup:
    Type: AWS::AutoScaling::AutoScalingGroup
    Properties:
      LaunchConfigurationName: !Ref WebsiteLaunchConfig
      AvailabilityZones:
        - Fn::Select:
          - 0
          - Fn::GetAZs: !Ref AWS::Region
        - Fn::Select:
          - 1
          - Fn::GetAZs: !Ref AWS::Region
      VPCZoneIdentifier: !Ref PublicSubnets
      DesiredCapacity: 1
      MaxSize: 1
MinSize: 1You haven’t specified a target group for this Auto Scaling group, so now’s the time to create one for your future load balancer and associate it with the Auto Scaling group.
Create Target Groups With CloudFormation
Creating a target group is relatively simple:
 WebsiteTargetGroup:
    Type: AWS::ElasticLoadBalancingV2::TargetGroup
    Properties:
      Port: 80
      Protocol: HTTP
      VpcId: !Ref VpcIdentifier
You can now modify your Auto Scaling group to specify the target group, like so:
 WebsiteScalingGroup:
    Type:AWS::AutoScaling::AutoScalingGroup
    Properties:
      LaunchConfigurationName: !Ref WebsiteLaunchConfig
      AvailabilityZones:
        - Fn::Select:
          - 0
          - Fn::GetAZs: !Ref AWS::Region
        - Fn::Select:
          - 1
          - Fn::GetAZs: !Ref AWS::Region
      VPCZoneIdentifier: !Ref PublicSubnets
      DesiredCapacity: 1
      MaxSize: 1
      MinSize: 1
      TargetGroupARNs:
        - !Ref WebsiteTargetGroup
Nearly there! All you have to do now is connect a load balancer, and then you’re done! You need to add a security group to allow traffic through, and then write:
WebsiteLoadBalancer:
    Type:AWS::ElasticLoadBalancingV2::LoadBalancer
    Properties:
      Type: application
      Scheme:internet-facing
      SecurityGroups:
        - !Ref WebsiteLoadBalancerSecurityGroup
      Subnets:  !Ref PublicSubnets
  WebsiteLoadBalancerSecurityGroup:
    Type:AWS::EC2::SecurityGroup
    Properties:
      GroupDescription: Website EC2 security group
      SecurityGroupEgress:
        - IpProtocol: -1
          CidrIp: 0.0.0.0/0
      SecurityGroupIngress:
        - IpProtocol: tcp
          FromPort: 80
          ToPort: 80
          CidrIp: 0.0.0.0/0
      VpcId: !Ref VpcIdentifier
Finally, you need to add a listener. This is probably the first time you’ve heard of this, as earlier it was created for you in the web console.
 WebsiteLoadBalancerListener:
    Type: AWS::ElasticLoadBalancingV2::Listener
    Properties:
      LoadBalancerArn: !Ref WebsiteLoadBalancer
      Port: 80
      Protocol: HTTP
      DefaultActions:
        - Type: forward
          TargetGroupArn: !Ref WebsiteTargetGroup
There’s nothing specific to mention about this function—it references the functions created previously.
Download a complete copy of the template with a security group, target group, and load balancer details here.
Let’s Recap!
AWS provides different functions to simplify writing stacks, such as Fn::Base64 and Fn::Sub.
Some of the template’s parameters are managed by AWS, such as AWS::Region. These are called pseudo parameters.
When you specify a UserData in CloudFormation, this has to be encoded in Base64.
You have to explicitly add a listener to the load balancer to allow traffic in.
Security groups should be created for the launch configuration and the load balancer.
You now have an automated infrastructure in AWS, but we haven’t looked at how to maintain it yet. How can you manage backups, monitor the instances, and more? You’re going to find out in the next part, right after the quiz.
