Automate Your Network
You’re just sitting back, coffee in hand, letting the cloud manage the network for you when the CTO of your company, Cat’s Eyes, comes in cracking the whip—he was so pleased with your work that he now wants you to deploy the same thing in another AWS account, immediately! This would have been achievable if you’d automated the creation of your infrastructure… but unfortunately, you didn’t. Never mind! You’re going to see how to automate your network now, and then you’ll be able to replicate it as many times as you want.
In this chapter, you’re going to use CloudFormation, an AWS tool that automates creating and updating AWS infrastructure. You can only use CloudFormation to automate AWS infrastructure; that’s all it’s designed to do. You’ll have to manually destroy the VPC and all the resources you created in the previous chapter, as currently, it’s impossible to import existing infrastructure into a CloudFormation template.
What Does CloudFormation Do?
It provides a language to describe and provision all infrastructure resources in AWS.
It allows you to use a simple text file to model and provision all necessary resources for your applications across all Regions and accounts.
It manages dependencies between different resources for you. For example, it will understand that it needs to create a VPC before trying to attach a gateway.
The Template File
CloudFormation is based on a file that describes your infrastructure: the template file. This template file can be written in JSON or YAML.
Create Your First VPC in CloudFormation
You’re going to start by creating your VPC again but with CloudFormation this time. You need to write the instructions into your template to create the VPC, just like we did when we used the web console.
To create a VPC, write the following code in a text editor:
AWSTemplateFormatVersion: 2010-09-09
Description: >-
  AWS CloudFormation VPC Template
Resources:
  MyAwesomeVPC:
    Type: 'AWS::EC2::VPC'
    Properties:
      CidrBlock: 10.0.0.0/16
      Tags:
        - Key: Name
Value: 'MainVPC'Eek, sounds complicated!
Don’t worry, we’re going to go through it line by line:
AWSTemplateFormatVersion: 2010-09-09 | Represents the version of the language you’re using. This will always be the same until AWS publishes a new version. |
Description: >- AWS CloudFormation VPC Template | These instructions allow you to describe your template for documentation purposes. |
Resources: | Here, you declare that the instructions to follow are resources, i.e., entities to be created in AWS. |
MyAwesomeVPC Type: 'AWS::EC2::VPC' | Declares a resource with the name “MyAwesomeVPC”. The resource type AWS::EC2::VPC tells CloudFormation what type of entity it should create in the cloud. The name of the resource doesn’t correspond to the name that will be visible in AWS but to the name you give the resource, so you can identify it later in your stack. We’ll come back to this later. The spaces highlighted in red at the start of each line help you see how the entities are connected to each other: VPC is a Resource and has a Type. |
Properties: CidrBlock: 10.0.0.0/16 | If you read the previous chapter, you’ll know that this is where you declare the different properties of your VPC, which we filled out earlier in the web interface, particularly the CIDR block of the VPC: 10.0.0.0/16. Note the spaces before the key words: here Properties is a level below VPC, and CidrBlock is a level below Properties. |
Tags: - Key: Name Value: 'MainVPC' | Finally, declare a Name tag, which provides a name for your VPC in AWS. |
Phew, that was a lot of information!
Make sure you save the file with a .yaml file extension.
Now let’s test the template! Download a copy of the template here.
Create Your First Template in CloudFormation
To start, click on Services and find CloudFormation in the Management and Governance section. The CloudFormation interface will open, and you can then follow these steps:
Create a file on your computer and name it infrastructure.yml.
Enter all of the above code in the file and save your changes.
In the AWS web console, click on Create Stack.
Choose Upload a template to Amazon S3.
Select your file, and click Next.
Give your stack a name, such as Network, for example.
Click Next.
You can ignore all the other parameters for the moment and click Next again.
Finally, click Create.
CloudFormation will immediately attempt to run the content of the file and will display the information CREATE_IN_PROGRESS.

Once it’s finished, the message CREATE_COMPLETE will be displayed.
You can check the events below to see how CloudFormation has processed the contents of your template:

If you look at the VPC section, you’ll see that MainVPC has now been created:

Cool, huh? But it’s not finished yet—now you need to deal with the subnets!
Create Subnets in CloudFormation
If you remember, you created:
A public subnet in Availability Zone A.
A public subnet in Availability Zone B.
A private subnet in Availability Zone A.
A private subnet in Availability Zone B.
After taking a quick look at the CloudFormation documentation on subnets, you can add the following information to your template to create your first private subnet in zone A:
PrivateSubnetA:
   Type: AWS::EC2::Subnet
   Properties:
     AvailabilityZone: eu-west-2a
     CidrBlock: 10.0.0.0/24
     Tags:
       - Key: Name
         Value: 'MainVPC-private-a'
VpcId: ???There’s a problem on line 9—you need to enter the VPC ID to associate it with the subnet, but this doesn’t exist yet, as it’s going to be created by your template!
Does that mean we need to make several different templates?
Luckily, no! Remember when I said we’d be coming back to the subject of resources? Well, that time is now!
You are going to use the name of the VPC resource in the template to tell CloudFormation to search for the VPC ID after it’s created and then insert this into the subnet. Confused? Read this closely:
PrivateSubnetA:
   Type: AWS::EC2::Subnet
   Properties:
     AvailabilityZone: eu-west-2a
     CidrBlock: 10.0.0.0/24
     Tags:
       - Key: Name
         Value: 'MainVPC-private-a'
     VpcId: !Ref MyAwesomeVPC
Here, !Ref MyAwesomeVPC refers to the resource above in your first VPC template. CloudFormation will then automatically manage dependencies and create the VPC before attempting to create the subnets, and when it creates the subnets, it will use the number of the VPC it’s just created. You see, it’s not so complicated after all!
Here’s the full code:
AWSTemplateFormatVersion: 2010-09-09
Description: >-
  AWS CloudFormation VPC Template
Resources:
  MyAwesomeVPC:
    Type: 'AWS::EC2::VPC'
    Properties:
      CidrBlock: 10.0.0.0/16
      Tags:
        - Key: Name
          Value: 'MainVPC'
  PrivateSubnetA:
    Type: AWS::EC2::Subnet
    Properties:
      AvailabilityZone: eu-west-2a
      CidrBlock: 10.0.0.0/24
      Tags:
        - Key: Name
          Value: 'MainVPC-private-a'
      VpcId: !Ref MyAwesomeVPC
You can now update the template and check if your subnet has been properly created. Click on the name of the template and click Action, then Update Stack in the top right-hand corner (or Update Stack in the old interface). As earlier, select Upload a template to Amazon S3 and choose your file. Finally, click Next until you get to the end of the dialog prompts.
CloudFormation provides a preview of changes, and you can then click Update.

The stack will display the message UPDATE_IN_PROGRESS and then UPDATE_COMPLETE.
 You can now see that the subnet has been created:

Now all you need to do is add the other subnets to the template!
Download a copy of the template with all subnet details here.
Go a Step Further: Automatically Calculate CIDR Blocks
CIDR blocks are not the easiest thing in the world. Fortunately, there’s a feature you can use to calculate them automatically! CloudFormation provides a set of instructions to simplify repetitive tasks, such as calculating CIDRs. One of these instructions is Fn::Cidr.
Here’s how it works:
Fn::Cidr:
  - ipBlock
  - count
  - cidrBits
Or in its short form: !Cidr [ ipBlock, count, cidrBits ].
For example, to automatically calculate the CIDR 10.0.0.0/24 of private subnet A, you could write:
PrivateSubnetA:
    Type: AWS::EC2::Subnet
    Properties:
      AvailabilityZone: eu-west-2a
      CidrBlock: !Select [ 0, !Cidr [ 10.0.0.0/16, 1, 8 ]]
      Tags:
        - Key: Name
          Value: 'MainVPC-private-a'
      VpcId: !Ref MyAwesomeVPC
Here, the instruction is given to break down the CIDR of VPC 10.0.0.0/16 into an 8-bit sub-block. The instruction !Cidr leads to a table, so the instruction !Select has been added to select the first entity generated (with the index 0).
Even better, you don’t have to write 10.0.0.0/16 out again, as it’s already written in the VPC. You can ask CloudFormation to find the CIDR block of the VPC and use it directly:
PrivateSubnetA:
   Type: AWS::EC2::Subnet
   Properties:
     AvailabilityZone: eu-west-2a
     CidrBlock: !Select [ 0, !Cidr [ !GetAtt MyAwesomeVPC.CidrBlock, 1, 8 ]]
     Tags:
       - Key: Name
         Value: 'MainVPC-private-a'
     VpcId: !Ref MyAwesomeVPC
The instruction GetAtt allows you to retrieve an attribute from an existing CloudFormation resource—in this example, the attribute CidrBlock from the resource VPC.
This feature is one of the more advanced ones you might find in professional CloudFormation templates. It may take some time to understand it fully, so don’t worry if you haven’t mastered it yet! For now, it’s time to move on to NAT gateways, but first, let’s look at Elastic IPs.
Create an Internet Gateway in CloudFormation
To make two of your subnets public, you need a gateway. Following the AWS documentation, you can write the following:
InternetGateway:
   Type: AWS::EC2::InternetGateway
   Properties:
     Tags:
       - Key: Name
         Value: 'MainVPC-InternetGateway'
As before, make sure you keep the spaces at the start of each line! Let’s name the gateway MainVPC-InternetGateway(or whatever you want).
Test your stack and check the gateway—you’ll see that it’s detached. This is because you haven’t yet told CloudFormation to attach it to a VPC.

Then add the instructions:
  AttachInternetGateway:
    Type: 'AWS::EC2::VPCGatewayAttachment'
    Properties:
      VpcId: !Ref MyAwesomeVPC
      InternetGatewayId: !Ref InternetGateway
Don’t forget the spaces at the start of each line. You’ll notice references to resources we created earlier.
But why is this instruction called AttachInternetGateway when it’s not creating a resource?
Good question. In CloudFormation, all the actions you carry out in the AWS account are resources, including actions to attach entities to each other. This means that you have to give them a name in the template, even though they don’t correspond to an “AWS object” to be created. Here, we’ve called this instruction AttachInternetGateway, but you could call it anything you want.
Test your stack by re-uploading the new template, and let’s move on to the next task!
Create Elastic IP Addresses in CloudFormation
If you remember, you created two addresses for your two NAT gateways. As specified in the CloudFormation documentation, you can create Elastic IP addresses using AWS::EC2::EIP. The code should be as follows:
NatEipA:
  Type: AWS::EC2::EIP
  Properties:
    Domain: vpc
NatEipB:
  Type: AWS::EC2::EIP
  Properties:
    Domain: vpc
Remember the spaces! The value of the property Domain will always be vpc.
You now have the instructions to create your two Elastic IPs. Test the deployment of your stack, and we’ll move on to NAT gateways.
Create NAT Gateways in CloudFormation
Let’s refer back to the CloudFormation documentation once again, this time on NAT gateways, and then write the following:
NatGatewayA:
    DependsOn: AttachInternetGateway
    Type: AWS::EC2::NatGateway
    Properties:
      AllocationId: !GetAtt NatEipA.AllocationId
      SubnetId: !Ref PublicSubnetA
      Tags:
        - Key: Name
          Value: MainVPC-nat-a
Again, remember the spaces! This creates a NAT gateway in public subnet A, using the reference retrieved by Ref. You can use GetAtt to find the allocation ID of the Elastic IP so that the NAT gateway can use it.
Hang on! What’s this new instruction, DependsOn?
Remember that the Ref attribute provides references which CloudFormation uses to determine the order in which it should create resources. Well, sometimes you might want to create certain resources before others, but without linking them, as they won’t need to refer to each other. This is the case here.
To create a NAT gateway in a VPC, you have to have the following prerequisites:
A subnet.
An Elastic IP.
An internet gateway attached to the VPC.
As there are references to a subnet and an Elastic IP, CloudFormation knows it needs to create them before trying to create the NAT gateway.
The solution is to tell CloudFormation to wait for the internet gateway to be attached, using the instruction DependsOn.
Test the code and try writing the second NAT gateway in public subnet B on your own. Once you’ve finished, we’ll configure routing.
Create Route Tables in CloudFormation
You still have one important part to configure, and then you’ll be done! Remember, you need to configure routing as follows:
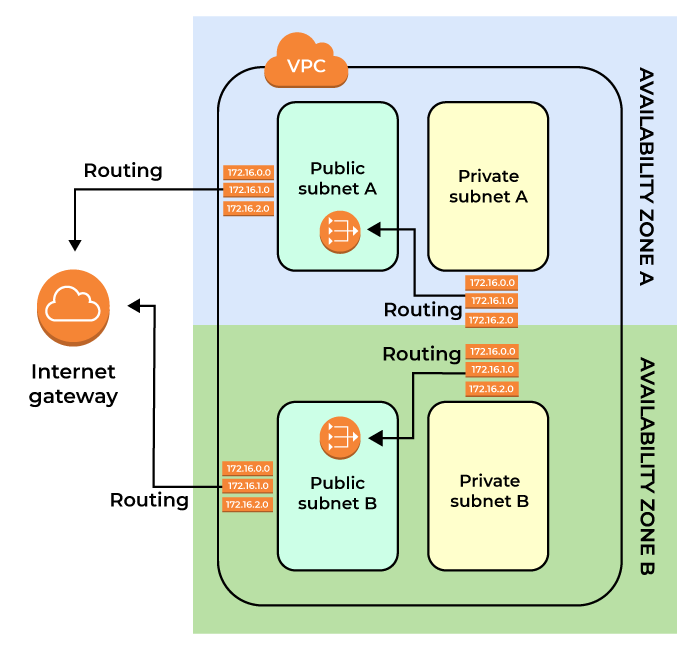 This corresponds to the following resources:
A route table for the private subnet of Availability Zone A, pointing to the NAT gateway of Availability Zone A.
A route table for the private subnet of Availability Zone B, pointing to the NAT gateway of Availability Zone B.
A route table for the public subnet of Availability Zone A, pointing to the internet gateway.
A route table for the public subnet of Availability Zone B, pointing to the internet gateway.
So, you need to create a total of four route tables, attached to the right subnets and containing the relevant instructions.
The commands for creating a route table are fairly simple. Here are the instructions for public subnet A:
PublicRouteTableA:
  Type: AWS::EC2::RouteTable
  Properties:
    VpcId: !Ref MyAwesomeVPC
    Tags:
      - Key: Name
        Value: MainVPC-route-public-b
But we haven’t provided the subnet to be attached! Don’t we need to do this?
Well spotted! But this information requires another resource, AWS::EC2::SubnetRouteTableAssociation, written as follows:
AttachPublicRouteTableA:
  Type: AWS::EC2::SubnetRouteTableAssociation
  Properties:
    RouteTableId: !Ref PublicRouteTableA
    SubnetId: !Ref PublicSubnetA
What about the routing instructions?
You need yet another resource for this. Here’s how to create a route to the gateway in the routing table for private subnet A:
PublicRouteA:
   Type: AWS::EC2::Route
   Properties:
     DestinationCidrBlock: 0.0.0.0/0
     GatewayId: !Ref InternetGateway
     RouteTableId: !Ref PublicRouteTableA
Now it’s over to you to create the other route tables and their routes. Make sure the private route tables point to the NAT gateways corresponding to their subnet.
Download a complete copy of the template with all subnet details here.
And that’s all there is to it. Now let’s see how you can do even more with the contents of the template file.
Add Input Parameters to Your Stack
When you create a CloudFormation template, you often want it to be generic, for example, something you can use several times with just a few changes to the parameters. So far, to change the VPC’s address block, you’ve had to edit the file, but it would be much more practical if you could just enter the information into CloudFormation directly instead.
CloudFormation allows you to input variables into your template! To do this, you need to specify in the file that you’re expecting parameters. For example:
Parameters:
  VpcCidrBlock:
    Type: String
    Default: 10.0.0.0/16
    Description: Enter the main VPC CIDR block.
Above, we’ve declared that the template expects to receive an input parameter called VpcCidrBlock. This parameter is a variable specified by the user while the template is running. You need to use the Ref attribute so the template can use the value provided by the user as follows:
MyAwesomeVPC:
  Type: 'AWS::EC2::VPC'
  Properties:
    CidrBlock: !Ref VpcCidrBlock
When the stack is implemented, CloudFormation asks you to provide this value:
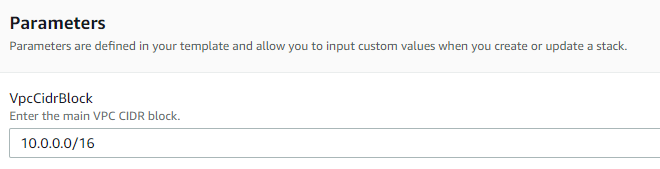
When this value is entered, CloudFormation updates the VPC and its associated resources.
Understand Common Problems
Sometimes, something might go wrong when creating a stack. In this case, CloudFormation will display an error code. Here are a few examples:
Code | Description |
CREATE_FAILED | Failed to create one or more stacks. |
DELETE_FAILED | Failed to delete one or more stacks. |
ROLLBACK_FAILED | Failed to remove one or more stacks after a failed stack creation or an explicitly canceled stack creation. |
UPDATE_ROLLBACK_FAILED | Failed to restore one or more stacks to a working state after a failed update. |
Let’s Recap!
CloudFormation is an infrastructure as code tool.
CloudFormation supports the languages YAML and JSON.
All resources that can be used in JSON with CloudFormation can also be used in YAML.
A CloudFormation template should include the instruction AWSTemplateFormatVersion: 2010-09-09 in the heading.
You can use the keyword Ref to reference CloudFormation resources.
You can return the value of attributes in your stack using the keyword GetAtt.
You can declare explicit dependencies using the keyword DependsOn.
