Test Your Newly Assembled Computer

Prepare for Testing
You’re almost done!
Before powering on the computer for the first time, check the seating of all internal cards and devices, and make sure all internal power leads are in place.
Don't close up the case for your first test, but note that it will affect airflow (cooling) inside the PC, so don’t leave the PC running longer than necessary.
To get things ready:
Unpack and set up one of the computer monitors. Connect it to power and fit a data lead to the PC. If there is more than one graphics port, check its manual to see if one is the primary port. Often it doesn’t matter.
Plug the keyboard and mouse into USB ports. Don’t use the USB hub (if any) at this time as you’ve not tested it yet - it’s best to use the minimum amount of add-ons until you know the main computer is working OK.
If present, make sure that the manual power switch on the back of the PSU is in the off position.
Connect the PSU to main power using the lead provided.
Switch on the display.
Switch on the PSU, checking for any problems with any component.
The PC might power on at this time. If not, press the power button on the case to start the PC.
Recheck for any unexpected behavior.
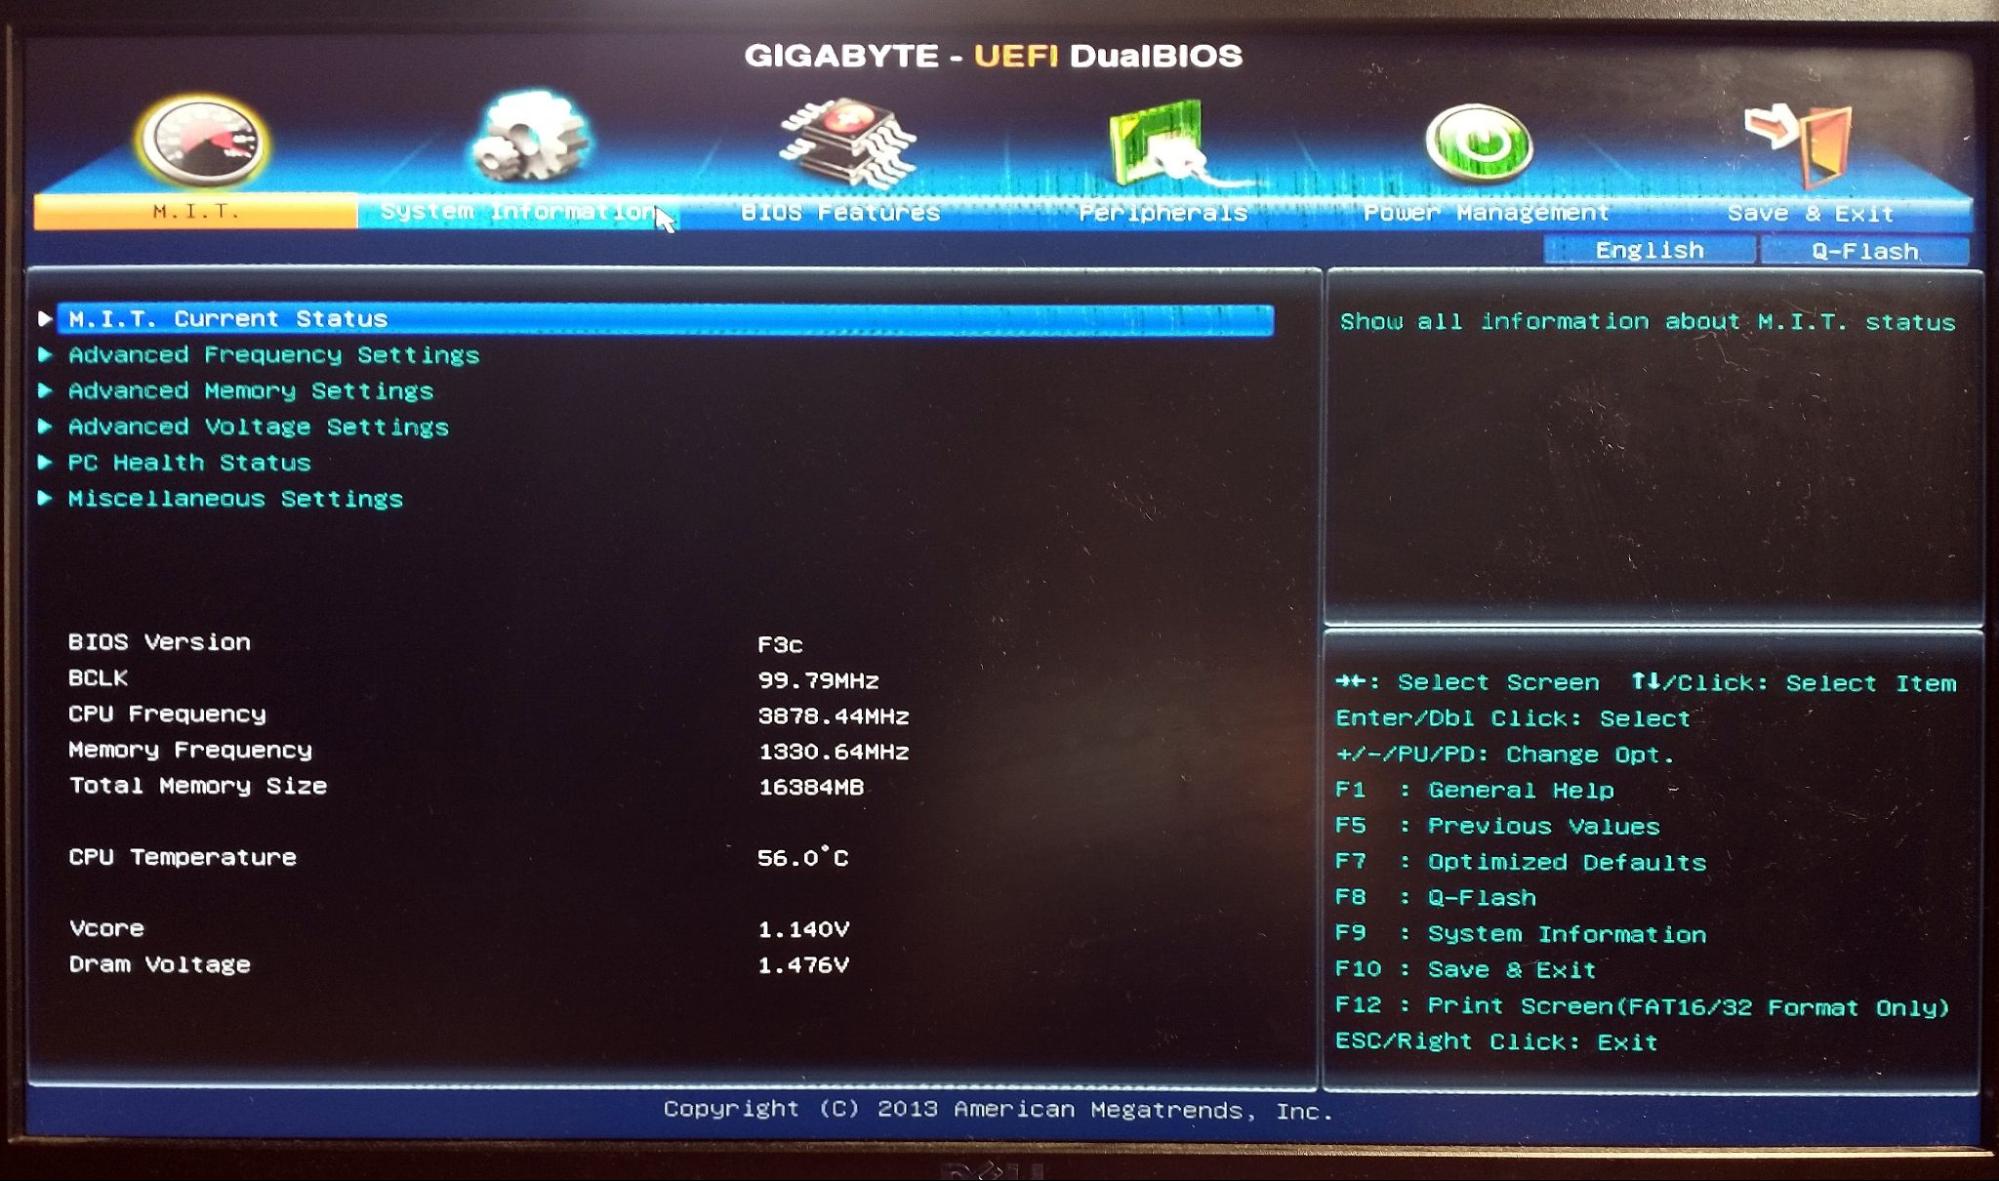
At this point, the motherboard (the PC) will begin its power-on self test (POST) and might display progress, and then the results on the display - what’s shown depends on the motherboard’s manufacturer; some POST summaries are more verbose than others.
The PC will probably then try to start an operating system, such as Windows or Linux, but this process will produce an error message since nothing's been installed yet. This is normal under the circumstances.
If you see a POST screen, check the output. It may show the PC's configuration (CPU type, amount of RAM fitted, storage devices found, etc.), in which case you can use it to check that the specification is as expected.
Assuming there are signs of life, try the following:
Check the motherboard’s manual to see which key or key combination will cause the board to enter its setup mode. This is typically F1, F2, F12, DEL, or ESC on the keyboard.
Press the PC’s reset button and hold down the key(s) needed to start the motherboard setup program.
If all goes well, the first screen should be a summary of the PC’s configuration. If not, see whether there’s a menu option to go to the setup/summary page.
Use the “Exit without Saving” option to leave the setup program.
The motherboard’s setup program will show a lot of configuration options for everything from the case fans to the CPU speed and voltage. Many settings will be configured automatically, so do not be tempted to change anything unless you follow instructions or are aware of the consequences; check the motherboard manual and the manufacturer’s support pages if you think you need to change any settings.
If there are no signs of life or the reported configuration is not as expected, remove the PC’s power and run through the steps in the next section.
If the PC powers up and you see an output on the monitor - well done! Time to power off and close up the case - the assembly part is done!
What if It Doesn’t Go As Planned?
If the system cannot start to a point where the display is running, almost all motherboards will attempt to signal a problem using the case speaker.
Error messages play out as a string of long and short tone sequences. The meaning of the sequences is vendor-specific (there’s no overall standard) and will be explained in the motherboard manual. These tone sequences are called beep codes.
Beep codes can help isolate specific faults such as RAM not detected or graphics card unresponsive so that you can check these things. One small comfort is that the motherboard must be receiving power and the CPU running to generate the beeps.
If you’ve reached this point and still don’t have a working system, take a deep breath and don’t panic! Often, it’s a simple issue that stops the computer from working.
Here are a few tips:
Can you see any smoke or smell anything burning? If so, investigate and see whether this takes you to a fixable root cause. For example, it could be a faulty power supply.
Did you see any lights (LEDs) come on, or did the fans spin? If not, check incoming power and the power supply. You will need a test meter, a PSU tester, or a known good PSU of similar wattage to swap in. Wall sockets or power leads could be the problem.
Did you see signs of life but no display output? Check that the display is powered up and that the data lead from the computer is connected correctly to the right port. If you have installed a graphics card and the motherboard has integrated graphics, the motherboard port might be disabled, so don’t use it.
Are the components in place correctly? Recheck that they area all fully inserted into their sockets and connectors and all fitted to the motherboard (CPU, RAM, expansion cards). Try removing and replacing them.
Were there still only brief signs of life? If, for example, the fans twitched and the power LED flashed briefly, switch off the PC and remove the mains plug from its socket. Unplug all the internal power connectors and the fan-motherboard connectors except for one internal device such as the HDD/SSD and try powering up again. If the PC powers up, one of the disconnected components is suspect, so disconnect from main power, reconnect internal power to one more device, reconnect the main power and switch on again.
Which component is causing the problem? Work through powering up all internal devices - starting with the motherboard - until you find one that stops the PC from working. You might find that you reconnect everything, and the PC is now OK. If so, it was probably a loose internal power lead.
Could it be the internal power lead? If the PC is still not working, disconnect the internal power lead from the first device tested and check again. This is just in case that’s the faulty part.
Could it be the expansion cards, connectors, or RAM? The next test is to remove all expansion cards and connectors from the internal devices, plus all the RAM. See if that makes things come to life. If so, reconnect parts one at a time, testing as you go.
Last resort: test by substitution. If you can’t pinpoint the fault, the next best option is testing by substitution, which implies you have spare parts on hand, or you are willing to return suspect parts to the supplier and wait for them to test them or send a replacement.
Take Your Computer to the Next Level
The next major step is to install an operating system (OS), such as Windows or Linux.
A following step is to install any software that comes with the add-ons (printer, scanner, etc.).
Once the OS and software are installed, you can connect and test all of the expansion options (memory cards readers, USB ports, sound, etc.), then connect and test the other external devices (webcam, microphone, printer, etc.).
After that come the applications and any other needed utilities.
Once all this is done, you’ll be able to test out the entire computer setup and, if it’s for a customer, deliver it and make sure they are familiar with how to use its basic functions. The customer might expect you to connect the computer to their office network/Wi-Fi but check first because some organizations prefer to do this themselves. They may also want to install their own antivirus or security software before the computer goes online.
Let’s Recap!
Testing is a fairly rigid process.
Be observant during first power-on: use sight, sound, and smell tests.
Troubleshoot as necessary. Start with the basics.
Get the machine to a state where it’s ready to have an operating system installed.
Congratulations on assembling your working computer!
PC parts are made by a wide range of manufacturers, so don’t be surprised if the ones you use are different (connectors, bracket shapes, colors, extra features etc.), but all the common elements are standardized and should fit together without too much fuss - plus it gets easier and more intuitive the more computers you assemble!
Let’s apply the knowledge you've gained in part 4 to our last quiz!
