Set up logs to check issues in your application
We have a problem! Our application was working in production just fine until last night. People have reported that they were not able to see their Watchlist pages from 8 pm to 9:30 pm, and instead, they saw an error page. But the application went back to normal afterward. We don’t want it to happen again, but we cannot be sure unless we know what went wrong during that time. Was it a server issue? Was it about communication with OMDb API? What was it?! We wouldn’t know without a detailed history of our application’s inner workings - or logs!
Because logging is a common requirement for many types of applications, there are many available frameworks. Fortunately, you don't need to reinvent the wheel and get into the process of integrating them with Spring Boot. Just by adding Spring web starter dependency, which we already did in earlier chapters, you get Logback frameworks preconfigured for you. All that’s left for you to do is add logging statements to your code. Let’s see how.
Let’s add some logs
While it might sound ideal to go back and see what happened in the code line by line, it’s not practical to put log statements on each one. It will be too much work, and the log will be too big to be useful. Trust me, you don't want to read a code that has logs on every second line! You want them, but not too much or too little.
So where is the sweet spot? How can I decide where to put my logging statements?
The ultimate goal of adding logs to any application is to facilitate debugging production issues. The best place to put logs is at points where exceptions happen because most application issues are related to an exception in the application.
We want to know if a request was ever received by our application, so it’s a good idea to put logs at the entry points of our application; in our case, handler methods in our controller class.
Applications can be prone to issues when external services are called because we are dealing with a lot of things that are out of our control, so it’s a good practice to log communication with the outside world. In our case, that would be when we call OMDb API to get the rating of movies.
Having these guidelines in mind, let's add some logs to our application.
Let’s add some logs to our CustomErrorController, because that’s where we are showing error pages to users.
package com.openclassrooms.watchlist.controller;

import javax.servlet.RequestDispatcher;
import javax.servlet.http.HttpServletRequest;

import org.slf4j.Logger;
import org.slf4j.LoggerFactory;
import org.springframework.boot.web.servlet.error.ErrorController;
import org.springframework.stereotype.Controller;
import org.springframework.web.bind.annotation.GetMapping;
import org.springframework.web.servlet.ModelAndView;

@Controller
public class CustomErrorController implements ErrorController {

	Logger logger = LoggerFactory.getLogger(CustomErrorController.class);

	@Override
	public String getErrorPath() {
		return "/error";
	}

	@GetMapping("/error")
	public ModelAndView handleError(HttpServletRequest request) {

		Object status = request.getAttribute(RequestDispatcher.ERROR_STATUS_CODE);
    	logger.error("Error with status code " + status + " happened. Support! Do something about it!");
	    return new ModelAndView("error");
	}
}
Now it’s time to add logs to entry points of our application, which are the handler methods in our WatchlistController class.
package com.openclassrooms.watchlist.controller;

import java.util.HashMap;
import java.util.Map;

import org.slf4j.Logger;
import org.slf4j.LoggerFactory;
import org.springframework.beans.factory.annotation.Autowired;
import org.springframework.stereotype.Controller;
import org.springframework.validation.BindingResult;
import org.springframework.validation.annotation.Validated;
import org.springframework.web.bind.annotation.GetMapping;
import org.springframework.web.bind.annotation.PostMapping;
import org.springframework.web.servlet.ModelAndView;
import org.springframework.web.servlet.view.RedirectView;

import com.openclassrooms.watchlist.domain.WatchlistItem;
import com.openclassrooms.watchlist.exception.DuplicateTitleException;
import com.openclassrooms.watchlist.service.WatchlistService;
import com.openclassrooms.watchlist.validation.ValidationOrder;

@Controller
public class WatchlistController {

	Logger logger = LoggerFactory.getLogger(WatchlistController.class);

	private WatchlistService watchlistService;

	@Autowired
	public WatchlistController(WatchlistService watchlistService) {
		super();
		this.watchlistService = watchlistService;
	}

	@GetMapping("/watchlist")
	public ModelAndView getMovieList() {

		logger.info("GET /watchlist called");

		String viewName = "watchlist";
		Map<String, Object> model = new HashMap<String, Object>();

		model.put("watchlistItems", watchlistService.getWatchlistItems());
		model.put("numberOfMovies", watchlistService.getWatchlistItemsSize());

		return new ModelAndView(viewName , model);
	}

	@GetMapping("/watchlistItem")
	public ModelAndView showWatchlistItem() {

		logger.info("GET /watchlistItem called");

		String viewName = "watchlistItem";

		Map<String, Object> model = new HashMap<String, Object>();
		model.put("watchlistItem", new WatchlistItem());

		return new ModelAndView(viewName , model);
	}

	@PostMapping("/watchlistItem")
	public ModelAndView submitWatchlistItemForm(@Validated(ValidationOrder.class) WatchlistItem watchlistItem, BindingResult bindingResult) {

		logger.info("GET /watchlistItem called");

		if (bindingResult.hasErrors()) {
            return new ModelAndView("watchlistItem");
        }

		try {
			watchlistService.addWatchlistItem(watchlistItem);
		} catch (DuplicateTitleException e) {
			bindingResult.rejectValue("title", "", "This movie is already on your watchlist");
            return new ModelAndView("watchlistItem");
		}

		RedirectView redirectView = new RedirectView();
		redirectView.setUrl("/watchlist");

		return new ModelAndView(new RedirectView("/watchlist"));
	}
}
And finally, we need to log where we call an external service, which happens in our MovieRatingServiceLiveImpl.
package com.openclassrooms.watchlist.service;

import java.io.IOException;
import java.util.Optional;

import org.slf4j.Logger;
import org.slf4j.LoggerFactory;
import org.springframework.boot.autoconfigure.condition.ConditionalOnProperty;
import org.springframework.http.ResponseEntity;
import org.springframework.stereotype.Service;
import org.springframework.web.client.RestTemplate;

import com.fasterxml.jackson.databind.JsonNode;
import com.fasterxml.jackson.databind.ObjectMapper;

@ConditionalOnProperty(name = "app.env", havingValue = "prod")
@Service
public class MovieRatingServiceLiveImpl implements MovieRatingService {

	Logger logger = LoggerFactory.getLogger(MovieRatingServiceLiveImpl.class);

	private String apiUrl = "http://www.omdbapi.com/?apikey=cc9bf9ef&t=";

	@Override
	public Optional<String> getMovieRating(String title) {

		RestTemplate template = new RestTemplate();

		logger.debug("Calling omdbapi with url {} and title {}", apiUrl , title);

		ResponseEntity<String> response = template.getForEntity(apiUrl + title , String.class);

		try {
			JsonNode node = new ObjectMapper().readTree(response.getBody()).path("imdbRating");
			if (node.isMissingNode()) {
				logger.warn("imdbRating node is missing, returning empty.");
			}
			return Optional.ofNullable(node.asText());
		} catch (IOException e) {
			logger.error("ERROR! Exception happened!",e);
			return Optional.empty();
		}
	}
}
Understand log levels
What are logger.info, logger.debug, logger.warn, and logger.error? Why did we use different methods instead of printing whatever we wanted to log?
The main principle behind generating logs is not too much, not too little. But "too many logs" has a different meaning for different environments. In dev and test environments, you want to see more detailed logs. However, in production, you want only more crucial logs; otherwise, it would be too much to navigate through for a real-world size application with lots of users. To solve this problem, logging frameworks provide something called log levels to control the number of logs produced by an application.
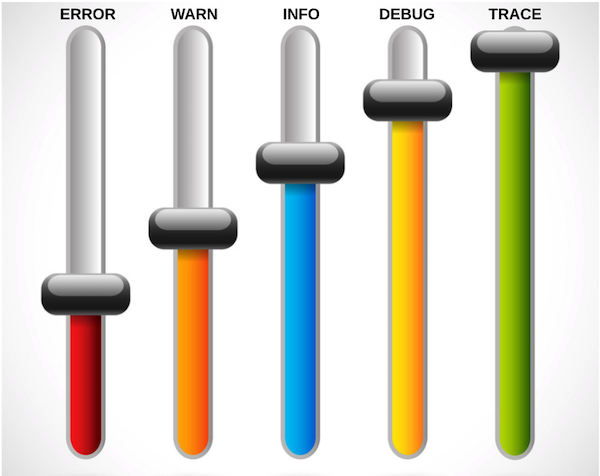
SLF4J defines five levels of severity for logging as ERROR, WARN, INFO, DEBUG, and TRACE. Their severity is ranked in that ERROR is the highest, and TRACE has the lowest.
ERROR > WARN > INFO > DEBUG > TRACE
You can control the level and amount of logging using a configuration setting (as you will see shortly). For example, if you set the level of logging to WARN, you will see only messages that were logged using the logger.error() or logger.warn() methods. If you set the level to INFO, you will see messages that were logged using any of logger.error() , logger.warn() or logger.info() and so on. It means that the lower you set the severity of logs, the more log will be generated. You can think of changing levels as a volume slider that controls the amount of generated logs. The lower you bring the slider, the less amount of logs containing more critical messages would be produced.
In a production environment, the log level is usually set to WARN or INFO; in a test environment, it is usually set to DEBUG; and in a development environment, it's set to DEBUG or TRACE.
Changing the log level
Now that you understand what log levels are and how they relate to logging methods, let’s change the log level of our application.
Log levels are set for packages, and they follow package hierarchy. For example, if you set the log level for com.openclassrooms, it will be set for all classes in that package and packages below it (like com.openclassrooms.watchlist). If you want to set the log level for all packages, you can use 'root' as the package name. In Spring Boot, the log level is INFO by default. Let's change it to DEBUG for our application packages.
All you have to do is to set one value in application.properties which will adjust the volume knob to the level you want. So open application.properties file and add the line below.
logging.level.root=WARNRestart and use the application, and then pay attention to generated logs. Notice what you see (or don’t see) on the console, compared to previous executions of the application.
You'll do a lot of logging at work, so get comfortable with it now. I would suggest going back and try setting different log levels for controllers and services and see what happens on the console.
Use the right logging method
It's not always obvious what logging method should be used at a particular point in the code. You can use the following as a rule of thumb for each level:
error()An incident that could leave the end user with a negative experience when using the application. They may contact support.warn()An incident that could potentially cause a problem, but it's not severe enough to disrupt the normal use of the application.info()Major events that occur during normal operations, like when an outside request is received, an external service is called, a business rule (cross-field validation) gets violated, etc.debug()More details regarding inner workings of the application which would be activated mostly in test environments to investigate some hard to identify issues.trace()Not very commonly used unless you want to have some very low-level details regarding the data structures, memory dumps, stack traces, etc.
Writing logs to a file
So far, our logs have appeared on the standard output console and not saved anywhere. Sometimes you are able to save to a file for later reference, but that’s not always possible; you might have to save the logs into a file instead. Let’s see how we could redirect the output of a log to a file.
Setting the file name in one property value is all that it takes to redirect files to a file. It couldn't be easier! After you run the application, you should see a file named watchlist-app.log on the same directory as the application.
logging.file=watchlist-app.logLet’s recap!
In this chapter:
You saw how to add logs to the code using SLF4J and Logback frameworks.
You learned about the meaning and use of TRACE, INFO, DEBUG, WARN, and ERROR log levels.
You learned how to control logs level and log output using
application.propertiesvariables.
Now that you've got this down, it's time to check out one of Spring boot's powerful tools: actuator! Let's jump into the next chapter and get started!
